Last week I’ve been working on adding a Let’s encrypt certificate to an Azure Web App of a customer. Let’s encrypt provides free SSL certificates and as a Dutchie, I definitely love free stuff!

To make this happen, there is a great Azure Web App extension out there, that you can add to your App site to enable adding and renewing a SSL certificate automatically. Next to this extension, there is a guide out there to help you install and configure it.

I’ve followed this guide as well, however I have fitted the process outlined to the ARM template for the application that I’ve been working on. The reason for this is off course that I want to deploy my application from a CI/CDhttp pipeline as much as possible. The rest of this blog contains a step-by-step instruction on adding an SSL certificate

Let’s get to it!


1.      No support for free or dynamic plan

SSL certificates are now also available on Azure Web Apps that are running on the basic tier. You no longer have to upgrade to standard, but this tutorial will not work if you are using the free (F1) or dynamic (D1) App Service Plan.

2. Adding a custom domain to your website

Let’s add the hostname that we want to enable SSL for as a nested resource under the App Service:

        {
          "type": "hostNameBindings",
          "name": "[parameters('appServiceHostName')]",
          "apiVersion": "2016-08-01",
          "location": "[resourceGroup().location]",
          "properties": {
            "siteName": "[parameters('appServiceName')]",
            "sslState": "SniEnabled",
            "thumbprint": "56B97C7FBD2734F061D24DEDFCDCA8281EBB13AA"
          },
          "dependsOn": [
            "[resourceId('Microsoft.Web/sites', parameters('appServiceName'))]"
          ]
        }

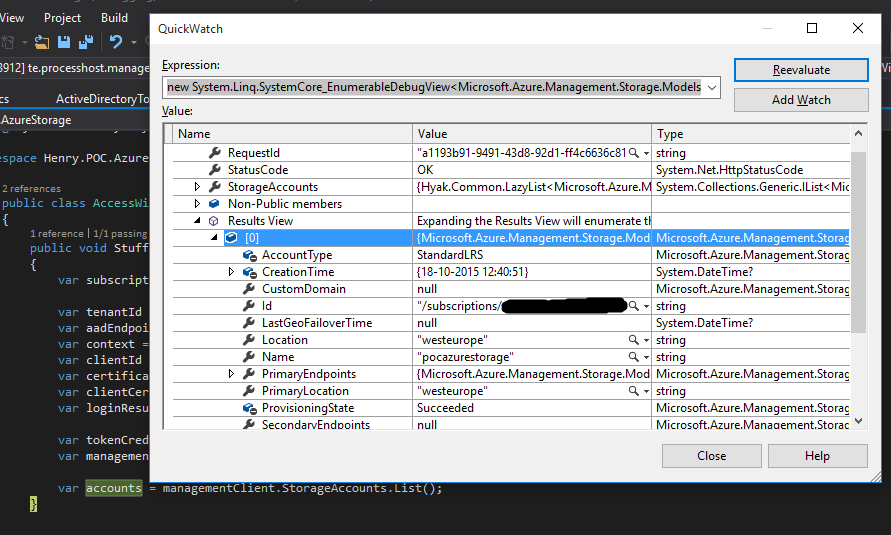
3. Creating a storage account

For my application I was already using a storage account, so there was one in my ARM template. It looked like this:

    {
      "type": "Microsoft.Storage/storageAccounts",
      "name": "[parameters('storageAccountName')]",
      "apiVersion": "2016-01-01",
      "location": "[resourceGroup().location]",
      "kind": "Storage",
      "sku": {
        "name": "Standard_LRS"
      }
    }

I am already using this Storage Account to support the webjob for a number of Azure Functions. Neither for this, nor the certificate renewal I need the guarantees that any form of replication beyond LRS offers.

4. Register an App Service Principal

The extension, after being installed, has to be able to add the issued certificate to the App Service. To do this, it needs to access to the Azure Management API’s. Two things need to be set up, to make this work: authentication and authorization.

For authentication an application needs to be registered with the Azure Active Directory. This can now be done in the Azure Portal. Unfortunately, we cannot do this via an ARM template since your Active Directory is not part of your subscription, but your Active Directory is outside your Azure subscription.

Note: Another approach might be to add an Azure Manged Service Identity to your App Service and re-engineer the let’s encrypt extension to leverage that.

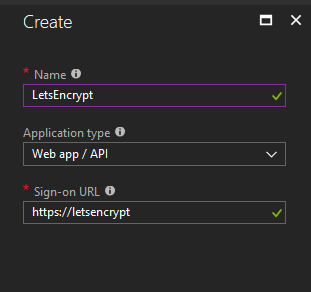
For now, let’s use the portal for creating an app registration. Navigate to the ‘Active Directory’ service and then to ‘App registrations.’ Once here, add a new app registration as follows:

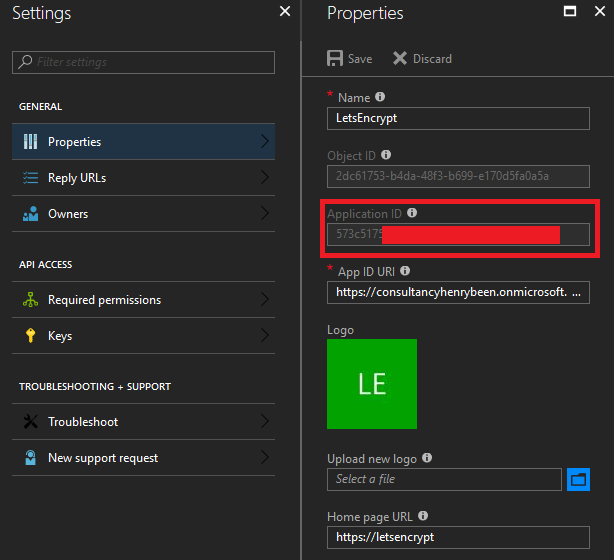
When the app registration is added, open it up and copy and store the Application ID. We will reuse it later under the name ClientId.

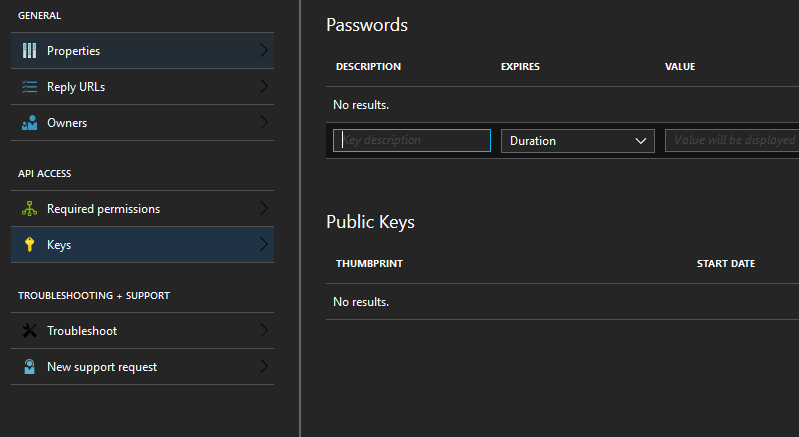
Next, go the the tab ‘Key’s  and generate a new key. Give it a new, make it never expire and after clicking ‘save,’ copy and store it. We will later reuse it under the name ClientSecret. Make sure you handle this key in a safe manner, it is a password!

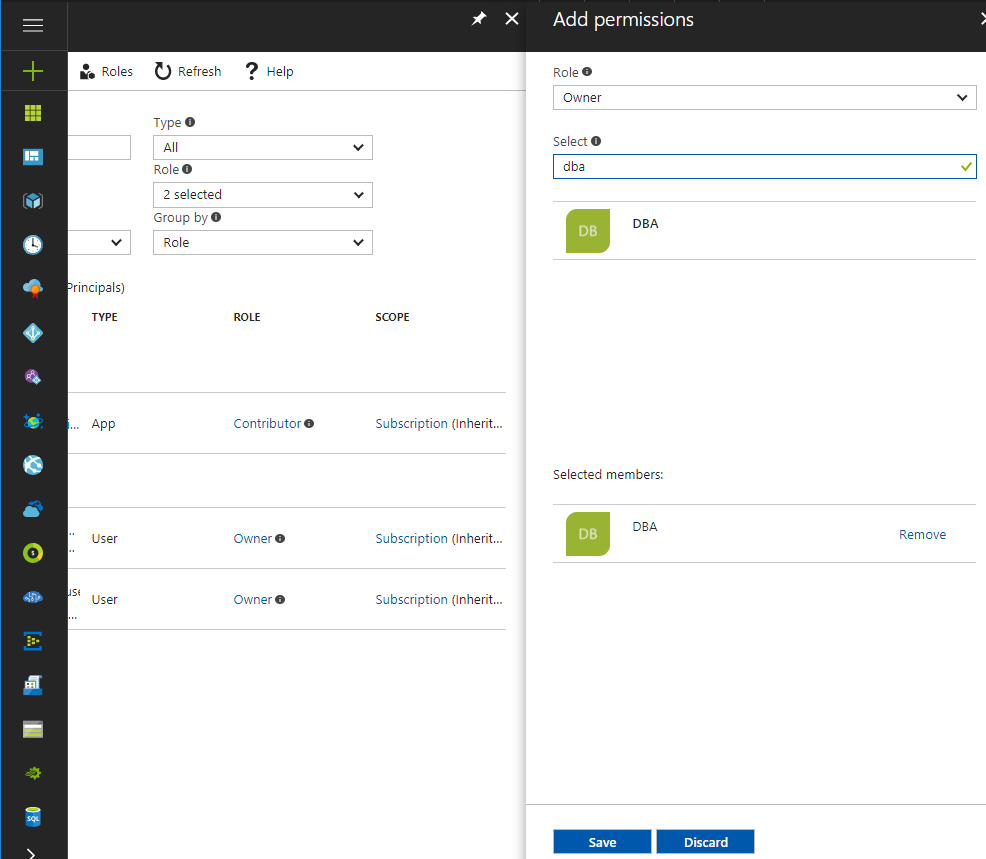
Now that we have registered a new identity in the Active Directory, we have to authorize this identity to change our application’s infrastructure (add the SSL certificate.) This we can do, again, via our ARM template. Add a resource as follows:

    {
      "type": "Microsoft.Authorization/roleAssignments",
      "apiVersion": "2015-07-01",
      "name": "[parameters('appServiceContributerRoleName')]",
      "dependsOn": [
        "[resourceId('Microsoft.Web/Sites', parameters('appServiceName'))]"
      ],
      "properties": {
        "roleDefinitionId": "[concat('/subscriptions/', subscription().subscriptionId, '/providers/Microsoft.Authorization/roleDefinitions/', 'b24988ac-6180-42a0-ab88-20f7382dd24c')]",
        "principalId": "[parameters('appServiceContributorObjectId')]",
        "scope": "[concat(subscription().id, '/resourceGroups/', resourceGroup().name)]"
      }
    }

Please note that I am adding an authorisation scope. Omitting the scope, will apply the granted role on your whole subscription. Adding a scope will limit the granted role to our ResourceGroup.

Now you might be wondering, why do I not limit the scope even further? To just the Web App maybe? However, this is not possible. If you expand the scope further and point to just the Web App, an error like this is issued:

"message": "The request to create role assignment '87b50594-284f-4ad2-baa5-ef7505976836' is not valid. Role assignment scope '/subscriptions/a314c0b2-589c-4c47-a565-f34f64be939b/resourceGroups/ycc-test/providers/Microsoft.Web/Sites/yccdashboardtstAppService' must match the scope specified on the URI '/subscriptions/a314c0b2-589c-4c47-a565-f34f64be939b/resourcegroups/ycc-test'."

Edit: I was mistaken here, on this page I show how to do RBAC Role Assignments on individual resources. However, in this case we still have to grant access to the whole Resourcegroup, since installing the certificate requires contributor on the whole Resourcegroup (See also this issue).

Also note, that to issue role assignments, your VSTS endpoint has to have the owner role on the resourcegroup, not just Contributor. Weigh your options here.

5. Adding application settings

Next, two sets of application settings need to be added to support the Let’s encrypt extension. The first two are for running Webjobs in general. The rest are settings that are used by the extension itself. You can also add them via the UI, but let’s not forget we want to rely on CI/CD as much as possible. To add the application settings, I’ve added the following to my ARM template as a nested resource in the App Service definition:

        {
          "apiVersion": "2016-03-01",
          "name": "appsettings",
          "type": "config",
          "dependsOn": [
            "[resourceId('Microsoft.Web/sites', parameters('appServiceName'))]"
          ],
          "properties": {
            "AzureWebJobsStorage": "[concat('DefaultEndpointsProtocol=https;AccountName=', parameters('storageAccountName'), ';AccountKey=', listKeys(variables('storageAccountid'),'2015-05-01-preview').key1)]",
            "AzureWebJobsDashboard": "[concat('DefaultEndpointsProtocol=https;AccountName=', parameters('storageAccountName'), ';AccountKey=', listKeys(variables('storageAccountid'),'2015-05-01-preview').key1)]",
            "letsencrypt:Tenant": "[subscription().tenantId]",
            "letsencrypt:SubscriptionId": "[subscription().subscriptionId]",
            "letsencrypt:ResourceGroupName": "[resourceGroup().name]",
            "letsencrypt:ServicePlanResourceGroupName": "[resourceGroup().name]",
            "letsencrypt:ClientId": "[parameters('appServiceContributerClientId')]",
            "letsencrypt:ClientSecret": "[parameters('appServiceContributerClientSecret')]"
          }
        }

As you can see, I am leveraging the power of ARM as much as possible. I am not hardcoding any of the values for the tenant, subscriptionId or the resource group names. This way I maximize the reuse of values wherever possible, making my templates easier to maintain.

6. Adding the let’s encrypt extension

Finally, we have to add the extension to our App Service. This can now also be done via the ARM template as a nested resource within the App Service

        {
          "apiVersion": "2015-08-01",
          "name": "letsencrypt",
          "type": "siteextensions",
          "dependsOn": [
            "[resourceId('Microsoft.Web/Sites', parameters('appServiceName'))]"
          ],
          "properties": {
          }
        }

7. Final, one time set up

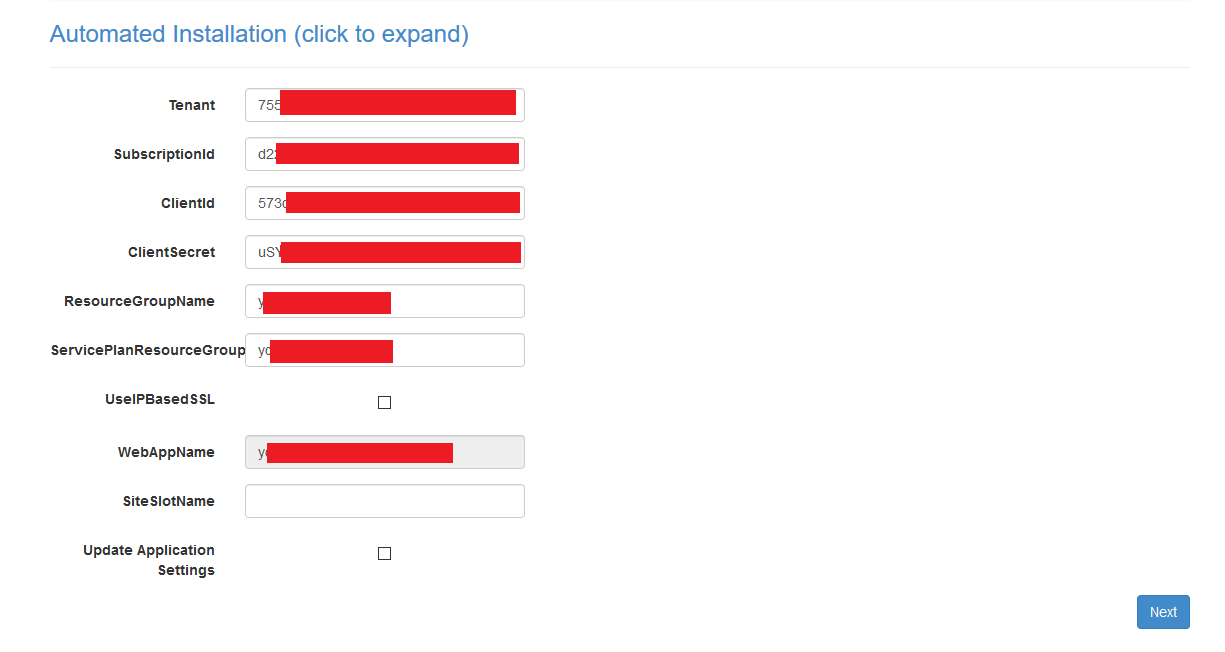
After rolling out our ARM template, we can now navigate to the let’s encrypt extension. Either via the portal or by navigating directly to https://{yourappservicename}.scm.azurewebsites.net/letsencrypt/ Here we have to complete a one-time set-up to install the certificate and we’re done. Renewal is done automatically. Now, since we have already configured everything via our template, this is as simple as clicking next three times. The first screen that opens up, is for settings and should look prefilled like this:


After clicking next we are presented with a list of custom domains for which SSL certificates will be requested (and automatically renewed) for us. Press next one more time and your done!.


Too bad! You still need a private build agent when using VSTS

As a true cloud born developer on the Microsoft stack, my ALM | DevOps solution of choice is VSTS. Next to this being the defacto standard in my environment (bubble), I believe it also is the best solution out there for building and releasing applications at this point in time. However when it comes to build & release agents, I still go for self-hosting my agents every single time. Although this might sound like more work, or more expensive, I believe it to still be the superior option when it comes to the cost/performance ratio. In this blog I will try to explain why this is so.

Why you don’t want to use the 240 free minutes

In VSTS you get up to 240 free build minutes every month. Great! This might sound like enough for your purposes. However, you can spent these minutes only when an agent becomes available to service your build and release. And this is not so great. Often it takes a minute or two before this happens, so longer then anyone cares to wait for a build. Let alone for one to start.

Also… do you really want to take the risk that you are out of free minutes, just when you need to quickly deliver a bug fix? Of course not. So relying on these free minutes is not a good idea. Neither from a performance perspective as from a risk/cost perspective.

Why you don’t want to use a managed agent

The alternative, Microsoft-CI/CD seems like the best way forward then. Just a couple of clicks and you have bought yourself a fully managed hosted agent for roughly $ 40 a month. These hosted agents are constructed before every single build (or release) and destructed right after. This way, a high level of isolation between builds is guaranteed, and you don’t have to wait for a shared agent to become available. A wonderful thing when working in the cloud.

But there is also a dark side to this construction and destruction of agents. It means that executing a build or release will always be slow. Everything (task steps, sources and even NuGet packages) needs to be downloaded every single time. Especially when you are building small solutions that you want to build and release very quickly and in short iterations, these delays and the (lack of) performance in general of hosted agents becomes frustrating. A build that takes only two seconds on your development machine, might easily take up to five minutes on a private hosted agent.

Running a private agent

With this in mind, you want to consider running a self-hosted agent, what Microsoft calls self-hosted CI/CD. This means that you download the VSTS build agent from VSTS and install and run it on a machine of your own: an Azure VM for instance. Every VSTS account comes with support for one self-hosted agent and you can buy more pipelines for $ 15 a month.

Performance

What this will get you is a dedicated agent that is constantly standing by to run a build or release for you. So no maximum number of build minutes you can use, nor any more waiting for builds to start. However, that’s not all. Experiments in three different contexts have also shown, that these builds are much, much faster. For example, see the graph with build times on a small project I recently did here:

What this shows is that the build times of this particular build went from anywhere between four and six minutes, down to less than one minute!

Costs

At this point you might be concerned about the costs of running a self-hosted agent, because next to a pipeline in VSTS, you also need a VM to run your agent on. This will come to roughly $ 65 a month, if choosing the cheapest standard VM that can run an agent (A0). Almost double of an Microsoft-hosted CI/CD. And that’s not a really powerful VM. However, this does not have to be the true cost of your VM. There are two ways to safe on costs:

  • If you use your build machines only for a limited number of hours per day and not in the weekends, you can use Azure automation scripts to turn them on and off on demand. If done well, this can save you roughly 60% when adhering to working hours and weekends. This would make buying a VM from the D-series feasible.
  • Another approach is not using a standard VM, but a B-series burstable VM. The results I talked about before, were achieved on an B2s VM, available for $ 47 a month. These type of VM’s do not always have the full capacity of the CPU, but are allowed to burst up to double of there CPU capacity when needed after underusing the CPU for a while. This unused/burst usage pattern fits really well with build agents. Next to this, they also support SSD disks. So in practice this will give you a VM with 4 cores and SSD storage for less than $ 50 a month. A very good price, looking at the performance benefits.

Final thoughts: other improvements

In practice, the Microsoft-hosted CI/CD is often not fast enough. Not only due to the provisioning of agents, but also due to the lack of caching for package managers and general lack of performance on the VM. For this reason we are still stuck with self-hosting our CI/CD agents. However, this is possible without incurring  (almost) any extra cost, while gaining five times the performance.

Of course, this will leave you with the responsibility of patching the VM you are running your agents on. However, just patching Visual studio on one computer that allows for no incoming internet traffic is doable. Also, there is a great tutorial out there from Wouter de Kort, where he shares how you can create your own build agent image and keep it up to date automatically.

March 25th, a Sunday, I got a direct message on Twitter from Christos Matskas, who I recently met at an event in the Netherlands. He asked if I could help host a meetup where his colleague Seth Juarez could come and give a presentation into deep learning and interact with developers interested in Machine Learning (what salespeople call Artificial Intelligence, according to Seth). Just one catch, it had to be either next Wednesday or Thursday.

I rarely worry about anything, so neither did I that day. Seth is pretty well known, so it felt like an honor to be able to host a meetup with him and I figured that it wouldn’t be too hard to get a great audience. So, I said yes as soon as I got a company (IBIS Software) to sponsor the location.

The next couple of days we spent on getting some PR for the just-once “pop-up meetup with Jeth Suarez.” This was actually (much) harder than expected, but we ended up with an enthusiastic crowd of over 25 people.

As requested by a number of attendees I am sharing the slides Seth used. The event was also recorded and can be viewed back here.

Again, thanks for being there Seth. IBIS, thanks for sponsoring a location, food and drinks!

Ever wished you would receive a simple heads up when an Azure deployment fails? Ever troubleshooted an issue and looked for the button: “Tell me when this happens again?” Well, I just found it.

Yesterday I stumbled across a -for me (*) – new feature that is just amazing: azure activity log alerts. A feature to notify me when something specific happens.

With the introduction of the Azure Resource Manager model, the activity log was also introduced. The activity log is an audit trail of all events that happen within your Azure subscription, either user initiated or events that originate in Azure itself. This is a tremendous powerfull feature in itself, however it has become more powerfull now. With azure activity log alerts you can create rules that automatically trigger and notify you when an event is emitted that you find interesting.

In this blog post I will detail two scenario’s where activity log alerts can help you out.

(*) It seems this feature was already launched in May this year, according to this Channel9 video

Example: Manage authorizations

Let’s say you are working with a large team on a large project or on a series of related projects. One thing that you might want to keep taps on, is people creating new authorizations. So let’s see if we can quickly set something up to send me an e-mail whenever this happens.

  1. Let’s start by spinning up the monitoring blade in the Azure portal.
  2. In the monitoring blade the activity log automatically opens up. Here we can look through past events and see what has happened and why. Since we are looking to get pro-activly informed about any creation events, lets navigate to Alerts:
  3. In the top of the blade, choose Add activity log alert and the following dialog will open:
  4. Here there are a number of things we have to fill out. As the name and description “A new authorization is created” covers what we are about to do. Select your subscription and the resourcegroup where you want to place this alert. This is not the resourcegroup that the alert concerns, it is where the alert itself lives. As event category we pick “Administrative” and as Resource Type “Role assignment.” The last resets all other dropdowns so we only have to select an Operation name. Let’s pick “Create role assignment.”
  5. After selecting what we want to be alerted about, let’s decide how we want to alerted. This is done via an Alert group, an alert group is a group of one or more actions that are grouped under one name and can be reused. Let’s name our action group “StandardActionGroup” and add an e-mailadres. Giving us a final result as follows:
  6. Now let’s authorize a new user on a resource:
  7. And hurray, we are notified by e-mail:

Example: Streaming Analytics hick-up

So you have an Azure resource that has some issues. Every now and then it gets in a faulted state or just stops working. Often you will find that this is nicely put into the activity log. For example I have a Streaming Analytics job that faults every now and then. Let’s see how we can get Azure to “tell me when this happens again.”

  1. Go to the activity log of the resource with an error
  2. Open the details of the Warning and find the link to Add activity log alert

  3. The blade to open a new alert is added, with everything prefilled to capture just that specific event. In essence allowing you to ask Azure to tell you ‘if it happens again’

Can we automate that?

Finally, as you can see in the image below, every activity log alert is a resource in itself. Which means you can see them when you list a resourcegroup and that you can create them automatically using ARM templates. For example as part of your continuous delivery practice.

E-mail sucks, I want to create automated responses

Also possible. You can also have an webhook called as part of an actiongroup. This way you can easily hook up an Azure function to immediately remedy an issue, for example.

The second day of this month, Microsoft announced two new libraries to interact with the Azure Event Hub. I was afraid we had a lot of rework coming our way, however this upgrade was one of the easiest I’ve ever done!

Removed the old NuGET packages, added the new packages. Replaced SendBatchAsync() with SendAsync() and a small change in connectionstring and I was good.

As you can see I’ve introduced a small quirk at line 45 to make this new code work with old connectionstrings that smells a bit However, it works like a charm and can easily be removed later on.

Small quirks like these allow me to ship this code to systems that are still configured with a connectionstring that contains the TransportType property. This way I do not have to time the code and configuration upgrade of systems. I can just ship the code, ship the configuration change later and finally clean up the quirk.

One of the better upgrade experiences. Thanx!

I just read that there is a new T-SQL operator in town: STRING_AGG. Finally! Having worked with MySQL prior to moving (primarily) to Azure SQL DB, I have always missed a T-SQL equivalent to GROUP_CONCAT.

I’m happy to see that STRING_AGG has the same workings as GROUP_CONCAT. Both do not only concatenate string values, but also allow for injecting a ‘glue’ in between. Use is just as expected, a query such as

<pre>

SELECT STRING_AGG(DisplayName, ‘, ’) FROM Users WHERE AccountId = 45

</pre>

Will produce a single row result of

<pre>

Henry Been, John Doe

</pre>

Simply Awesome!

Dinsdag en woensdag vier en vijf oktober, heb ik samen met een aantal collega’s weer de Microsoft TechDays bezocht. Op de TechDays zorgen tal van sprekers ervoor dat je in twee dagen weer helemaal op de hoogte raakt van de nieuwste ontwikkelingen van Microsoft. Mijn eigen aandacht ging dit jaar niet alleen uit naar de sessies die gegeven werden, ik heb er dit jaar zelf ook twee mogen geven.

Op de SnelStart blog vertel ik over mijn ervaringen en zijn de sheets te downloaden. Opnames van de sessies staan op Channel9.

Terwijl ik dit schrijf, is Microsoft hard aan het werk om de transitie van de Azure Service Management (ASM) API’s naar de Azure Resource Management (ARM) API’s af te ronden. Beide API’s bieden de mogelijkheid om je Azure resources te beheren en zijn de REST API’s achter Azure Powershell en de Azure portal.

De oudere, ASM API wordt niet voor niks vervangen. Het grote nadeel van deze API is, dat hij niet de mogelijkheid biedt tot fine-grained autorisaties. De enige manier om toegang tot resources te beheren is op het niveau van de subscription. Je kunt niet per resource bepalen wie waar bij mag. In elke organisatie met meer dan een paar resources is dit volledig onacceptabel.

De ARM API is op dit punt een grote stap vooruit. Met ARM kun je Azure Service Management (ASM) APIs to the per resource bepalen wie er bij kan en zelfs regelen wat men precies mag.

Maar dat is niet alles. Naast personen zijn er soms ook applicaties of systemen die toegang nodig hebben tot een of meer Azure resources. Via ASM kon dit door het gebruik van zogenaamde management certificates. De houder van zo’n certificaat had dan volledige controle over een subscription. Met ARM is het mogelijk om ook applicaties gericht toegang te geven tot een subset van je resources. Het is echter niet erg duidelijk hoe dit werkt. In dit blog zal ik dan ook laten zien hoe je een applicatie toegang kan geven tot Azure resources volgnes het principle of least privilege. Voor autorisatie zal ik daarvoor gebruik maken van certificaten, een veiligere methodiek dan wachtwoorden.

Iedereen die, via ARM, toegang tot een subscription heeft moet bekend zijn in de Azure Active Directory (AAD) die bij die subscription hoort. Dit geld niet alleen voor personen, maar ook voor applicaties. Het registreren van een applicatie in de AAD kan helaas nog niet in de nieuwe portal. We moeten dus terug naar de oude portal of gebruik maken van Powershell. Nadat de applicatie geregistreerd is in de AAD, moet deze ook nog geautoriseerd worden op een resourcegroup. Dit kan echter weer alleen in de nieuwe portal of via Powershell. Om die reden kies ik voor Powershell zodat ik niet heen en weer hoef tussen portals.

Om verbinding te maken met de AAD vanuit Powershell is er een specifieke Powershell module (MSOL) nodig, die je hier vindt.

Allereerst registreren we de applicatie:

> # Connect to your active directory
> Connect-MsolService

> #Create the application
> New-MsolServicePrincipal -DisplayName YourApplication
The following symmetric key was created as one was not supplied r...k=

DisplayName : YourApplication
ServicePrincipalNames : {f...1}
ObjectId : c...f
AppPrincipalId : f...1
TrustedForDelegation : False
AccountEnabled : True
Addresses : {}
KeyType : Symmetric
KeyId : 2...4
StartDate : 18-10-2015 15:13:31
EndDate : 18-10-2016 15:13:31
Usage : Verify
> # We will need that AppPrincipalId later, so keep it for reference

> # However, first we remove that Symmetric key we do not need
> # First we find its KeyId
> Get-MsolServicePrincipalCredential -AppPrincipalId f...1
cmdlet Get-MsolServicePrincipalCredential at command pipeline position 1
Supply values for the following parameters:
ReturnKeyValues: 

Type : Symmetric
Value : 
KeyId : 2...4
StartDate : 18-10-2015 15:13:31
EndDate : 18-10-2016 15:13:31
Usage : Verify 

> # Now remove it providing again the ApplicationId and the KeyId.
> # The KeyIds parameter takes an array, hence the parentheses
> Remove-MsolServicePrincipalCredential -AppPrincipalId f...1 -KeyIds ("2...4")

Nu voegen we authenticatie op basis van een certificaat toe:

> # Let's grab the certificate from filesystem and transform it to Base64
> $certificate = New-Object System.Security.Cryptography.X509Certificates.X509Certificate 
> $certificate.Import("c:\...\YourApplication.cer")
> $binaryCertificate = $certificate.GetRawCertData() 
> $base64Certificate = [System.Convert]::ToBase64String($binaryCertificate);

> # Register the certificate as the applications credential
> New-MsolServicePrincipalCredential -AppPrincipalId "f...1" -Type asymmetric -Value $base64Certificate -Usage verify

Tenslotte moeten we de applicatie rechten geven op een resource. Voor dit doel heb ik een resourcegroup ‘poc’ aangemaakt:

> # Every resource under ARM is defined by an URL
> $scope = "/subscriptions/4...f/resourceGroups/poc"

> # Contributor is a pre-assigned role that includes every right, except GRANTS
> New-AzureRoleAssignment -ServicePrincipalName "f...1" -RoleDefinitionName Contributor -Scope $scope

De applicatie schrijven

Nu dat we een applicatie in de AAD geregistreerd hebben, kunnen we de applicatie zelf schrijven. Hieronder vind je een minimaal voorbeeld voor authenticatie en het opvragen van een lijst van alle storage accounts in een rsource group:

var subscriptionId = "4...f"; // The guid assigned to your subscription. If you don't have it, use Get-AzureSubscription
var tenantId = "4...f"; // The guid assigned to your AAD Tenant. If you don't have it, use Get-AzureSubscription
var aadEndpoint = $"https://login.windows.net/{tenantId}";
var clientId = "f...1"; // Again, AppPrincipleId
var certificateThumbprint = "b...a"
var armLocation = "https://management.azure.com/"

var context = new AuthenticationContext(aadEndpoint);
var certificate = GetARMCertificate(certificateThumbprint);
var credentials = new ClientAssertionCertificate(clientId, certificate);
var loginResult = context.AcquireToken(armLocation, credentials);
var token = new TokenCloudCredentials(subscriptionId, loginResult.AccessToken);
var managementClient = new StorageManagementClient(token);

var accounts = managementClient.StorageAccounts.List();

Er zijn twee NuGET packages die je moet installeren om deze code te draaien: Microsoft.IdentityModel.Clients.ActiveDirectory and Microsoft.Azure.Management.Storage

En hier het eindresultaat: Een overzicht van alle storage accounts in de resource group. Andere acties, zoals het toevoegen of verwijderen van storage accounts zijn natuurlijk ook mogelijk..

ARMCertificateAuth