In my previous post (secret management part 1: using azurekey vault and azure managed identity) I showed an example of storing secrets (keys, passwords or certificates) in an Azure Key Vault and how to retrieve them securely. Now, this approach has one downside and that is this indirection via the Key Vault.

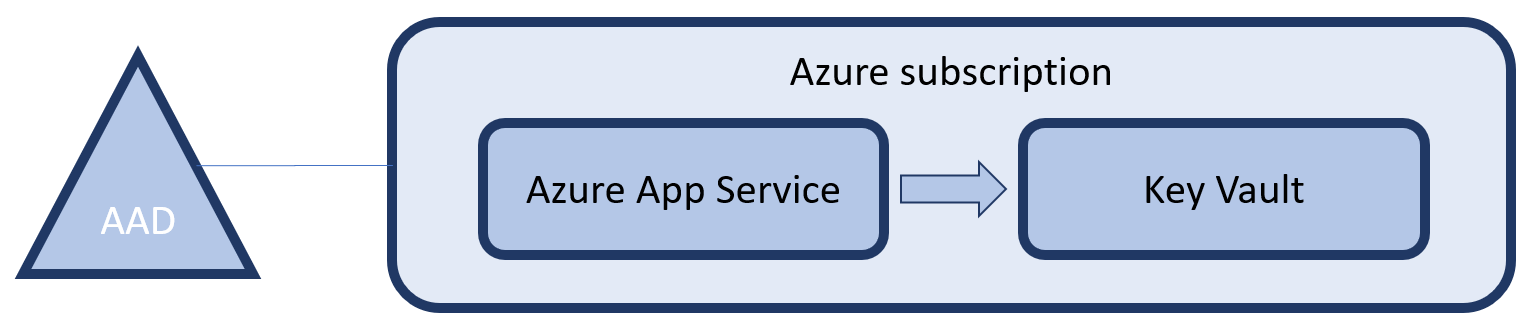
In the previous implementation, service X creates an key to access it and we store it in the Key Vault. After that, service Y that needs the key, authenticates to the Azure Active Directory to access the Key Vault, retrieve the secret and use it to access service X. Why can’t we just access service X, after authenticating to the Azure Active Directory, as shown below?

In this approach we completely removed the need for Azure Key Vault, reducing the amount of hassle. Another benefit is that we are no longer creating extra secrets, which means we can also not loose them. Just another security benefit. Now let’s build an example and see how this works.

Infrastructure

Again we start by creating an ARM Template to deploy our infrastructure. This time we are using a feature of the Azure SQL DB Server to have an AAD identity be appointed as an administrator on that server, in the following snippet.

{
  "type": "administrators",
  "name": "activeDirectory",
  "apiVersion": "2014-04-01-preview",
  "location": "[resourceGroup().location]",
  "properties": {
    "login": "MandatorySettingValueHasNoFunctionalImpact", 
    "administratorType": "ActiveDirectory",
    "sid": "[reference(concat(resourceId('Microsoft.Web/sites', parameters('appServiceName')),'/providers/Microsoft.ManagedIdentity/Identities/default'), '2015-08-31-preview').principalId]",
    "tenantId": "[subscription().tenantid]"
  },
  "dependsOn": [
    "[concat('Microsoft.Sql/servers/', parameters('sqlServerName'))]"
  ]
}

We are using the same approach as earlier, but now to set the objectId for the AAD admin of the Azure SQL DB Server. One thing that is also important is that the property for ‘login’ is just a placeholder of the principals name. Since we do not know it, we can set it to anything we want. If we would ever change the user through the portal (which we shouldn’t), this property will reflect the actual username.

Again, the full template can be found on GitHub.

Code

With the infrastructure in place, let’s write some passwordless code to have our App Service access the created Azure SQL DB:

if (isManagedIdentity)
{
  var azureServiceTokenProvider = new AzureServiceTokenProvider();
  var accessToken = await azureServiceTokenProvider.GetAccessTokenAsync("https://database.windows.net/");

  var builder = new SqlConnectionStringBuilder
  {
    DataSource = ConfigurationManager.AppSettings["databaseServerName"] + ".database.windows.net",
    InitialCatalog = ConfigurationManager.AppSettings["databaseName"],
    ConnectTimeout = 30
  };

  if (accessToken == null)
  {
    ViewBag.Secret = "Failed to acuire the token to the database.";
  }
  else
  {
    using (var connection = new SqlConnection(builder.ConnectionString))
    {
      connection.AccessToken = accessToken;
      connection.Open();

      ViewBag.Secret = "Connected to the database!";
    }
  }
}

First we request a token and specify a specific resource “https://database.windows.net/” as the type of resource we want to use the token for. Next we start building a connection string, just as we would do normally. However, we leave out anything related to authentication. Next (and this is only available in .NET Framework 4.6.1 or higher), just before opening the SQL Connection we set the acquired token on the connection object. From there on, we can again work normally as ever before.

Again, it’s that simple! The code is, yet again available on GitHub.

Supported services

Unfortunately, you can not use this approach for every service you will want to call and are dependent on the service supporting this approach. A full list of services that support token based application authentication are listed on MSDN. Also, you can support this way of authentication on your own services. Especially when you are moving to a microservices architecture, this can save you a lot of work and management of secrets.

Last week I received a follow-up question from a fellow developer about a presentation I did regarding Azure Key Vault and Azure Managed Identity. In this presentation I claimed, and quickly showed, how you can use these two offerings to store all the passwords, keys and certificates you need for your ASP.NET application in a secure storage (the Key Vault) and also avoid the problem of just getting another, new password to access that Key Vault.

I have written a small ASP.NET application that reads just one very secure secret from an Azure Key Vault and displays it on the screen. Let’s dive into the infrastructure and code to make this work!

Infrastructure

Whenever we want our code to run in Azure, we need to have some infrastructure it runs on. For a web application, your infrastructure will often contain an Azure App Service Plan and an Azure App Service. We are going to create these using an ARM template. We use the same ARM template to also create the Key Vault and provide an identity to our App Service. The ARM template that delivers these components can be found on GitHub. Deploying this template, would result in the following:

The Azure subscription you are deploying this infrastructure to, is backed by an Azure Active Directory. This directory is the basis for all identity & access management within the subscription. This relation also links the Key  Vault to that same AAD. This relation allows us to create access policies on the Key Vault that describe what operations (if any) any user in that directory can perform on the Key Vault.

Applications can also be registered in an AAD and we can thus give them access to the Key Vault. However, how would an application authenticate itself to the AAD? This is where Managed Identity comes in. Managed Identity will create an service principal (application) in that same Active Directory that is backing the subscription. At runtime your Azure App Service will be provided with environment variables that allow you to authenticate without the use of passwords.

For more information about ARM templates, see the information on MSDN. However there are two important parts of my template that I want to share. First the part that enables the Managed Identity on the App Service:

{
  "name": "[parameters('appServiceName')]",
  "type": "Microsoft.Web/sites",
  …,
  "identity": {
    "type": "SystemAssigned"
  }
}

Secondly, we have to give this identity, that is yet to be created, access to the Key Vault. We do this by specifying an access policy on the KeyVault. Be sure to declare a ‘DependsOn’ the App Service, so you will only reference the identity after it is created:

{
  "type": "Microsoft.KeyVault/vaults",
  "name": "[parameters('keyVaultName')]",
  …,
  "properties": {
    "enabledForTemplateDeployment": false,
    "tenantId": "[subscription().tenantId]",
    "accessPolicies": [
       {
        "tenantId": "[subscription().tenantId]",
        "objectId": "[reference(concat(resourceId('Microsoft.Web/sites', parameters('appServiceName')),'/providers/Microsoft.ManagedIdentity/Identities/default'), '2015-08-31-preview').principalId]",
        "permissions": {
          "secrets": [ "get" ]
        }
      }
    ]
  }
}

Here I am using some magic (that I just copy/pasted from MSDN) to refer back to my earlier deployed app service managed identity and retrieve the principalId and use that to create an access policy for that identity.

That is all, so let’s deploy the templates. Normally you would set up continuous deployment using Azure Pipelines, but for this quick demo I used Powershell:

Login-AzureRmAccount
Select-AzureRmSubscription -SubscriptionId " xxxxxxxx-xxxx-xxxx-xxxx-xxxxxxxxxxx"
New-AzureRmResourceGroup "keyvault-managedidentity" -Location "West-Europe"
New-AzureRmResourceGroupDeployment -TemplateFile .\keyvault-managedidentity.json -TemplateParameterFile .\keyvault-managedidentity.parameters.json -ResourceGroupName keyvault-managedidentity

Now with the infrastructure in place, let’s add the password that we want to protect to the Key Vault. There are many, many ways to do this but let’s use Powershell again:

$password = Read-Host 'What is your password?' -AsSecureString
Set-AzureKeyVaultSecret -VaultName demo4847 -Name password -SecretValue $password

Do not be alarmed if you get an access denied error. This is most likely because you still have to give yourself access to the Key Vault. By default no-one has access, not even the subscription owners. Let’s fix that with the following command:

Set-AzureRmKeyVaultAccessPolicy -ResourceGroupName "keyvault-managedidentity" -VaultName demo4847 -ObjectId xxxxxxxx-xxxx-xxxx-xxxx-xxxxxxxxxxxx -PermissionsToSecrets list,get,set

Code

With the infrastructure in place, let’s write the application that access this secret. I have created a simple, ASP.NET MVC application and edited the Home view to contain the following main body. Again the code is also on GitHub:

A secret

@if (ViewBag.IsManagedIdentity) {

Got a secret, can you keep it? (...) If I show you then I know you won't tell what I said: @ViewBag.Secret

} else {

Running locally, so no secret to tell }

Now to supply the requested values, I have added the following code to the HomeController:

public async Task Index()
  var isManagedIdentity = Environment.GetEnvironmentVariable("MSI_ENDPOINT") != null
    && Environment.GetEnvironmentVariable("MSI_SECRET") != null;

  ViewBag.IsManagedIdentity = isManagedIdentity;

  if (isManagedIdentity)
  {
    var azureServiceTokenProvider = new AzureServiceTokenProvider();
    var keyVaultClient = new KeyVaultClient(new KeyVaultClient.AuthenticationCallback(azureServiceTokenProvider.KeyVaultTokenCallback));
    var secret = await keyVaultClient.GetSecretAsync("https://demo4847.vault.azure.net/secrets/password");

    ViewBag.Secret = secret.Value;
  }

  return View();
}

First I check if we are running in an Azure App Service with Managed Identity enabled. This looks a bit hacky, but it is actually the recommended approach. Next, if running as an MI, I use the AzureSErviceTokenProvider (NuGet package: Microsoft.Azure.Services.AppAuthentication) to retrieve an AAD token. In turn I use that token to instantiate an KeyVaultClient (NuGet package: Microsoft.Azure.KeyVault) and use it to retrieve the secret.

That’s it!

Want to know more?

I hope to write two more blogs on this subject soon. One about using system to system authentication and authorization and not storing extra secrets into KeyVault and one about Config Builders, a new development for .NET Core 2.0 and .NET Framework 4.71 or higher.