Last week I’ve been working on adding a Let’s encrypt certificate to an Azure Web App of a customer. Let’s encrypt provides free SSL certificates and as a Dutchie, I definitely love free stuff!
To make this happen, there is a great Azure Web App extension out there, that you can add to your App site to enable adding and renewing a SSL certificate automatically. Next to this extension, there is a guide out there to help you install and configure it.
I’ve followed this guide as well, however I have fitted the process outlined to the ARM template for the application that I’ve been working on. The reason for this is off course that I want to deploy my application from a CI/CDhttp pipeline as much as possible. The rest of this blog contains a step-by-step instruction on adding an SSL certificate
Let’s get to it!
1. No support for free or dynamic plan
SSL certificates are now also available on Azure Web Apps that are running on the basic tier. You no longer have to upgrade to standard, but this tutorial will not work if you are using the free (F1) or dynamic (D1) App Service Plan.
2. Adding a custom domain to your website
Let’s add the hostname that we want to enable SSL for as a nested resource under the App Service:
        {
          "type": "hostNameBindings",
          "name": "[parameters('appServiceHostName')]",
          "apiVersion": "2016-08-01",
          "location": "[resourceGroup().location]",
          "properties": {
            "siteName": "[parameters('appServiceName')]",
            "sslState": "SniEnabled",
            "thumbprint": "56B97C7FBD2734F061D24DEDFCDCA8281EBB13AA"
          },
          "dependsOn": [
            "[resourceId('Microsoft.Web/sites', parameters('appServiceName'))]"
          ]
        }
3. Creating a storage account
For my application I was already using a storage account, so there was one in my ARM template. It looked like this:
    {
      "type": "Microsoft.Storage/storageAccounts",
      "name": "[parameters('storageAccountName')]",
      "apiVersion": "2016-01-01",
      "location": "[resourceGroup().location]",
      "kind": "Storage",
      "sku": {
        "name": "Standard_LRS"
      }
    }
I am already using this Storage Account to support the webjob for a number of Azure Functions. Neither for this, nor the certificate renewal I need the guarantees that any form of replication beyond LRS offers.
4. Register an App Service Principal
The extension, after being installed, has to be able to add the issued certificate to the App Service. To do this, it needs to access to the Azure Management API’s. Two things need to be set up, to make this work: authentication and authorization.
For authentication an application needs to be registered with the Azure Active Directory. This can now be done in the Azure Portal. Unfortunately, we cannot do this via an ARM template since your Active Directory is not part of your subscription, but your Active Directory is outside your Azure subscription.
Note: Another approach might be to add an Azure Manged Service Identity to your App Service and re-engineer the let’s encrypt extension to leverage that.
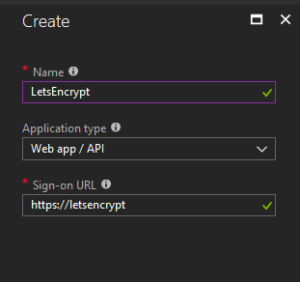
For now, let’s use the portal for creating an app registration. Navigate to the ‘Active Directory’ service and then to ‘App registrations.’ Once here, add a new app registration as follows:
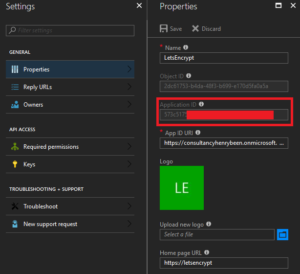
When the app registration is added, open it up and copy and store the Application ID. We will reuse it later under the name ClientId.
Next, go the the tab ‘Key’s and generate a new key. Give it a new, make it never expire and after clicking ‘save,’ copy and store it. We will later reuse it under the name ClientSecret. Make sure you handle this key in a safe manner, it is a password!
Now that we have registered a new identity in the Active Directory, we have to authorize this identity to change our application’s infrastructure (add the SSL certificate.) This we can do, again, via our ARM template. Add a resource as follows:
    {
      "type": "Microsoft.Authorization/roleAssignments",
      "apiVersion": "2015-07-01",
      "name": "[parameters('appServiceContributerRoleName')]",
      "dependsOn": [
        "[resourceId('Microsoft.Web/Sites', parameters('appServiceName'))]"
      ],
      "properties": {
        "roleDefinitionId": "[concat('/subscriptions/', subscription().subscriptionId, '/providers/Microsoft.Authorization/roleDefinitions/', 'b24988ac-6180-42a0-ab88-20f7382dd24c')]",
        "principalId": "[parameters('appServiceContributorObjectId')]",
        "scope": "[concat(subscription().id, '/resourceGroups/', resourceGroup().name)]"
      }
    }
Please note that I am adding an authorisation scope. Omitting the scope, will apply the granted role on your whole subscription. Adding a scope will limit the granted role to our ResourceGroup.
Now you might be wondering, why do I not limit the scope even further? To just the Web App maybe? However, this is not possible. If you expand the scope further and point to just the Web App, an error like this is issued:
"message": "The request to create role assignment '87b50594-284f-4ad2-baa5-ef7505976836' is not valid. Role assignment scope '/subscriptions/a314c0b2-589c-4c47-a565-f34f64be939b/resourceGroups/ycc-test/providers/Microsoft.Web/Sites/yccdashboardtstAppService' must match the scope specified on the URI '/subscriptions/a314c0b2-589c-4c47-a565-f34f64be939b/resourcegroups/ycc-test'."
Edit: I was mistaken here, on this page I show how to do RBAC Role Assignments on individual resources. However, in this case we still have to grant access to the whole Resourcegroup, since installing the certificate requires contributor on the whole Resourcegroup (See also this issue).
Also note, that to issue role assignments, your VSTS endpoint has to have the owner role on the resourcegroup, not just Contributor. Weigh your options here.
5. Adding application settings
Next, two sets of application settings need to be added to support the Let’s encrypt extension. The first two are for running Webjobs in general. The rest are settings that are used by the extension itself. You can also add them via the UI, but let’s not forget we want to rely on CI/CD as much as possible. To add the application settings, I’ve added the following to my ARM template as a nested resource in the App Service definition:
        {
          "apiVersion": "2016-03-01",
          "name": "appsettings",
          "type": "config",
          "dependsOn": [
            "[resourceId('Microsoft.Web/sites', parameters('appServiceName'))]"
          ],
          "properties": {
            "AzureWebJobsStorage": "[concat('DefaultEndpointsProtocol=https;AccountName=', parameters('storageAccountName'), ';AccountKey=', listKeys(variables('storageAccountid'),'2015-05-01-preview').key1)]",
            "AzureWebJobsDashboard": "[concat('DefaultEndpointsProtocol=https;AccountName=', parameters('storageAccountName'), ';AccountKey=', listKeys(variables('storageAccountid'),'2015-05-01-preview').key1)]",
            "letsencrypt:Tenant": "[subscription().tenantId]",
            "letsencrypt:SubscriptionId": "[subscription().subscriptionId]",
            "letsencrypt:ResourceGroupName": "[resourceGroup().name]",
            "letsencrypt:ServicePlanResourceGroupName": "[resourceGroup().name]",
            "letsencrypt:ClientId": "[parameters('appServiceContributerClientId')]",
            "letsencrypt:ClientSecret": "[parameters('appServiceContributerClientSecret')]"
          }
        }
As you can see, I am leveraging the power of ARM as much as possible. I am not hardcoding any of the values for the tenant, subscriptionId or the resource group names. This way I maximize the reuse of values wherever possible, making my templates easier to maintain.
6. Adding the let’s encrypt extension
Finally, we have to add the extension to our App Service. This can now also be done via the ARM template as a nested resource within the App Service
        {
          "apiVersion": "2015-08-01",
          "name": "letsencrypt",
          "type": "siteextensions",
          "dependsOn": [
            "[resourceId('Microsoft.Web/Sites', parameters('appServiceName'))]"
          ],
          "properties": {
          }
        }
7. Final, one time set up
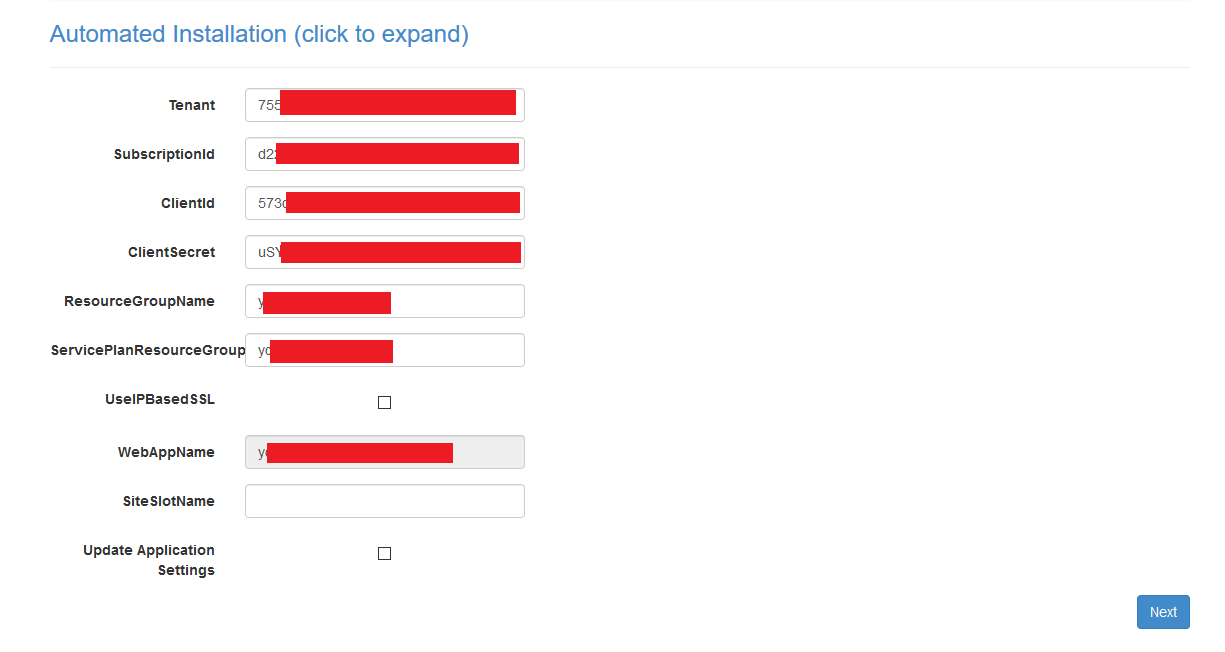
After rolling out our ARM template, we can now navigate to the let’s encrypt extension. Either via the portal or by navigating directly to https://{yourappservicename}.scm.azurewebsites.net/letsencrypt/ Here we have to complete a one-time set-up to install the certificate and we’re done. Renewal is done automatically. Now, since we have already configured everything via our template, this is as simple as clicking next three times. The first screen that opens up, is for settings and should look prefilled like this:
After clicking next we are presented with a list of custom domains for which SSL certificates will be requested (and automatically renewed) for us. Press next one more time and your done!.


