Last week I received a follow-up question from a fellow developer about a presentation I did regarding Azure Key Vault and Azure Managed Identity. In this presentation I claimed, and quickly showed, how you can use these two offerings to store all the passwords, keys and certificates you need for your ASP.NET application in a secure storage (the Key Vault) and also avoid the problem of just getting another, new password to access that Key Vault.

I have written a small ASP.NET application that reads just one very secure secret from an Azure Key Vault and displays it on the screen. Let’s dive into the infrastructure and code to make this work!

Infrastructure

Whenever we want our code to run in Azure, we need to have some infrastructure it runs on. For a web application, your infrastructure will often contain an Azure App Service Plan and an Azure App Service. We are going to create these using an ARM template. We use the same ARM template to also create the Key Vault and provide an identity to our App Service. The ARM template that delivers these components can be found on GitHub. Deploying this template, would result in the following:

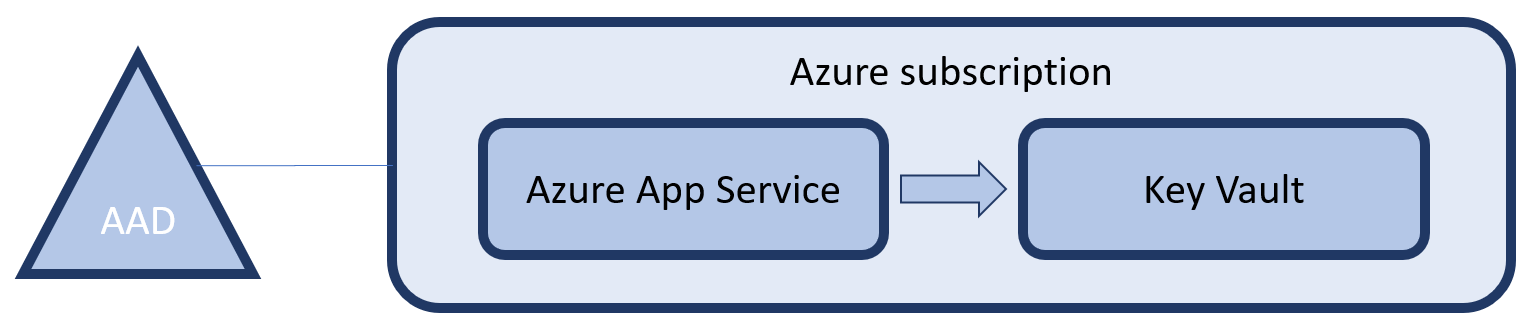
The Azure subscription you are deploying this infrastructure to, is backed by an Azure Active Directory. This directory is the basis for all identity & access management within the subscription. This relation also links the Key  Vault to that same AAD. This relation allows us to create access policies on the Key Vault that describe what operations (if any) any user in that directory can perform on the Key Vault.

Applications can also be registered in an AAD and we can thus give them access to the Key Vault. However, how would an application authenticate itself to the AAD? This is where Managed Identity comes in. Managed Identity will create an service principal (application) in that same Active Directory that is backing the subscription. At runtime your Azure App Service will be provided with environment variables that allow you to authenticate without the use of passwords.

For more information about ARM templates, see the information on MSDN. However there are two important parts of my template that I want to share. First the part that enables the Managed Identity on the App Service:

{
  "name": "[parameters('appServiceName')]",
  "type": "Microsoft.Web/sites",
  …,
  "identity": {
    "type": "SystemAssigned"
  }
}

Secondly, we have to give this identity, that is yet to be created, access to the Key Vault. We do this by specifying an access policy on the KeyVault. Be sure to declare a ‘DependsOn’ the App Service, so you will only reference the identity after it is created:

{
  "type": "Microsoft.KeyVault/vaults",
  "name": "[parameters('keyVaultName')]",
  …,
  "properties": {
    "enabledForTemplateDeployment": false,
    "tenantId": "[subscription().tenantId]",
    "accessPolicies": [
       {
        "tenantId": "[subscription().tenantId]",
        "objectId": "[reference(concat(resourceId('Microsoft.Web/sites', parameters('appServiceName')),'/providers/Microsoft.ManagedIdentity/Identities/default'), '2015-08-31-preview').principalId]",
        "permissions": {
          "secrets": [ "get" ]
        }
      }
    ]
  }
}

Here I am using some magic (that I just copy/pasted from MSDN) to refer back to my earlier deployed app service managed identity and retrieve the principalId and use that to create an access policy for that identity.

That is all, so let’s deploy the templates. Normally you would set up continuous deployment using Azure Pipelines, but for this quick demo I used Powershell:

Login-AzureRmAccount
Select-AzureRmSubscription -SubscriptionId " xxxxxxxx-xxxx-xxxx-xxxx-xxxxxxxxxxx"
New-AzureRmResourceGroup "keyvault-managedidentity" -Location "West-Europe"
New-AzureRmResourceGroupDeployment -TemplateFile .\keyvault-managedidentity.json -TemplateParameterFile .\keyvault-managedidentity.parameters.json -ResourceGroupName keyvault-managedidentity

Now with the infrastructure in place, let’s add the password that we want to protect to the Key Vault. There are many, many ways to do this but let’s use Powershell again:

$password = Read-Host 'What is your password?' -AsSecureString
Set-AzureKeyVaultSecret -VaultName demo4847 -Name password -SecretValue $password

Do not be alarmed if you get an access denied error. This is most likely because you still have to give yourself access to the Key Vault. By default no-one has access, not even the subscription owners. Let’s fix that with the following command:

Set-AzureRmKeyVaultAccessPolicy -ResourceGroupName "keyvault-managedidentity" -VaultName demo4847 -ObjectId xxxxxxxx-xxxx-xxxx-xxxx-xxxxxxxxxxxx -PermissionsToSecrets list,get,set

Code

With the infrastructure in place, let’s write the application that access this secret. I have created a simple, ASP.NET MVC application and edited the Home view to contain the following main body. Again the code is also on GitHub:

A secret

@if (ViewBag.IsManagedIdentity) {

Got a secret, can you keep it? (...) If I show you then I know you won't tell what I said: @ViewBag.Secret

} else {

Running locally, so no secret to tell }

Now to supply the requested values, I have added the following code to the HomeController:

public async Task Index()
  var isManagedIdentity = Environment.GetEnvironmentVariable("MSI_ENDPOINT") != null
    && Environment.GetEnvironmentVariable("MSI_SECRET") != null;

  ViewBag.IsManagedIdentity = isManagedIdentity;

  if (isManagedIdentity)
  {
    var azureServiceTokenProvider = new AzureServiceTokenProvider();
    var keyVaultClient = new KeyVaultClient(new KeyVaultClient.AuthenticationCallback(azureServiceTokenProvider.KeyVaultTokenCallback));
    var secret = await keyVaultClient.GetSecretAsync("https://demo4847.vault.azure.net/secrets/password");

    ViewBag.Secret = secret.Value;
  }

  return View();
}

First I check if we are running in an Azure App Service with Managed Identity enabled. This looks a bit hacky, but it is actually the recommended approach. Next, if running as an MI, I use the AzureSErviceTokenProvider (NuGet package: Microsoft.Azure.Services.AppAuthentication) to retrieve an AAD token. In turn I use that token to instantiate an KeyVaultClient (NuGet package: Microsoft.Azure.KeyVault) and use it to retrieve the secret.

That’s it!

Want to know more?

I hope to write two more blogs on this subject soon. One about using system to system authentication and authorization and not storing extra secrets into KeyVault and one about Config Builders, a new development for .NET Core 2.0 and .NET Framework 4.71 or higher.

Over the last weeks I’ve been working with a customer who is migrating to VSTS for building and releasing desktop applications. For years they had been compiling their applications, signing their binaries and creating their setups on a dedicated machine using custom batch scripts that ran on MSBuild post-build only on that specific machine. After this, they copied the resulting installer to a FTP server for download by their customers. Moving to VSTS meant that their packaging process needed to be revisited.

In this blog I will share a proof of concept that I did for them using VSTS, SignTool.exe and InnoSetup for building and releasing an installer. I wanted to proof that we could, securely, store all the code and configuration we needed in source control and configure VSTS build & release to create an setup file using InnoSetup and distribute that to our users using Azure Blob Storage.

Creating the application

Let’s start by creating a simple console application. After creation, I moved in this mighty code:

var obj = new
{
	Message = "This is a very complicated Console application with a dependency on Newtonsoft.Json"
};

var json = JsonConvert.SerializeObject(obj);

Console.WriteLine(json);
Console.WriteLine("Press any key to exit...");
Console.ReadKey();

Next to this source code in Program.cs, I also added two more files: cert.pfx and setup.iss. The first is the certificate that I want to use for signing my executable. This file should be encrypted using a password and a decent algorithm (see here for a discussion of how to check that) so that we can safely store it in source control and reuse it later on. The second file is the configuration that we will use later on to create a Windows Setup that can install my application on the computer of a customer.

Setting up the build

After this, I created a VSTS build. After creating a default .NET Desktop build, I added two more tasks of type Command Line. The first task for signing my executable, the second for creating the setup.

The actual commands I am using are:

  1. For signing the exe: “C:\Program Files (x86)\Windows Kits\10\bin\10.0.17134.0\x86\signtool.exe” sign /f $(Build.SourcesDirectory)\ConsoleApplication\ConsoleApplication\bin\$(BuildConfiguration)\cert.pfx /p %PASSWORD% $(Build.SourcesDirectory)\ConsoleApplication\ConsoleApplication\bin\$(BuildConfiguration)\ConsoleApplication.exe
  2. For creating the setup: “c:\Program Files (x86)\Inno Setup 5\ISCC.exe” $(Build.SourcesDirectory)\ConsoleApplication\ConsoleApplication\bin\$(BuildConfiguration)\setup.iss

This requires that that I configure the first execution with an environment variable with name PASSWORD (lower right of the screenshot above), which I in turn retrieve from the variables of this build. This is the password that is used to access cert.pfx to perform the actual signing. This build variable is of the type secret and can thus not be retrieved from VSTS and will not be displayed in any log file. The second task of course requires InnoSetup to be installed on the build server.

Finally, instead of copying the normal build output I am publishing an build artifact containing only the setup that was build in the previous step.

Setting up the release

Having a setup file is of no use if we are not distributing it to our users. Now in this case, I need to support three types of users: testers from within my organisation, alpha users who receive a weekly build and all other users that should only receive stable builds. It is important to provide testers with the same executable (installer) that will be delivered to users later and not having a seperate delivery channel for them. At the same time, we do not want alpha users to get a version that is not tested yet or all users to receive a version that hasn’t been in alpha for a while yet. To accomodate this, I have created a release pipeline with three environments: test, alpha and production:

Every check-in will automatically trigger a build, which will automatically trigger a release to my test environment. After this, I manually have to approve a release to the alhpa group and from there on to all customers. We call this ring based deployments. While every release to an environment contains just one step, namely copy of the setup to Azure Blob Storage – the locations all differ, thus enabling us to deliver different versions of our software to different user groups:

All in all, it took me about an hour and a half to set this all up and proof that it was working. This shows how easy you can get going with continuous deployment of desktop applications.

Last week I’ve been working on adding a Let’s encrypt certificate to an Azure Web App of a customer. Let’s encrypt provides free SSL certificates and as a Dutchie, I definitely love free stuff!

To make this happen, there is a great Azure Web App extension out there, that you can add to your App site to enable adding and renewing a SSL certificate automatically. Next to this extension, there is a guide out there to help you install and configure it.

I’ve followed this guide as well, however I have fitted the process outlined to the ARM template for the application that I’ve been working on. The reason for this is off course that I want to deploy my application from a CI/CDhttp pipeline as much as possible. The rest of this blog contains a step-by-step instruction on adding an SSL certificate

Let’s get to it!


1.      No support for free or dynamic plan

SSL certificates are now also available on Azure Web Apps that are running on the basic tier. You no longer have to upgrade to standard, but this tutorial will not work if you are using the free (F1) or dynamic (D1) App Service Plan.

2. Adding a custom domain to your website

Let’s add the hostname that we want to enable SSL for as a nested resource under the App Service:

        {
          "type": "hostNameBindings",
          "name": "[parameters('appServiceHostName')]",
          "apiVersion": "2016-08-01",
          "location": "[resourceGroup().location]",
          "properties": {
            "siteName": "[parameters('appServiceName')]",
            "sslState": "SniEnabled",
            "thumbprint": "56B97C7FBD2734F061D24DEDFCDCA8281EBB13AA"
          },
          "dependsOn": [
            "[resourceId('Microsoft.Web/sites', parameters('appServiceName'))]"
          ]
        }

3. Creating a storage account

For my application I was already using a storage account, so there was one in my ARM template. It looked like this:

    {
      "type": "Microsoft.Storage/storageAccounts",
      "name": "[parameters('storageAccountName')]",
      "apiVersion": "2016-01-01",
      "location": "[resourceGroup().location]",
      "kind": "Storage",
      "sku": {
        "name": "Standard_LRS"
      }
    }

I am already using this Storage Account to support the webjob for a number of Azure Functions. Neither for this, nor the certificate renewal I need the guarantees that any form of replication beyond LRS offers.

4. Register an App Service Principal

The extension, after being installed, has to be able to add the issued certificate to the App Service. To do this, it needs to access to the Azure Management API’s. Two things need to be set up, to make this work: authentication and authorization.

For authentication an application needs to be registered with the Azure Active Directory. This can now be done in the Azure Portal. Unfortunately, we cannot do this via an ARM template since your Active Directory is not part of your subscription, but your Active Directory is outside your Azure subscription.

Note: Another approach might be to add an Azure Manged Service Identity to your App Service and re-engineer the let’s encrypt extension to leverage that.

For now, let’s use the portal for creating an app registration. Navigate to the ‘Active Directory’ service and then to ‘App registrations.’ Once here, add a new app registration as follows:

When the app registration is added, open it up and copy and store the Application ID. We will reuse it later under the name ClientId.

Next, go the the tab ‘Key’s  and generate a new key. Give it a new, make it never expire and after clicking ‘save,’ copy and store it. We will later reuse it under the name ClientSecret. Make sure you handle this key in a safe manner, it is a password!

Now that we have registered a new identity in the Active Directory, we have to authorize this identity to change our application’s infrastructure (add the SSL certificate.) This we can do, again, via our ARM template. Add a resource as follows:

    {
      "type": "Microsoft.Authorization/roleAssignments",
      "apiVersion": "2015-07-01",
      "name": "[parameters('appServiceContributerRoleName')]",
      "dependsOn": [
        "[resourceId('Microsoft.Web/Sites', parameters('appServiceName'))]"
      ],
      "properties": {
        "roleDefinitionId": "[concat('/subscriptions/', subscription().subscriptionId, '/providers/Microsoft.Authorization/roleDefinitions/', 'b24988ac-6180-42a0-ab88-20f7382dd24c')]",
        "principalId": "[parameters('appServiceContributorObjectId')]",
        "scope": "[concat(subscription().id, '/resourceGroups/', resourceGroup().name)]"
      }
    }

Please note that I am adding an authorisation scope. Omitting the scope, will apply the granted role on your whole subscription. Adding a scope will limit the granted role to our ResourceGroup.

Now you might be wondering, why do I not limit the scope even further? To just the Web App maybe? However, this is not possible. If you expand the scope further and point to just the Web App, an error like this is issued:

"message": "The request to create role assignment '87b50594-284f-4ad2-baa5-ef7505976836' is not valid. Role assignment scope '/subscriptions/a314c0b2-589c-4c47-a565-f34f64be939b/resourceGroups/ycc-test/providers/Microsoft.Web/Sites/yccdashboardtstAppService' must match the scope specified on the URI '/subscriptions/a314c0b2-589c-4c47-a565-f34f64be939b/resourcegroups/ycc-test'."

Edit: I was mistaken here, on this page I show how to do RBAC Role Assignments on individual resources. However, in this case we still have to grant access to the whole Resourcegroup, since installing the certificate requires contributor on the whole Resourcegroup (See also this issue).

Also note, that to issue role assignments, your VSTS endpoint has to have the owner role on the resourcegroup, not just Contributor. Weigh your options here.

5. Adding application settings

Next, two sets of application settings need to be added to support the Let’s encrypt extension. The first two are for running Webjobs in general. The rest are settings that are used by the extension itself. You can also add them via the UI, but let’s not forget we want to rely on CI/CD as much as possible. To add the application settings, I’ve added the following to my ARM template as a nested resource in the App Service definition:

        {
          "apiVersion": "2016-03-01",
          "name": "appsettings",
          "type": "config",
          "dependsOn": [
            "[resourceId('Microsoft.Web/sites', parameters('appServiceName'))]"
          ],
          "properties": {
            "AzureWebJobsStorage": "[concat('DefaultEndpointsProtocol=https;AccountName=', parameters('storageAccountName'), ';AccountKey=', listKeys(variables('storageAccountid'),'2015-05-01-preview').key1)]",
            "AzureWebJobsDashboard": "[concat('DefaultEndpointsProtocol=https;AccountName=', parameters('storageAccountName'), ';AccountKey=', listKeys(variables('storageAccountid'),'2015-05-01-preview').key1)]",
            "letsencrypt:Tenant": "[subscription().tenantId]",
            "letsencrypt:SubscriptionId": "[subscription().subscriptionId]",
            "letsencrypt:ResourceGroupName": "[resourceGroup().name]",
            "letsencrypt:ServicePlanResourceGroupName": "[resourceGroup().name]",
            "letsencrypt:ClientId": "[parameters('appServiceContributerClientId')]",
            "letsencrypt:ClientSecret": "[parameters('appServiceContributerClientSecret')]"
          }
        }

As you can see, I am leveraging the power of ARM as much as possible. I am not hardcoding any of the values for the tenant, subscriptionId or the resource group names. This way I maximize the reuse of values wherever possible, making my templates easier to maintain.

6. Adding the let’s encrypt extension

Finally, we have to add the extension to our App Service. This can now also be done via the ARM template as a nested resource within the App Service

        {
          "apiVersion": "2015-08-01",
          "name": "letsencrypt",
          "type": "siteextensions",
          "dependsOn": [
            "[resourceId('Microsoft.Web/Sites', parameters('appServiceName'))]"
          ],
          "properties": {
          }
        }

7. Final, one time set up

After rolling out our ARM template, we can now navigate to the let’s encrypt extension. Either via the portal or by navigating directly to https://{yourappservicename}.scm.azurewebsites.net/letsencrypt/ Here we have to complete a one-time set-up to install the certificate and we’re done. Renewal is done automatically. Now, since we have already configured everything via our template, this is as simple as clicking next three times. The first screen that opens up, is for settings and should look prefilled like this:


After clicking next we are presented with a list of custom domains for which SSL certificates will be requested (and automatically renewed) for us. Press next one more time and your done!.


Too bad! You still need a private build agent when using VSTS

As a true cloud born developer on the Microsoft stack, my ALM | DevOps solution of choice is VSTS. Next to this being the defacto standard in my environment (bubble), I believe it also is the best solution out there for building and releasing applications at this point in time. However when it comes to build & release agents, I still go for self-hosting my agents every single time. Although this might sound like more work, or more expensive, I believe it to still be the superior option when it comes to the cost/performance ratio. In this blog I will try to explain why this is so.

Why you don’t want to use the 240 free minutes

In VSTS you get up to 240 free build minutes every month. Great! This might sound like enough for your purposes. However, you can spent these minutes only when an agent becomes available to service your build and release. And this is not so great. Often it takes a minute or two before this happens, so longer then anyone cares to wait for a build. Let alone for one to start.

Also… do you really want to take the risk that you are out of free minutes, just when you need to quickly deliver a bug fix? Of course not. So relying on these free minutes is not a good idea. Neither from a performance perspective as from a risk/cost perspective.

Why you don’t want to use a managed agent

The alternative, Microsoft-CI/CD seems like the best way forward then. Just a couple of clicks and you have bought yourself a fully managed hosted agent for roughly $ 40 a month. These hosted agents are constructed before every single build (or release) and destructed right after. This way, a high level of isolation between builds is guaranteed, and you don’t have to wait for a shared agent to become available. A wonderful thing when working in the cloud.

But there is also a dark side to this construction and destruction of agents. It means that executing a build or release will always be slow. Everything (task steps, sources and even NuGet packages) needs to be downloaded every single time. Especially when you are building small solutions that you want to build and release very quickly and in short iterations, these delays and the (lack of) performance in general of hosted agents becomes frustrating. A build that takes only two seconds on your development machine, might easily take up to five minutes on a private hosted agent.

Running a private agent

With this in mind, you want to consider running a self-hosted agent, what Microsoft calls self-hosted CI/CD. This means that you download the VSTS build agent from VSTS and install and run it on a machine of your own: an Azure VM for instance. Every VSTS account comes with support for one self-hosted agent and you can buy more pipelines for $ 15 a month.

Performance

What this will get you is a dedicated agent that is constantly standing by to run a build or release for you. So no maximum number of build minutes you can use, nor any more waiting for builds to start. However, that’s not all. Experiments in three different contexts have also shown, that these builds are much, much faster. For example, see the graph with build times on a small project I recently did here:

What this shows is that the build times of this particular build went from anywhere between four and six minutes, down to less than one minute!

Costs

At this point you might be concerned about the costs of running a self-hosted agent, because next to a pipeline in VSTS, you also need a VM to run your agent on. This will come to roughly $ 65 a month, if choosing the cheapest standard VM that can run an agent (A0). Almost double of an Microsoft-hosted CI/CD. And that’s not a really powerful VM. However, this does not have to be the true cost of your VM. There are two ways to safe on costs:

  • If you use your build machines only for a limited number of hours per day and not in the weekends, you can use Azure automation scripts to turn them on and off on demand. If done well, this can save you roughly 60% when adhering to working hours and weekends. This would make buying a VM from the D-series feasible.
  • Another approach is not using a standard VM, but a B-series burstable VM. The results I talked about before, were achieved on an B2s VM, available for $ 47 a month. These type of VM’s do not always have the full capacity of the CPU, but are allowed to burst up to double of there CPU capacity when needed after underusing the CPU for a while. This unused/burst usage pattern fits really well with build agents. Next to this, they also support SSD disks. So in practice this will give you a VM with 4 cores and SSD storage for less than $ 50 a month. A very good price, looking at the performance benefits.

Final thoughts: other improvements

In practice, the Microsoft-hosted CI/CD is often not fast enough. Not only due to the provisioning of agents, but also due to the lack of caching for package managers and general lack of performance on the VM. For this reason we are still stuck with self-hosting our CI/CD agents. However, this is possible without incurring  (almost) any extra cost, while gaining five times the performance.

Of course, this will leave you with the responsibility of patching the VM you are running your agents on. However, just patching Visual studio on one computer that allows for no incoming internet traffic is doable. Also, there is a great tutorial out there from Wouter de Kort, where he shares how you can create your own build agent image and keep it up to date automatically.

Over the last couple of months I have been coaching a number of PHP teams to help them improve their software engineering practices. The main goals were to improve the quality of the product, ease of delivery and the overall maintainability of the code. If there is one thing that defines maintainable code, in my opinion, it is the existence of unit tests. However, one of the things that proved more difficult than one might expect is to start writing proper unit tests in an existing PHP solution.

In this instance, the teams were using the Laravel framework. However, standard Laravel practices limited the testability of the code created by the teams. I have worked with these teams to make their code more testable to two ends:

  • Improve overall testability by introducing new class design patterns
  • Reduce the duration of tests. Prior to this approach, a lot of tests were implemented as end-to-end, interface based tests. And boy, are they slow!

After a number of weeks, we saw the first results coming in, so all of this worked out nicely.

The goal of this post is to share the issues found that were preventing the team from proper unit testing and how we got around them.

Issue 1: instantiating a class in a unit test

The first thing we ran into was the fact that it was impossible to instantiate any class from a unit test. There were two reasons for this. The first was that there was actual work done in the constructor of almost every class: calling a method on another class and/or hitting the database.

Next to this, dependencies for any class were not passed in via the constructor, but were created in the constructor using a standard Laravel pattern. The good news here is that Laravel actually provides you with a dependency container. The bad news is, that it was often used like this:

class TestSubject {
    public function __construct() {
        $this->someDependency = app()->make(SomeDependency::class);
    }
}

This calls a global, static method app() to get the dependency container and then instantiates a class by type. Having this code in the constructor makes it completely impossible to new the class up from a unit test.

In short, we couldn’t instantiate classes in a unit test due to:

  • Doing work in a constructor
  • Instantiating dependencies ourselves

Solution: Let the constructor only gather dependencies

First of all, calling methods or the database was quite easy to refactoring out of the constructors. Also, this is a thing that can easily be avoided when creating new classes.

The best way to not instantiate dependencies yourselves, is to leave that to the framework. Instead of hitting the global app() method to obtain the container, we added the needed type as a parameter to the constructor, leaving it up to the Laravel container to provide an instance at runtime (constructor dependency injection.)

public function __construct(SomeDependency $someDependency) {
    $this->someDependency = $someDependency;
}

Now there is still one issue here and that is we are depending upon a concrete class, not an abstraction. This means, we are violation the Dependency Inversion principle. To fix this, we need to depend on an interface. However, now the Laravel dependency container no longer knows which type to provide to our class when instantiating it, since it cannot instantiate a class. Therefore, we have to configure a binding that maps the interface to the class.

app()->bind(SomeDependencyInterface::class, SomeDependency::class);

Having done this, we can now change our constructor to look as follows.

public function __construct(SomeDependency $someDependency) {
    $this->someDependency = $someDependency;
}

At this point we have changed the following:

  • No work in constructors
  • Getting dependencies provided instead of instantiating them ourselves.
  • Depending upon abstractions

Mission accomplished! These things combined now allows to instantiate our test subject in a unit test as follows:

$this->dependencyMock = $this->createMock(SomeDependencyInterface::class);

$this->subject = new TestSubject($this-> dependencyMock);

Issue 2: Global static helper methods

Now we can instantiate a TestSubject in a test and start testing it. The second we got to this state, we ran into another problem that was all over the code base: global, static, helper methods. These methods have different sources. They are built-in PHP methods, Laravel helper methods or convenience methods from 3rd parties. However, they all present us with the same problems when it comes to testability:

  • We cannot mock calls to global, static methods. Which means we cannot remove their behavior at runtime and thus cannot isolate our TestSubject and start pulling in real dependencies, dependencies of dependencies, etc…

From here on, I will share (roughly in order of preference) a number of approaches to get around this limitation.

Solution 1: Finding a constructor injection replacement

When starting to investigate these static methods, especially those provided by Laravel, we saw that a lot of them were just short wrapper methods around the Dependency Container. For example, the implementation of a much used view method was this:

public function view($name = null, $data = [], $mergeData = [])
{
    $factory = app(ViewFactory::class);

    if (func_num_args() === 0) {
        return $factory;
    }
    return $factory->make($view, $data, $mergeData);
}

For all these convenience methods, it is straightforward to see that we can easily refactor the calling code from this:

public function __construct() { }

public function index() {
    // … more code
    return view(“blade.name”, $params);
}

To this:

public function __construct(ViewFactory $viewFactory) {
    $this->viewFactory = $viewFactory;
}

public function index() {
    // … more code
    return $this->viewFactory->make(“blade.name”, $params);
}

A quick and easy way to remove a decent portion of calls to global functions.

Solution 2: Software engineering tricks

If there is no interface readily available for constructor injection, we can create one ourselves. A common engineering trick is to move unmockable code to a new class. We then inject this to our subject at runtime. At test time however, we can then mock this wrapper and test our subject as much as possible.

As an example, let’s take the following code:

class Subject {
    function isFileChanged($fileName, $originalHash) {
        $newHash = sha1($fileName);
        return $originalHash == $newHash;
    }
}

Of course we can test this class by letting it operate on a temporary file, but another approach would be to do this:

class Subject {
    private $sha1Hasher;

    public function __construct(ISha1Hasher $sha1Hasher) {
        $this->sha1Hasher = $sha1Hasher;
    }

    function isFileChanged($fileName, $originalHash) {
        $newHash = $this->sha1Hasher->hash ($fileName);
        return $originalHash == $newHash;
    }
}

Maybe not a thing you would do in this specific instance. But if you have code that is more complex and is executing a single call to a global method, this way you can move that call behind an interface and mock it out while testing:

public function testSubject() {
    $hasherMock = $this->createMock(ISha1Hasher::class);
    $hasherMock->method(“hash”)->with(“n/a”)->willReturn(“123”);
    $subject = new Subject($hasherMock);

    $result =$subject->isFileChanged(“n/a”, “123”);

    $this->assertFalse($result);
}

In my opinion, solution 2 is by far a better approach to take than solutions 3 and 4. However, if you are afraid that adding to much types might clutter your codebase or reduce the performance of your application, there are two more approaches available. Both have drawbacks, so I would only use them if you see no other way.

Solution 3: Leveraging PHP namespace precedence

If refactoring global static calls in you code to a new class is not an option and your code is organized into namespaces, there is another way we can mock calls to built-in PHP methods. In the file with our TestClass, we can add a new method with the same name in a namespace that is closer to the caller.

For example, the following call to file_exists() cannot be mocked out:

namespace demo;

class Subject {
    public function hasFile() {
        return file_exists("d:\bier");
    }
}

As you can see, the class containing the hasFile() method is in a namespace called demo. We can create a new method, also called file_exists() in that same namespace, just before our TestClass. When executing, the methods in the namespace that is the closed to the caller will take precedence.

This means, we mock the call to file_exists() to always return true, as follows:
namespace demo;

function file_exists($fileName) {
    return true;
}

class TestClass {
    public function testWhenFileExists_thenReturnTrue() {
        $result = $this->subject->hasFile();

        $this->assertTrue($result);
    }
}


The main drawback of this approach is that it reduces the readability of your code. Also, relying on method hiding for testing purposes might make your code harder to understand for those that do not grasp all the language details.

Solution 4: Leveraging your frameworks and libraries

Finally, your framework might provide its own means for mocking certain calls. In Laravel for example, there is a construct of Facades that you can also use for mocking purposes. Another example is the Carbon datetime convenience library that provides a global static Carbon::setTestNow() method.

I for one would discourage this, as it would mean that you are writing logic that will become dependent on your framework and will not ever be able to switch to another framework without redoing everything. (However… who has done that even once?)

My other argument is one of taste: I simply do not like adding methods to production code, only to make it testable. And I have seen misuse of methods intended for tests only in production code as well…

However, if you do not share these feelings, the approach is quite nicely detailed here: https://laravel.com/docs/5.6/facades or here: http://laraveldaily.com/carbon-trick-set-now-time-to-whatever-you-want/

Conclusion

I hope that this blog gives you a number of approaches to make your PHP code more (unit)testable. Because we all know that only code that is continued tested in a pipeline, can quickly and easily be shipped fast and often to customers.

Enjoy!

With thanks for proofreading: Wouter de Kort, Alex Lisenkov

March 25th, a Sunday, I got a direct message on Twitter from Christos Matskas, who I recently met at an event in the Netherlands. He asked if I could help host a meetup where his colleague Seth Juarez could come and give a presentation into deep learning and interact with developers interested in Machine Learning (what salespeople call Artificial Intelligence, according to Seth). Just one catch, it had to be either next Wednesday or Thursday.

I rarely worry about anything, so neither did I that day. Seth is pretty well known, so it felt like an honor to be able to host a meetup with him and I figured that it wouldn’t be too hard to get a great audience. So, I said yes as soon as I got a company (IBIS Software) to sponsor the location.

The next couple of days we spent on getting some PR for the just-once “pop-up meetup with Jeth Suarez.” This was actually (much) harder than expected, but we ended up with an enthusiastic crowd of over 25 people.

As requested by a number of attendees I am sharing the slides Seth used. The event was also recorded and can be viewed back here.

Again, thanks for being there Seth. IBIS, thanks for sponsoring a location, food and drinks!

Ever wished you would receive a simple heads up when an Azure deployment fails? Ever troubleshooted an issue and looked for the button: “Tell me when this happens again?” Well, I just found it.

Yesterday I stumbled across a -for me (*) – new feature that is just amazing: azure activity log alerts. A feature to notify me when something specific happens.

With the introduction of the Azure Resource Manager model, the activity log was also introduced. The activity log is an audit trail of all events that happen within your Azure subscription, either user initiated or events that originate in Azure itself. This is a tremendous powerfull feature in itself, however it has become more powerfull now. With azure activity log alerts you can create rules that automatically trigger and notify you when an event is emitted that you find interesting.

In this blog post I will detail two scenario’s where activity log alerts can help you out.

(*) It seems this feature was already launched in May this year, according to this Channel9 video

Example: Manage authorizations

Let’s say you are working with a large team on a large project or on a series of related projects. One thing that you might want to keep taps on, is people creating new authorizations. So let’s see if we can quickly set something up to send me an e-mail whenever this happens.

  1. Let’s start by spinning up the monitoring blade in the Azure portal.
  2. In the monitoring blade the activity log automatically opens up. Here we can look through past events and see what has happened and why. Since we are looking to get pro-activly informed about any creation events, lets navigate to Alerts:
  3. In the top of the blade, choose Add activity log alert and the following dialog will open:
  4. Here there are a number of things we have to fill out. As the name and description “A new authorization is created” covers what we are about to do. Select your subscription and the resourcegroup where you want to place this alert. This is not the resourcegroup that the alert concerns, it is where the alert itself lives. As event category we pick “Administrative” and as Resource Type “Role assignment.” The last resets all other dropdowns so we only have to select an Operation name. Let’s pick “Create role assignment.”
  5. After selecting what we want to be alerted about, let’s decide how we want to alerted. This is done via an Alert group, an alert group is a group of one or more actions that are grouped under one name and can be reused. Let’s name our action group “StandardActionGroup” and add an e-mailadres. Giving us a final result as follows:
  6. Now let’s authorize a new user on a resource:
  7. And hurray, we are notified by e-mail:

Example: Streaming Analytics hick-up

So you have an Azure resource that has some issues. Every now and then it gets in a faulted state or just stops working. Often you will find that this is nicely put into the activity log. For example I have a Streaming Analytics job that faults every now and then. Let’s see how we can get Azure to “tell me when this happens again.”

  1. Go to the activity log of the resource with an error
  2. Open the details of the Warning and find the link to Add activity log alert

  3. The blade to open a new alert is added, with everything prefilled to capture just that specific event. In essence allowing you to ask Azure to tell you ‘if it happens again’

Can we automate that?

Finally, as you can see in the image below, every activity log alert is a resource in itself. Which means you can see them when you list a resourcegroup and that you can create them automatically using ARM templates. For example as part of your continuous delivery practice.

E-mail sucks, I want to create automated responses

Also possible. You can also have an webhook called as part of an actiongroup. This way you can easily hook up an Azure function to immediately remedy an issue, for example.

The second day of this month, Microsoft announced two new libraries to interact with the Azure Event Hub. I was afraid we had a lot of rework coming our way, however this upgrade was one of the easiest I’ve ever done!

Removed the old NuGET packages, added the new packages. Replaced SendBatchAsync() with SendAsync() and a small change in connectionstring and I was good.

As you can see I’ve introduced a small quirk at line 45 to make this new code work with old connectionstrings that smells a bit However, it works like a charm and can easily be removed later on.

Small quirks like these allow me to ship this code to systems that are still configured with a connectionstring that contains the TransportType property. This way I do not have to time the code and configuration upgrade of systems. I can just ship the code, ship the configuration change later and finally clean up the quirk.

One of the better upgrade experiences. Thanx!

I just read that there is a new T-SQL operator in town: STRING_AGG. Finally! Having worked with MySQL prior to moving (primarily) to Azure SQL DB, I have always missed a T-SQL equivalent to GROUP_CONCAT.

I’m happy to see that STRING_AGG has the same workings as GROUP_CONCAT. Both do not only concatenate string values, but also allow for injecting a ‘glue’ in between. Use is just as expected, a query such as

<pre>

SELECT STRING_AGG(DisplayName, ‘, ’) FROM Users WHERE AccountId = 45

</pre>

Will produce a single row result of

<pre>

Henry Been, John Doe

</pre>

Simply Awesome!