In response to a comment / question on an earlier blog, I have taken a quick look at applying Azure Policy to Azure Management Groups. Azure Management Groups are a relatively new concept that was introduce to ease the management of authorizations on multiple subscriptions, by providing a means to group them. For such a group, RBAC roles and assignments can be created, to manage authorizations for a group of subscriptions at once. This saves a lot of time when managing multiple subscriptions, but also reduces the risk of mistakes or oversight of a single assignment. A real win.

Now, Azure Policies can also be defined in and assigned to management groups it is claimed here. However, how to do that is not documented yet (to my knowledge and limited Goo– Bing skills), nor was it visible in the portal. So after creating a management group in the portal (which I had not done before), I I turned to Powershell and wrote the following to try and do a Policy assignment to a Management Group:

$policyDefinition = Get-AzureRmPolicyDefinition -Name ca7660f6-1ba5-4c57-b26c-f816d2a192f6
$mg = Get-AzureRmManagementGroup -GroupName test
New-AzureRmPolicyAssignment -Name test -DisplayName test -PolicyDefinition $policyDefinition -Scope $mg.Id

Which gave me the following error:

New-AzureRmPolicyAssignment : InvalidCreatePolicyAssignmentRequest : The policy definition specified in policy assignment 'test' is out of scope. Policy definitions should be specified only at or 
above the policy assignment scope.
At line:1 char:1
+ New-AzureRmPolicyAssignment -Name test -DisplayName test -PolicyDefin ...
+ ~~~~~~~~~~~~~~~~~~~~~~~~~~~~~~~~~~~~~~~~~~~~~~~~~~~~~~~~~~~~~~~~~~~~~
+ CategoryInfo : CloseError: (:) [New-AzureRmPolicyAssignment], ErrorResponseMessageException
+ FullyQualifiedErrorId : InvalidCreatePolicyAssignmentRequest,Microsoft.Azure.Commands.ResourceManager.Cmdlets.Implementation.NewAzurePolicyAssignmentCmdlet

Which makes sense: you can only assign a policy to (a resourcegroup in) a subscription, if that is also the subscription the policy definition is saved into. So on to find out, how to define a policy within a resource group. To do that, I first wanted to retrieve an existing policy from the portal, so I navigated to Azure Policy page in the portal and stumbled onto the following screen:

And from here on, I could just assign a policy to a management group, if I had one in that group already… After switching to defining a policy, I noticed that I now could also save a policy definition to a management group.

So the conclusion is: yes, you can assign Azure Policies to Management Groups just like you can to a resource group or subscription, iff you already have at least one management group!

Further reading

Now, denying unwanted configurations is fine and can be a great help, but would it not be much better if we could automatically fix unwanted configurations when they are deployed? Yes.., this has pros and cons. Automagically correcting errors is not always the best way forward, as there is not really a learning curve for the team member deploying the unwanted configuration. On the other hand, if you can fix it automatically, why not? Just weigh your options on a I guess.

Let’s take an example from the database world. Let’s say we have a requirement that says that we want to have an IP address added to the firewall of every single database server in our subscription. The policy that would allow us to specify an IP address to add to the firewall of every database server is as follows:

{
  "if": {
    "field": "type",
    "equals": "Microsoft.Sql/servers"
  },
  "then": {
    "effect": "DeployIfNotExists",
    "details": {
      "type": "Microsoft.Sql/servers/firewallrules",
      "name": "AllowAccessForExampleIp",
      "existenceCondition": {
        "allOf": [
          {
            "field": "Microsoft.Sql/servers/firewallRules/startIpAddress",
            "equals": "[parameters('ipAddress')]"
          },
          {
            "field": "Microsoft.Sql/servers/firewallrules/endIpAddress",
            "equals": "[parameters('ipAddress')]"
          }
        ]
      },
      "deployment": {
        "properties": {
          "mode": "incremental",
          "template": {
            "$schema": "http://schema.management.azure.com/schemas/2015-01-01/deploymentTemplate.json#",
            "contentVersion": "1.0.0.0",
            "parameters": {
              "serverName": {
                "type": "string"
              },
              "ipAddress": {
                "type": "string"
              }
            },
            "resources": [
              {
                "name": "[concat(parameters('serverName'), '/AllowAccessForExampleIp')]",
                "type": "Microsoft.Sql/servers/firewallrules",
                "apiVersion": "2014-04-01",
                "properties": {
                  "startIpAddress": "[parameters('ipAddress')]",
                  "endIpAddress": "[parameters('ipAddress')]"
                }
              }
            ]
          },
          "parameters": {
            "serverName": {
              "value": "[field('name')]"
            },
            "ipAddress": {
              "value": "[parameters('ipAddress')]"
            }
          }
        }
      },
      "roleDefinitionIds": [
        "/providers/Microsoft.Authorization/roleDefinitions/b24988ac-6180-42a0-ab88-20f7382dd24c"
      ]
    }
  }
}

Quite the JSON. Let’s walk through this step by step. First of all we have the conditions under which this policy must apply, this whenever we are deploying something of type Microsoft.Sql/servers. The effect we are looking for is deployIfNotExists, which will do an additional ARM template deployment when ever the existenceCondition is not fulfilled. This template takes the same form as any nested template, which means we have to respecify all parameters to the template and provide them from the parameters of the policy or using field values.

Managed Identity for template deployment

Every ARM template deployment is done on behalf of an authenticated identity. When using any effect that causes another deployment, you have to create a Managed Identity when assigning the policy. In the policy property roleDefinitionIds you should list all roles that are needed to deploy the defined template. When assigning and executing this policy to a subscription or resourcegroup, Azure will automatically provision a service principal with these roles over the correct scope, which will be used to deploy the specified template.

Field() function and aliases

In the template itself (and also when passing parameters to the template), there is the usage of a function called field. With this function you can reference one or more properties of the resource that is triggering the policy. To see all available fields per resource, use the Get-AzureRmPolicyAlias Powershell command. This will provide a list of all aliases available. To filter this list by namespace, you can use:

Use Get-AzureRmPolicyAlias -ListAvailable | Where-Object -equals -Property Namespace -Value Microsoft.Sql

Policy in action

After creating and assigning this policy, we can see it in action by creating a SQL Server using the portal. This is just another interface for creating a template deployment. After successfully deploying this template, our policy will be evaluated and the first time it will create the intended firewall rule. We can see this when looking up all deployments to the resource group, which will also list a PolicyDeployment:

Next to that, when looking at the related events for the initial Microsoft.SQLServer deployment, we see that our policy is accepted for deployment after the initial deployment:

In my previous blog post I showed how to audit unwanted Azure resource configurations. Now, listing non-compliant resources is fine and can be a great help, but would it not be much better if we could just prevent unwanted configurations from being deployed?

Deny any deployment not in Europe

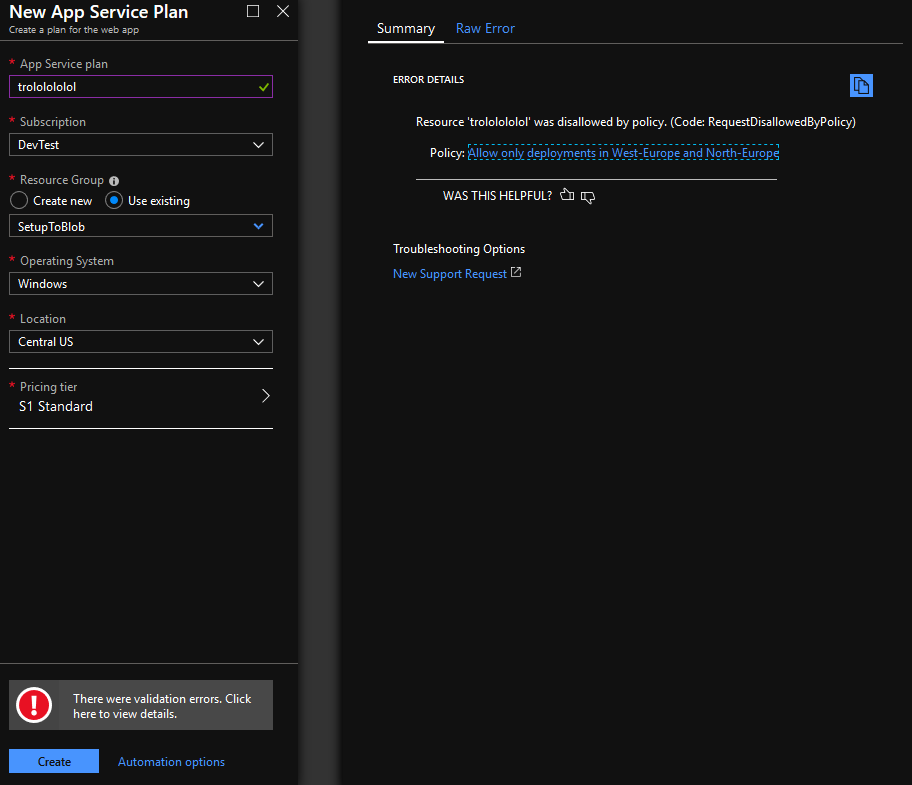
Let’s take the example of Azure regions. If you are working for an organization that wants to operate just within Europe, it might be best to just deny any deployment outside of West- and North-Europe. This will help prevent mistakes and help enforce rules within the organization. How would we write such a policy?

Any policyRule still consist out of two parts, an if and an then. First, the if – which acts like a query on our subscription or resourcegroup and determines to which resources the policy will be applied. In this case we want to trigger our policy under the following condition: location != ‘North Europe’ && location != ‘West Europe.’ We write this using JSON, by nesting conditions. This syntax is a bit verbose, but easy to understand. The effect that we want to trigger is a simple deny of any deployment that matches this condition. In JSON, this would look like this:

{
  "type": "Microsoft.Authorization/policyDefinitions",
  "name": "audit-vms",
  "properties": {
    "displayName": "Audit every Virtul Machine",
    "description": "This policy audits any virtual machine that exists in the assigned scope.",
    "policyRule": {
      "if": {
        "allOf": [
          {
            "field": "location",
            "notEquals": "westeurope"
          },
          {
            "field": "location",
            "notEquals": "northeurope"
          }
        ]
      },
      "then": {
        "effect": "deny"
      }
    }
  }
}

Creating a policy like this and then applying it to an subscription or resourcegroup, will the Azure Resource Manager instruct to immediately deny any deployment that violates the policy. With the following as a result:

Azure Policy is also evaluated when deploying from Azure Pipelines, where you will also get a meaningfull error when trying to deploy any template that violates a deny policy:

After sliced bread, the next best thing is of course Infrastructure-as-Code. In Azure, this means using ARM templates to deploy your infrastructure automatically in a repeatable fashion. It allows teams to quickly create anything they want in any Azure resourcegroup they have access to. Azure allows you to use RBAC to limit the Resourcegroup(s) a team or individual has access to. But is this secure enough? Yes, .. and no. Yes, can you limit everyone to the resource(groups) they have access to. However, within that group they can still do whatever they please. Wouldn’t it be cool to also be able to limit what a team can do, even within their own resourcegroup?

This is the first of a series of posts on Azure Policy, an Azure offering that allows you to define policies that allow or disallow specific configurations within your Azure subscription. In this post we will see how to define policies that inform us when a situation exists that we might rather not have. To be more concrete: we want to create an audit log entry whenever someone deploys a virtual machine. I am not a big fan of them and I want to know who is using VM’s to get a conversation going about how to move them to PaaS or serverless offerings.

Create a policy

Let’s start by writing our policy. The policy as a whole will look like this:

{
    "type": "Microsoft.Authorization/policyDefinitions",
    "name": "audit-vms",
    "properties": {
        "displayName": "Audit every Virtul Machine",
        "description": "This policy audits any virtual machine that exists in the assigned scope.",
        "policyRule": {
            "if": {
                "field": "type",
                "equals": "Microsoft.Compute/virtualMachines"
            },
            "then": {
                "effect": "audit"
            }
        }
    }
}

Every policy has a property type, that always has to have the same value. If you are familiar with ARM templates, you might guess that this allows the policy as a whole to be inserted into an ARM template. And this is correct, you can deploy Azure Policies as part of a subscription level ARM template. Next to the type, a name is mandatory and can be chosen freely. The third property describes the policy itself. The displayName and description speak for themselves and can be freely chosen. For the policyRule there are numerous possible approaches, but let’s start with a simple condition under the if property that ensures that this policies effect only triggers when it encounters any resource with a type of Microsoft.Compute/virtualMachines. Again, this relates to the resourcetype also encountered in ARM templates and references a namespace provider. Finaly the effect that we then want to to trigger is only an audit of anything that matches the if expression.

This way we can view the compliance state of the resource this policy is assigned to and also see all events that violate this policy.

Create the policy

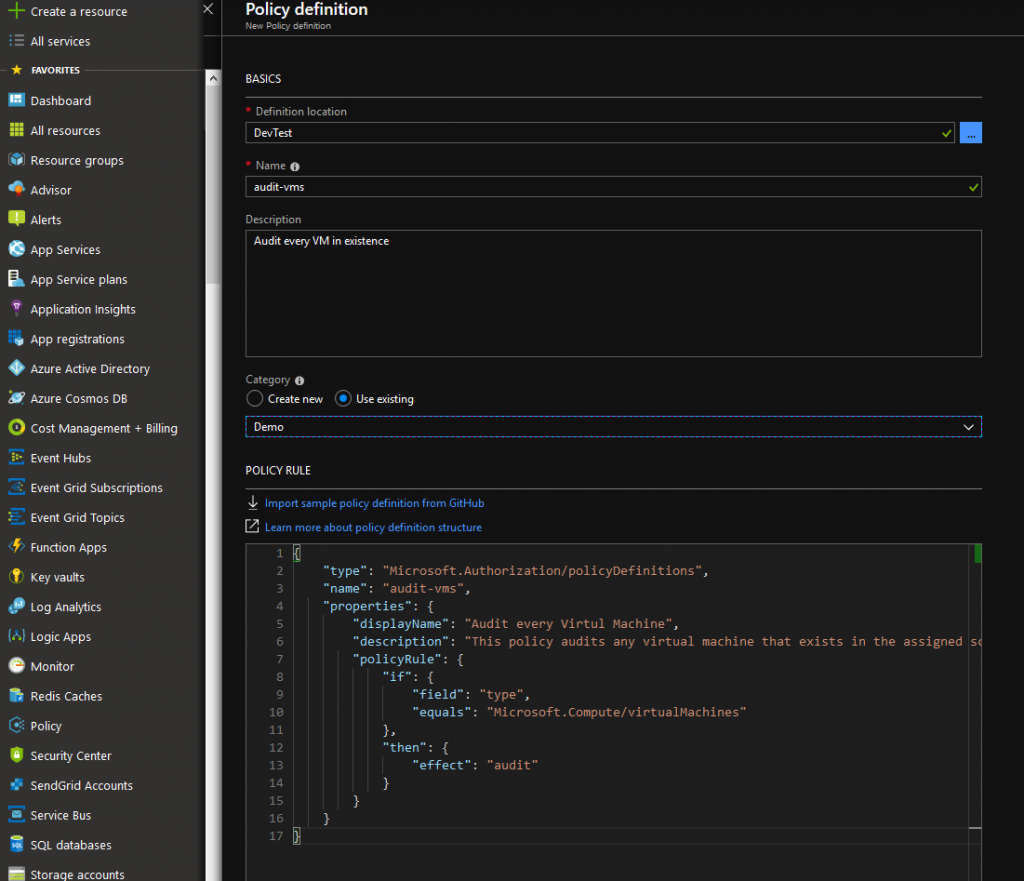
Before we can assign this policy to a subscription or resourcegroup, we have to define the policy itself. Let’s go to the portal and open up Azure Policy, then choose Definitions and finally new Policy Definition:

This opens up a new screen, that we fill in as shown here:

Finally, clicking Save at the bottom of the page, registers the policy in the subscription at the top and makes it ready for use.

Assign the policy

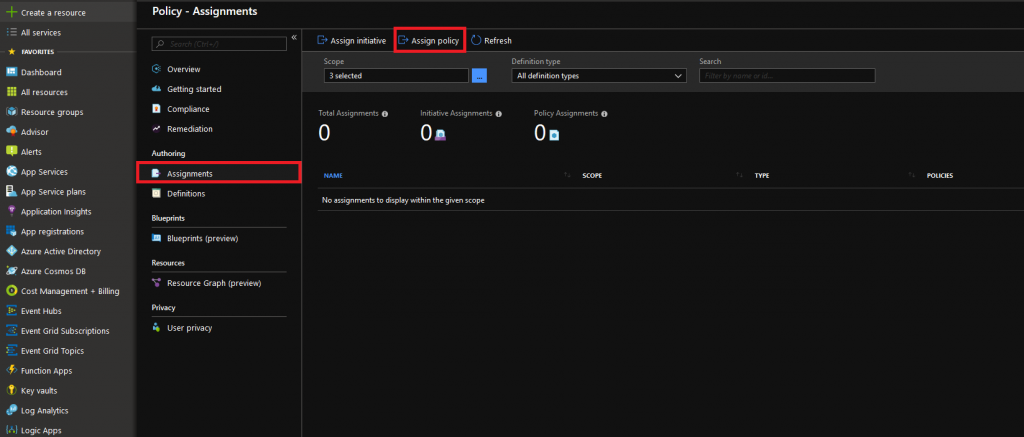
Now let’s assign this policy to a scope (a subscription or a specific resourcegroup) that it should apply to. Again we open up Azure Policy and then go to the Assignments tab, where we click Assign Policy:

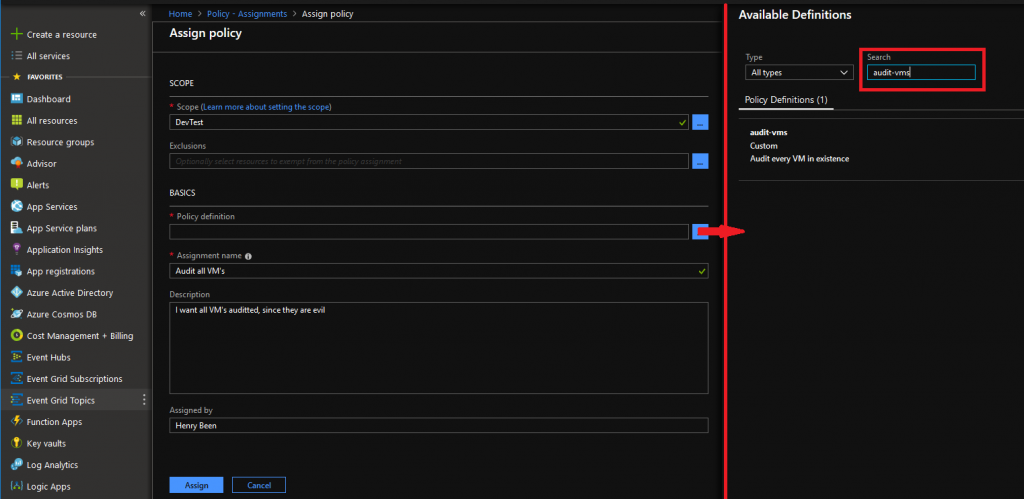
This opens up a new view:

In this view we must select the scope, including any exclusions if we want those. (Why would you?) Then you can select the Policy to apply, which you can search by name as I did or find in the category Custom left of the search box. After selecting the Policy an assignment name is mandatory and a description is optional. Filling these with a rationale for your policy will decrease the chance that others will simply remove it. Hit assign and put Azure to work on your policy assignment.

Inspect the results

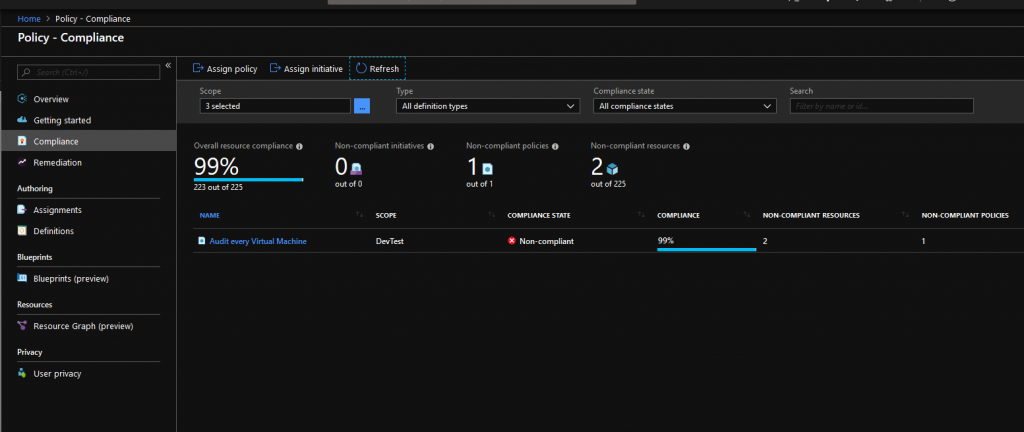
After first assigning our policy, it’s compliance state will be set to Not started, this means that your policy has not been applied to existing resources yet. It will however be evaluated for every new resource that is deployed. Now after a while the compliance state of my policy changed from Not started to Non-compliant, indicating there were one or more resources violating the policy.

This screenshot is taken from the Compliance overview tab, listing all my policies and whether my resources are compliant or not. Clicking on one of the policies, shows the list of resources not meeting the policy:

Here it shows both a VM that existed before this policy was assigned (hbbuild001) and a VM that was created after assigning the policy (sadf…).

Using this overview and the option to drill down to violating resources, it is easy to inspect on what is happening accros your subscriptions and get conversations going when things are happening that are not ideal.

Get notified on a violation

However, visiting these screens regularly to keep tabs on what is happening is probably not feasible in any real organization. It would be far better, if you were notified of any violation of a policy automatically. Luckily, this is possible as well. If you were to click on Events in the previous screenshot, this view will open:

Here you can see all the events surrounding this Policy: it’s creation, but also every violation. Opening up the details from this violation allow you to use this event as a blueprint for creating alerts for any other new violation.

For more

If you are looking for more things to do with Azure Policy, check out the links below. Also, I hope to write another blog on Azure Policy to show how to block or automatically fix deployments that violate your policies.

Resources:

In an earlier post on provisioning a Let’s encrypt SSL certificate to a Web App, I touched upon the subject of creating an RBAC Role Assignment using an ARM template. In that post I said that I wasn’t able to provision an Role Assignment to a just single resource (opposed to a whole Resourcegroup.) This week I found out that this was due to an error on my side. The template for provisioning an Authorizaton Rule for just a single resource, differs from that for provisioning a Rule for a whole Resourcegroup.

Here the correct JSON for provisioning an Role Assignment to a single resource:

    {
      "type": "Microsoft.Web/sites/providers/roleAssignments",
      "apiVersion": "2015-07-01",
      "name": "[concat(parameters('appServiceName'), '/Microsoft.Authorization/', parameters('appServiceContributerRoleGuid'))]",
      "dependsOn": [
        "[resourceId('Microsoft.Web/Sites', parameters('appServiceName'))]"
      ],
      "properties": {
        "roleDefinitionId": "[concat('/subscriptions/', subscription().subscriptionId, '/providers/Microsoft.Authorization/roleDefinitions/', 'b24988ac-6180-42a0-ab88-20f7382dd24c')]",
        "principalId": "[parameters('appServiceContributorObjectId')]"
      }
    },

As Ohad correctly points out in the comments the appServiceContributerRoleGuid, should be a unique Guid generated by you. It does not refer back to a Guid of any predefined role.

In contrast, below find the JSON for provisioning an Authorizaton Rule for a Resourcegroup as a whole. To provision a roleAssignment for a single resource, we do not need to set a more specific scope, but completely leave it out. Instead the roleAssignment has to be nested within the resource it applies to. This is visible when comparing the type, name and scope properties of both definitions.

    {
      "type": "Microsoft.Authorization/roleAssignments",
      "apiVersion": "2015-07-01",
      "name": "[parameters('appServiceContributerRoleName')]",
      "dependsOn": [
        "[resourceId('Microsoft.Web/Sites', parameters('appServiceName'))]"
      ],
      "properties": {
        "roleDefinitionId": "[concat('/subscriptions/', subscription().subscriptionId, '/providers/Microsoft.Authorization/roleDefinitions/', 'b24988ac-6180-42a0-ab88-20f7382dd24c')]",
        "principalId": "[parameters('appServiceContributorObjectId')]",
        "scope": "[concat(subscription().id, '/resourceGroups/', resourceGroup().name)]"
      }
    }

Today and last Friday I had the opportunity to get one of my favorite, but older topics, out on a beamer again: building database per tenant architectures with one example spanning over 60.000 databases! I was lucky to be invited to both CloudBrew 2018 (Mechelen, Belgium) and CloudCamp Ireland 18 (Dublin) to give this crazy presentation. Since then I have received multiple requests to share my slides, which I did on Slideshare: https://www.slideshare.net/HenryBeen/cloud-brew-cloudcamp

A good number of slides were adapted from the Microsoft WingTips repository, that you can find here: https://github.com/Microsoft/WingtipTicketsSaaS-DbPerTenant

If you attended and want to further discuss the topic, feel free to reach out to me!

If you have been reading my previous two posts (part I & part II) on this subject, you might have noticed that neither solution I presented is perfect. Both solutions still suffer from storing secrets for local development in source control. Also combining configuration from multiple sources, can be be difficult. Luckily, in the newest versions of the .NET Framework and .NET Core there is a solution available that allows you to store your local development secrets outside of source control: user secrets.

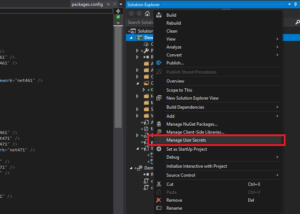
User secrets are contained in a JSON file that is stored in your user profile and which contents can be applied to your runtime App Settings. Adding user secrets to you project is done by rightclicking on the project and selecting manage user secrets:

The first time you do this, an unique GUID is generated for the project which links this specific project to an unique file in your users folder. After this, the file is automatically opened up for editting. Here you can provide overrides for app settings:

When starting the project now, these user secrets are loaded using config builders and available as AppSettings. So let’s take a closer look at these config builders.

Config builders

Config builders are new in .NET Framework 4.7.1 and .NET Core 2.0 and allow for pulling settings from one ore more other sources than just your app.config. Config builders support a number of different sources like user secrets, environment variables and Azure Key Vault (full list on MSDN). Even better: you can create your own config builder, to pull in configuration from your own configuration management system / keychain

The way config builders are used, differs between .NET Core and the Full Framework. In this example, I will be using the full framework. In the full framework config builders are added to your app.settings file. If you have added user secrets to your project, you will find an UserSecretsConfigBuilder in your Web.config already:


  ..
  

Important: If you add or edit this configuration by hand, do make sure that the configBuilders section is BEFORE the appSettings section.

Config builders and Azure KeyVault

Now let’s make this more realistic. When running locally, user secrets are fine. However, when running in Azure we want to use our Key Vault in combination with Manged Identity again. The full example is on GitHub and as in my previous posts, this example is based on first deploying an ARM template to set up the required infrastructure. With this in place, we can have our application read secrets from KeyVault on startup automatically.

Important: Your managed identity will need both list and get access to your Key vault. If not, you will get hard to debug errors.

As a first step, we have to install the config builder for Key Vault by adding the NuGET package Microsoft.Configuration.ConfigurationBuilders.Azure. After that, add an Web.config transformation for the Release configuration as follow:


Now we just have to deploy and enjoy the result:

Happy coding!

In my previous post (secret management part 1: using azurekey vault and azure managed identity) I showed an example of storing secrets (keys, passwords or certificates) in an Azure Key Vault and how to retrieve them securely. Now, this approach has one downside and that is this indirection via the Key Vault.

In the previous implementation, service X creates an key to access it and we store it in the Key Vault. After that, service Y that needs the key, authenticates to the Azure Active Directory to access the Key Vault, retrieve the secret and use it to access service X. Why can’t we just access service X, after authenticating to the Azure Active Directory, as shown below?

In this approach we completely removed the need for Azure Key Vault, reducing the amount of hassle. Another benefit is that we are no longer creating extra secrets, which means we can also not loose them. Just another security benefit. Now let’s build an example and see how this works.

Infrastructure

Again we start by creating an ARM Template to deploy our infrastructure. This time we are using a feature of the Azure SQL DB Server to have an AAD identity be appointed as an administrator on that server, in the following snippet.

{
  "type": "administrators",
  "name": "activeDirectory",
  "apiVersion": "2014-04-01-preview",
  "location": "[resourceGroup().location]",
  "properties": {
    "login": "MandatorySettingValueHasNoFunctionalImpact", 
    "administratorType": "ActiveDirectory",
    "sid": "[reference(concat(resourceId('Microsoft.Web/sites', parameters('appServiceName')),'/providers/Microsoft.ManagedIdentity/Identities/default'), '2015-08-31-preview').principalId]",
    "tenantId": "[subscription().tenantid]"
  },
  "dependsOn": [
    "[concat('Microsoft.Sql/servers/', parameters('sqlServerName'))]"
  ]
}

We are using the same approach as earlier, but now to set the objectId for the AAD admin of the Azure SQL DB Server. One thing that is also important is that the property for ‘login’ is just a placeholder of the principals name. Since we do not know it, we can set it to anything we want. If we would ever change the user through the portal (which we shouldn’t), this property will reflect the actual username.

Again, the full template can be found on GitHub.

Code

With the infrastructure in place, let’s write some passwordless code to have our App Service access the created Azure SQL DB:

if (isManagedIdentity)
{
  var azureServiceTokenProvider = new AzureServiceTokenProvider();
  var accessToken = await azureServiceTokenProvider.GetAccessTokenAsync("https://database.windows.net/");

  var builder = new SqlConnectionStringBuilder
  {
    DataSource = ConfigurationManager.AppSettings["databaseServerName"] + ".database.windows.net",
    InitialCatalog = ConfigurationManager.AppSettings["databaseName"],
    ConnectTimeout = 30
  };

  if (accessToken == null)
  {
    ViewBag.Secret = "Failed to acuire the token to the database.";
  }
  else
  {
    using (var connection = new SqlConnection(builder.ConnectionString))
    {
      connection.AccessToken = accessToken;
      connection.Open();

      ViewBag.Secret = "Connected to the database!";
    }
  }
}

First we request a token and specify a specific resource “https://database.windows.net/” as the type of resource we want to use the token for. Next we start building a connection string, just as we would do normally. However, we leave out anything related to authentication. Next (and this is only available in .NET Framework 4.6.1 or higher), just before opening the SQL Connection we set the acquired token on the connection object. From there on, we can again work normally as ever before.

Again, it’s that simple! The code is, yet again available on GitHub.

Supported services

Unfortunately, you can not use this approach for every service you will want to call and are dependent on the service supporting this approach. A full list of services that support token based application authentication are listed on MSDN. Also, you can support this way of authentication on your own services. Especially when you are moving to a microservices architecture, this can save you a lot of work and management of secrets.

Last week I received a follow-up question from a fellow developer about a presentation I did regarding Azure Key Vault and Azure Managed Identity. In this presentation I claimed, and quickly showed, how you can use these two offerings to store all the passwords, keys and certificates you need for your ASP.NET application in a secure storage (the Key Vault) and also avoid the problem of just getting another, new password to access that Key Vault.

I have written a small ASP.NET application that reads just one very secure secret from an Azure Key Vault and displays it on the screen. Let’s dive into the infrastructure and code to make this work!

Infrastructure

Whenever we want our code to run in Azure, we need to have some infrastructure it runs on. For a web application, your infrastructure will often contain an Azure App Service Plan and an Azure App Service. We are going to create these using an ARM template. We use the same ARM template to also create the Key Vault and provide an identity to our App Service. The ARM template that delivers these components can be found on GitHub. Deploying this template, would result in the following:

The Azure subscription you are deploying this infrastructure to, is backed by an Azure Active Directory. This directory is the basis for all identity & access management within the subscription. This relation also links the Key  Vault to that same AAD. This relation allows us to create access policies on the Key Vault that describe what operations (if any) any user in that directory can perform on the Key Vault.

Applications can also be registered in an AAD and we can thus give them access to the Key Vault. However, how would an application authenticate itself to the AAD? This is where Managed Identity comes in. Managed Identity will create an service principal (application) in that same Active Directory that is backing the subscription. At runtime your Azure App Service will be provided with environment variables that allow you to authenticate without the use of passwords.

For more information about ARM templates, see the information on MSDN. However there are two important parts of my template that I want to share. First the part that enables the Managed Identity on the App Service:

{
  "name": "[parameters('appServiceName')]",
  "type": "Microsoft.Web/sites",
  …,
  "identity": {
    "type": "SystemAssigned"
  }
}

Secondly, we have to give this identity, that is yet to be created, access to the Key Vault. We do this by specifying an access policy on the KeyVault. Be sure to declare a ‘DependsOn’ the App Service, so you will only reference the identity after it is created:

{
  "type": "Microsoft.KeyVault/vaults",
  "name": "[parameters('keyVaultName')]",
  …,
  "properties": {
    "enabledForTemplateDeployment": false,
    "tenantId": "[subscription().tenantId]",
    "accessPolicies": [
       {
        "tenantId": "[subscription().tenantId]",
        "objectId": "[reference(concat(resourceId('Microsoft.Web/sites', parameters('appServiceName')),'/providers/Microsoft.ManagedIdentity/Identities/default'), '2015-08-31-preview').principalId]",
        "permissions": {
          "secrets": [ "get" ]
        }
      }
    ]
  }
}

Here I am using some magic (that I just copy/pasted from MSDN) to refer back to my earlier deployed app service managed identity and retrieve the principalId and use that to create an access policy for that identity.

That is all, so let’s deploy the templates. Normally you would set up continuous deployment using Azure Pipelines, but for this quick demo I used Powershell:

Login-AzureRmAccount
Select-AzureRmSubscription -SubscriptionId " xxxxxxxx-xxxx-xxxx-xxxx-xxxxxxxxxxx"
New-AzureRmResourceGroup "keyvault-managedidentity" -Location "West-Europe"
New-AzureRmResourceGroupDeployment -TemplateFile .\keyvault-managedidentity.json -TemplateParameterFile .\keyvault-managedidentity.parameters.json -ResourceGroupName keyvault-managedidentity

Now with the infrastructure in place, let’s add the password that we want to protect to the Key Vault. There are many, many ways to do this but let’s use Powershell again:

$password = Read-Host 'What is your password?' -AsSecureString
Set-AzureKeyVaultSecret -VaultName demo4847 -Name password -SecretValue $password

Do not be alarmed if you get an access denied error. This is most likely because you still have to give yourself access to the Key Vault. By default no-one has access, not even the subscription owners. Let’s fix that with the following command:

Set-AzureRmKeyVaultAccessPolicy -ResourceGroupName "keyvault-managedidentity" -VaultName demo4847 -ObjectId xxxxxxxx-xxxx-xxxx-xxxx-xxxxxxxxxxxx -PermissionsToSecrets list,get,set

Code

With the infrastructure in place, let’s write the application that access this secret. I have created a simple, ASP.NET MVC application and edited the Home view to contain the following main body. Again the code is also on GitHub:

A secret

@if (ViewBag.IsManagedIdentity) {

Got a secret, can you keep it? (...) If I show you then I know you won't tell what I said: @ViewBag.Secret

} else {

Running locally, so no secret to tell }

Now to supply the requested values, I have added the following code to the HomeController:

public async Task Index()
  var isManagedIdentity = Environment.GetEnvironmentVariable("MSI_ENDPOINT") != null
    && Environment.GetEnvironmentVariable("MSI_SECRET") != null;

  ViewBag.IsManagedIdentity = isManagedIdentity;

  if (isManagedIdentity)
  {
    var azureServiceTokenProvider = new AzureServiceTokenProvider();
    var keyVaultClient = new KeyVaultClient(new KeyVaultClient.AuthenticationCallback(azureServiceTokenProvider.KeyVaultTokenCallback));
    var secret = await keyVaultClient.GetSecretAsync("https://demo4847.vault.azure.net/secrets/password");

    ViewBag.Secret = secret.Value;
  }

  return View();
}

First I check if we are running in an Azure App Service with Managed Identity enabled. This looks a bit hacky, but it is actually the recommended approach. Next, if running as an MI, I use the AzureSErviceTokenProvider (NuGet package: Microsoft.Azure.Services.AppAuthentication) to retrieve an AAD token. In turn I use that token to instantiate an KeyVaultClient (NuGet package: Microsoft.Azure.KeyVault) and use it to retrieve the secret.

That’s it!

Want to know more?

I hope to write two more blogs on this subject soon. One about using system to system authentication and authorization and not storing extra secrets into KeyVault and one about Config Builders, a new development for .NET Core 2.0 and .NET Framework 4.71 or higher.

Over the last weeks I’ve been working with a customer who is migrating to VSTS for building and releasing desktop applications. For years they had been compiling their applications, signing their binaries and creating their setups on a dedicated machine using custom batch scripts that ran on MSBuild post-build only on that specific machine. After this, they copied the resulting installer to a FTP server for download by their customers. Moving to VSTS meant that their packaging process needed to be revisited.

In this blog I will share a proof of concept that I did for them using VSTS, SignTool.exe and InnoSetup for building and releasing an installer. I wanted to proof that we could, securely, store all the code and configuration we needed in source control and configure VSTS build & release to create an setup file using InnoSetup and distribute that to our users using Azure Blob Storage.

Creating the application

Let’s start by creating a simple console application. After creation, I moved in this mighty code:

var obj = new
{
	Message = "This is a very complicated Console application with a dependency on Newtonsoft.Json"
};

var json = JsonConvert.SerializeObject(obj);

Console.WriteLine(json);
Console.WriteLine("Press any key to exit...");
Console.ReadKey();

Next to this source code in Program.cs, I also added two more files: cert.pfx and setup.iss. The first is the certificate that I want to use for signing my executable. This file should be encrypted using a password and a decent algorithm (see here for a discussion of how to check that) so that we can safely store it in source control and reuse it later on. The second file is the configuration that we will use later on to create a Windows Setup that can install my application on the computer of a customer.

Setting up the build

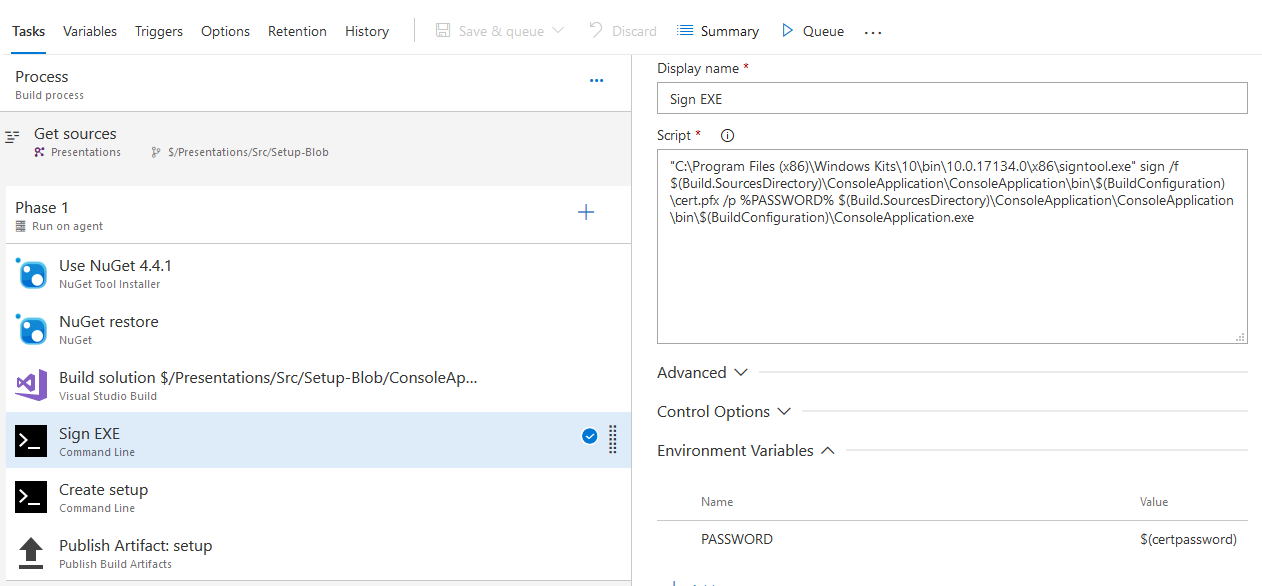
After this, I created a VSTS build. After creating a default .NET Desktop build, I added two more tasks of type Command Line. The first task for signing my executable, the second for creating the setup.

The actual commands I am using are:

  1. For signing the exe: “C:\Program Files (x86)\Windows Kits\10\bin\10.0.17134.0\x86\signtool.exe” sign /f $(Build.SourcesDirectory)\ConsoleApplication\ConsoleApplication\bin\$(BuildConfiguration)\cert.pfx /p %PASSWORD% $(Build.SourcesDirectory)\ConsoleApplication\ConsoleApplication\bin\$(BuildConfiguration)\ConsoleApplication.exe
  2. For creating the setup: “c:\Program Files (x86)\Inno Setup 5\ISCC.exe” $(Build.SourcesDirectory)\ConsoleApplication\ConsoleApplication\bin\$(BuildConfiguration)\setup.iss

This requires that that I configure the first execution with an environment variable with name PASSWORD (lower right of the screenshot above), which I in turn retrieve from the variables of this build. This is the password that is used to access cert.pfx to perform the actual signing. This build variable is of the type secret and can thus not be retrieved from VSTS and will not be displayed in any log file. The second task of course requires InnoSetup to be installed on the build server.

Finally, instead of copying the normal build output I am publishing an build artifact containing only the setup that was build in the previous step.

Setting up the release

Having a setup file is of no use if we are not distributing it to our users. Now in this case, I need to support three types of users: testers from within my organisation, alpha users who receive a weekly build and all other users that should only receive stable builds. It is important to provide testers with the same executable (installer) that will be delivered to users later and not having a seperate delivery channel for them. At the same time, we do not want alpha users to get a version that is not tested yet or all users to receive a version that hasn’t been in alpha for a while yet. To accomodate this, I have created a release pipeline with three environments: test, alpha and production:

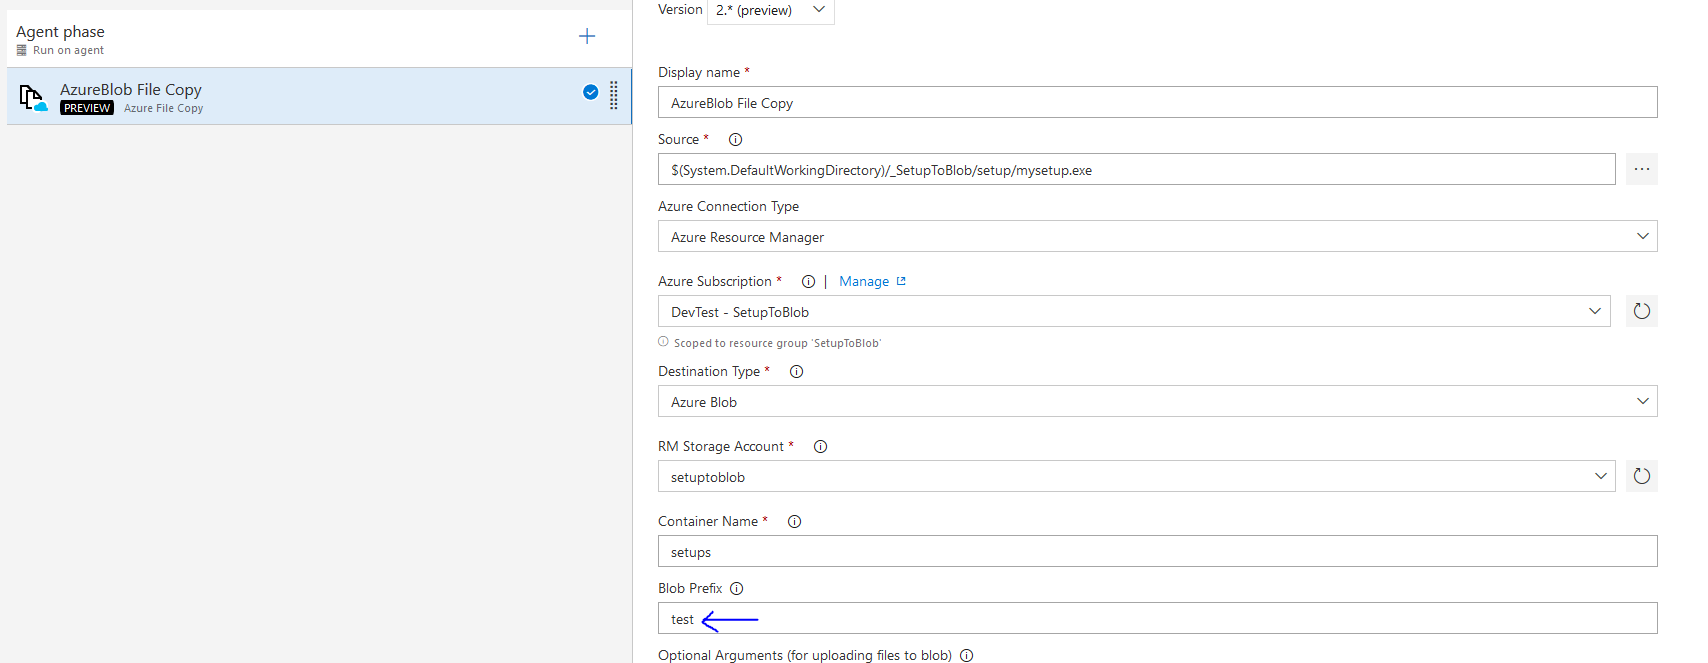
Every check-in will automatically trigger a build, which will automatically trigger a release to my test environment. After this, I manually have to approve a release to the alhpa group and from there on to all customers. We call this ring based deployments. While every release to an environment contains just one step, namely copy of the setup to Azure Blob Storage – the locations all differ, thus enabling us to deliver different versions of our software to different user groups:

All in all, it took me about an hour and a half to set this all up and proof that it was working. This shows how easy you can get going with continuous deployment of desktop applications.