I am a fan of private agents when working with Azure Pipelines, compared to the hosted Azure Pipelines Agents that are also available. In my experience the hosted agents can have a delay before they start and sometimes work slow in comparison with dedicated resources. Of course this is just an opinion. For this reason, I have been running my private agents on a virtual machine for years. Unfortunately, this solution is not perfect and has a big downside as well: no isolation between jobs.
No isolation between different jobs that are executed on the same agent means that all files left over from an earlier job, are available to any job currently running. It also means that it is possible to pollute NuGet caches, change files on the system, etc etc. And of course, running virtual machines in general is cumbersome due to patching, updates and all the operational risks and responsibilities.
So it was time to adopt one of the biggest revolutions in IT: containers. In this blog I will share how I created a Docker container image that hosts an Azure Pipelines agent and how to run a number of those images within Azure Container Instances. As a starting point I have taken the approach that Microsoft has laid down in its documentation, but I have made a number of tweaks and made my solution more complete. Doing so, I wanted to achieve the following:
- Have my container instances execute only a single job and then terminate and restart, ensuring nothing from a running job will become available to the next job.
- Have a flexible number of containers running that I can change frequently and with a single push on a button.
- Have a source code repository for my container image build, including a pipelines.yml that allows me to build and publish new container images on a weekly schedule.
- Have a pipeline that I can use to roll-out 1..n agents to Azure Container Instances – depending on the amount I need at that time.
- Do not have the PAT token that is needed for (de)registering agents available to anyone using the agent image.
- Automatically handle the registration of agents, as soon as a new container instance becomes available.
Besides the step-by-step instructions below I have also uploaded the complete working solution to GitHub at https://github.com/henrybeen/ContainerizedBuildAgents.
Let’s go!
Creating the container image
My journey started with reading the Microsoft documentation on creating a Windows container image with a Pipelines Agent. You can find this documentation at https://docs.microsoft.com/en-us/azure/devops/pipelines/agents/docker?view=azure-devops. I found two downsides to this approach for my use case. First, the PAT token that is used for (de)registering the agent during the complete lifetime of the container. This means that everyone executing jobs on that agent, can pick up the PAT token and abuse it. Secondly, the agent is downloaded and unpacked at runtime. This means that the actual agent is slow to spin up.
To work around these downsides I started with splitting the Microsoft provided script into two parts, starting with a file called Build.ps1 as shown below.
param (
    [Parameter(Mandatory=$true)]
    [string]
    $AZDO_URL,

    [Parameter(Mandatory=$true)]
    [string]
    $AZDO_TOKEN
)

if (-not $(Test-Path "agent.zip" -PathType Leaf))
{
    Write-Host "1. Determining matching Azure Pipelines agent..." -ForegroundColor Cyan

    $base64AuthInfo = [Convert]::ToBase64String([Text.Encoding]::ASCII.GetBytes(":$AZDO_TOKEN"))
    $package = Invoke-RestMethod -Headers @{Authorization=("Basic $base64AuthInfo")} "$AZDO_URL/_apis/distributedtask/packages/agent?platform=win-x64&`$top=1"
    $packageUrl = $package[0].Value.downloadUrl
    Write-Host "Package URL: $packageUrl"

    Write-Host "2. Downloading the Azure Pipelines agent..." -ForegroundColor Cyan

    $wc = New-Object System.Net.WebClient
    $wc.DownloadFile($packageUrl, "$(Get-Location)\agent.zip")
}
else {
    Write-Host "1-2. Skipping downloading the agent, found an agent.zip right here" -ForegroundColor Cyan
}

Write-Host "3. Unzipping the Azure Pipelines agent" -ForegroundColor Cyan
Expand-Archive -Path "agent.zip" -DestinationPath "agent"

Write-Host "4. Building the image" -ForegroundColor Cyan
docker build -t docker-windows-agent:latest .

Write-Host "5. Cleaning up" -ForegroundColor Cyan
Remove-Item "agent" -Recurse
The script downloads the latest agent, if agent.zip is not existing yet, and unzips that file. Once the agent is in place, the docker image is build using the call to docker build. Once completed, the unpacked agent.zip folder is removed – just to keep things tidy. This clean-up also allows for rerunning the script from the same directory multiple times without warnings or errors. A fast feedback loop is also the reason I test for the existence of agent.zip before downloading it.
The next file to create is the Dockerfile. The changes here are minimal. As you can see I also copy over the agent binaries, so I do not have to download these anymore when the container runs.
FROM mcr.microsoft.com/windows/servercore:ltsc2019

WORKDIR c:/azdo/work

WORKDIR c:/azdo/agent
COPY agent .

WORKDIR c:/azdo
COPY Start-Up.ps1 .

CMD powershell c:/azdo/Start-Up.ps1
First we ensure that the directory c:\azdo\work exists by setting it as the working directory. Next we move to the directory that will contain the agent files and copy those over. Finally, we move one directory up and copy the Start-Up script over. To run the container image, a call into that script is made. So, let’s explore Start-Up.ps1 next.
if (-not (Test-Path Env:AZDO_URL)) {
  Write-Error "error: missing AZDO_URL environment variable"
  exit 1
}

if (-not (Test-Path Env:AZDO_TOKEN)) {
  Write-Error "error: missing AZDO_TOKEN environment variable"
  exit 1
}

if (-not (Test-Path Env:AZDO_POOL)) {
  Write-Error "error: missing AZDO_POOL environment variable"
  exit 1
}

if (-not (Test-Path Env:AZDO_AGENT_NAME)) {
  Write-Error "error: missing AZDO_AGENT_NAMEenvironment variable"
  exit 1
}

$Env:VSO_AGENT_IGNORE = "AZDO_TOKEN"

Set-Location c:\azdo\agent

Write-Host "1. Configuring Azure Pipelines agent..." -ForegroundColor Cyan

.\config.cmd --unattended `
  --agent "${Env:AZDO_AGENT_NAME}" `
  --url "${Env:AZDO_URL}" `
  --auth PAT `
  --token "${Env:AZDO_TOKEN}" `
  --pool "${Env:AZDO_POOL}" `
  --work "c:\azdo\work" `
  --replace

Remove-Item Env:AZDO_TOKEN

Write-Host "2. Running Azure Pipelines agent..." -ForegroundColor Cyan

.\run.cmd --once
The script first checks for the existence of four, mandatory, environment variables. I will provide these later on from Azure Container Instances, where we are going to run the image. Since the PAT token is still in this environment variable, we are setting another variable that will ensure that this environment variable is not listed or exposed by the agent, even though we will unset it later on. From here on, the configuration of the agent is started with a series of command-line arguments that allow for a head-less registration of the agent with the correct agent pool.
It is good to know that I am using a non-random name on purpose. This allows me to re-use the same agent name -per Azure Container Instances instance- which prevents an ever increasing list of offline agents in my pool. This is also the reason I have to add the –replace argument. Omitting this would cause the registration to fail.
Finally, we run the agent, specifying the –once argument. This argument will make that the agent will pick-up only a single job and terminate once that job is complete. Since this is the final command in the PowerShell script, this will also terminate the script. And since this is the only CMD specified in the Dockerfile, this will also terminate the container.
This ensures that my container image will execute only one job ever, ensuring that the side-effects of any job cannot propagate to the next job.
Once these files exist, it is time to execute the following from the PowerShell command-line.
PS C:\src\docker-windows-agent> .\Build.ps1 -AZDO_URL https://dev.azure.com/**sorry**-AZDO_TOKEN **sorry**
1-2. Skipping downloading the agent, found an agent.zip right here
3. Unzipping the Azure Pipelines agent
4. Building the image
Sending build context to Docker daemon  542.8MB
Step 1/7 : FROM mcr.microsoft.com/windows/servercore:ltsc2019
 ---> 782a75e44953
Step 2/7 : WORKDIR c:/azdo/work
 ---> Using cache
 ---> 24bddc56cd65
Step 3/7 : WORKDIR c:/azdo/agent
 ---> Using cache
 ---> 03357f1f229b
Step 4/7 : COPY agent .
 ---> Using cache
 ---> 110cdaa0a167
Step 5/7 : WORKDIR c:/azdo
 ---> Using cache
 ---> 8d86d801c615
Step 6/7 : COPY Start-Up.ps1 .
 ---> Using cache
 ---> 96244870a14c
Step 7/7 : CMD powershell Start-Up.ps1
 ---> Running in f60c3a726def
Removing intermediate container f60c3a726def
 ---> bba29f908219
Successfully built bba29f908219
Successfully tagged docker-windows-agent:latest
5. Cleaning up
and…
docker run -e AZDO_URL=https://dev.azure.com/**sorry** -e AZDO_POOL=SelfWindows -e AZDO_TOKEN=**sorry** -e AZDO_AGENT_NAME=Agent007 -t docker-windows-agent:latest

1. Configuring Azure Pipelines agent...

  ___                      ______ _            _ _
 / _ \                     | ___ (_)          | (_)
/ /_\ \_____   _ _ __ ___  | |_/ /_ _ __   ___| |_ _ __   ___  ___
| | | |/ /| |_| | | |  __/ | |   | | |_) |  __/ | | | | |  __/\__ \
\_| |_/___|\__,_|_|  \___| \_|   |_| .__/ \___|_|_|_| |_|\___||___/
                                   | |
        agent v2.163.1             |_|          (commit 0a6d874)


>> Connect:

Connecting to server ...

>> Register Agent:

Scanning for tool capabilities.
Connecting to the server.
Successfully added the agent
Testing agent connection.
2019-12-29 09:45:39Z: Settings Saved.
2. Running Azure Pipelines agent...
Scanning for tool capabilities.
Connecting to the server.
2019-12-29 09:45:47Z: Listening for Jobs
2019-12-29 09:45:50Z: Running job: Agent job 1
2019-12-29 09:47:19Z: Job Agent job 1 completed with result: Success
This shows that the container image can be build and that running it allows me to execute jobs on the agent. Let’s move on to creating the infrastructure within Azure that is needed for running the images.
Creating the Azure container registry
As I usually do, I created a quick ARM templates for provisioning the Azure Container Registry. Below is the resource part.
{
    "name": "[variables('acrName')]",
    "type": "Microsoft.ContainerRegistry/registries",
    "apiVersion": "2017-10-01",
    "location": "[resourceGroup().location]",
    "sku": {
        "name": "Basic"
    },
    "properties": {
        "adminUserEnabled": true
    }
}
Creating a container registry is fairly straightforward, specifying a sku and enabling the creation of an administrative account is enough. Once this is done, we roll this template out to a resource group called Tools, tag the image against the new registry, authenticate and push the image.
PS C:\src\docker-windows-agent> New-AzureRmResourceGroupDeployment -ResourceGroupName Tools -TemplateFile .\acr.json -TemplateParameterFile .\acr.henry.json

DeploymentName          : acr
ResourceGroupName       : Tools
ProvisioningState       : Succeeded
Timestamp               : 29/12/2019 20:07:25
Mode                    : Incremental
TemplateLink            :
Parameters              :
                          Name             Type                       Value
                          ===============  =========================  ==========
                          discriminator    String                     hb

Outputs                 :
DeploymentDebugLogLevel :

PS C:\src\docker-windows-agent> az acr login --name hbazdoagentacr
Unable to get AAD authorization tokens with message: An error occurred: CONNECTIVITY_REFRESH_TOKEN_ERROR
Access to registry 'hbazdoagentacr.azurecr.io' was denied. Response code: 401. Please try running 'az login' again to refresh permissions.
Unable to get admin user credentials with message: The resource with name 'hbazdoagentacr' and type 'Microsoft.ContainerRegistry/registries' could not be found in subscription 'DevTest (a314c0b2-589c-4c47-a565-f34f64be939b)'.
Username: hbazdoagentacr
Password:
Login Succeeded

PS C:\src\docker-windows-agent> docker tag docker-windows-agent hbazdoagentacr.azurecr.io/docker-windows-agent

PS C:\src\docker-windows-agent> docker push hbazdoagentacr.azurecr.io/docker-windows-agent
The push refers to repository [hbazdoagentacr.azurecr.io/docker-windows-agent]
cb08be0defff: Pushed
1ed2626efafb: Pushed
f6c3f9abc3b8: Pushed
770769339f15: Pushed
8c014918cbca: Pushed
c57badbbe459: Pushed
963f095be1ff: Skipped foreign layer
c4d02418787d: Skipped foreign layer
latest: digest: sha256:7972be969ce98ee8c841acb31b5fbee423e1cd15787a90ada082b24942240da6 size: 2355
Now that all the scripts and templates are proven, let’s automate this through a pipeline. The following YAML is enough to build and publish the container.
trigger:
  branches:
    include:
      - master
  paths:
    include:
      - agent

pool:
  name: Azure Pipelines
  vmImage: windows-2019

workspace:
    clean: all

steps:
  - task: PowerShell@2
    displayName: 'PowerShell Script'
    inputs:
      targetType: filePath
      workingDirectory: agent
      filePath: ./agent/Build.ps1
      arguments: -AZDO_URL https://dev.azure.com/azurespecialist -AZDO_TOKEN $(AZDO_TOKEN)

  - task: Docker@2
    displayName: Build and push image to container registry
    inputs:
      command: buildAndPush
      containerRegistry: BuildAgentsAcr
      repository: docker-windows-agent
      Dockerfile: agent/Dockerfile
      tags: latest
      buildContext: agent
To make the above work, two more changes are needed:
- The Build.ps1 needs to be changed a bit, just remove steps 4 and 5
- A service connection to the ACR has to be made with the name BuildAgentsAcr
With the container image available in an ACR and a repeatable process to get updates out, it is time to create the Azure Container Instances that are going to run the image.
Creating the Azure container instance(s)
Again, I am using an ARM template for creating the Azure Container Instances.
{
    "copy": {
        "name": "acrCopy",
        "count": "[parameters('numberOfAgents')]"
    },
    "name": "[concat(variables('aciName'), copyIndex())]",
    "type": "Microsoft.ContainerInstance/containerGroups",
    "apiVersion": "2018-10-01",
    "location": "[resourceGroup().location]",
    "properties": {
        "imageRegistryCredentials": [{
            "server": "[reference(resourceId('Microsoft.ContainerRegistry/registries',variables('acrName'))).loginServer]",
            "username": "[listCredentials(resourceId('Microsoft.ContainerRegistry/registries',variables('acrName')),'2017-03-01').username]",
            "password": "[listCredentials(resourceId('Microsoft.ContainerRegistry/registries',variables('acrName')),'2017-03-01').passwords[0].value]"
        }],
        "osType": "Windows",
        "restartPolicy": "Always",
        "containers": [{
            "name": "[concat('agent-', copyIndex())]",
            "properties": {
                "image": "[parameters('containerImageName')]",
                "environmentVariables": [
                    {
                        "name": "AZDO_URL",
                        "value": "[parameters('azdoUrl')]"
                    },
                    {
                        "name": "AZDO_TOKEN",
                        "secureValue": "[parameters('azdoToken')]"
                    },
                    {
                        "name": "AZDO_POOL",
                        "value": "[parameters('azdoPool')]"
                    },
                    {
                        "name": "AZDO_AGENT_NAME",
                        "value": "[concat('agent-', copyIndex())]"
                    }
                ],
                "resources": {
                    "requests": {
                        "cpu": "[parameters('numberOfCpuCores')]",
                        "memoryInGB": "[parameters('numberOfMemoryGigabytes')]"
                    }
                }
            }
        }]
    }
}
At the start of the resource definition, we specify that we want multiple copies of this resource, not just one. The actual number of resources is specified using a template parameter. This construct allows us to specify the number of agents that we want to run in parallel in ACI instances every time this template is redeployed. If we combine this with a complete deployment mode, the result will be that agents in excess of that number get removed automatically as well. When providing the name of the ACI instance, we are concatenating the name with the outcome of the function copyIndex(). This function will return a integer, specifying in which iteration of the copy loop the template currently is. This way unique names for all the resources are being generated.
As with most modern resources, the container instance takes the default resource properties in the root object and contains another object called properties that contains all the resource specific configuration. Here we first have to specify the imageRegistryCredentials. These are the details needed to connect ACI to the ACR, for pulling the images. I am using ARM template syntax to automatically fetch and insert the values, without ever looking at them.
The next interesting property is the RestartPolicy. The value of Always instructs ACI to automatically restart my image whenever it completes running, no matter if that is from an error or successfully. This way, whenever the agent has run a single job and the container completes, it gets restarted within seconds.
In the second properties object, a reference to the container image, the environment variables and the container resources are specified. The values here should be self-explanatory, and of course the complete ARM template with all parameters and other plumbing is available on the GitHub repository.
With the ARM template done and ready to go, let’s create another pipeline – now using the following YAML.
trigger:
  branches:
    include:
      - master
  paths:
    include:
      - aci

pool:
  name: Azure Pipelines
  vmImage: windows-2019

workspace:
    clean: all

steps:
  - task: AzureResourceGroupDeployment@2
    displayName: 'Create or update ACI instances'
    inputs:
      azureSubscription: 'RG-BuildAgents'
      resourceGroupName: 'BuildAgents'
      location: 'West Europe'
      csmFile: 'aci/aci.json'
      csmParametersFile: 'aci/aci.henry.json'
      deploymentMode: Complete
      overrideParameters: '-azdoToken "$(AZDO_TOKEN)"'
Nothing new in here really. This pipeline just executes the ARM template against another Azure resource group. Running this pipeline succeeds and a few minutes later, I have the following ACI instances.
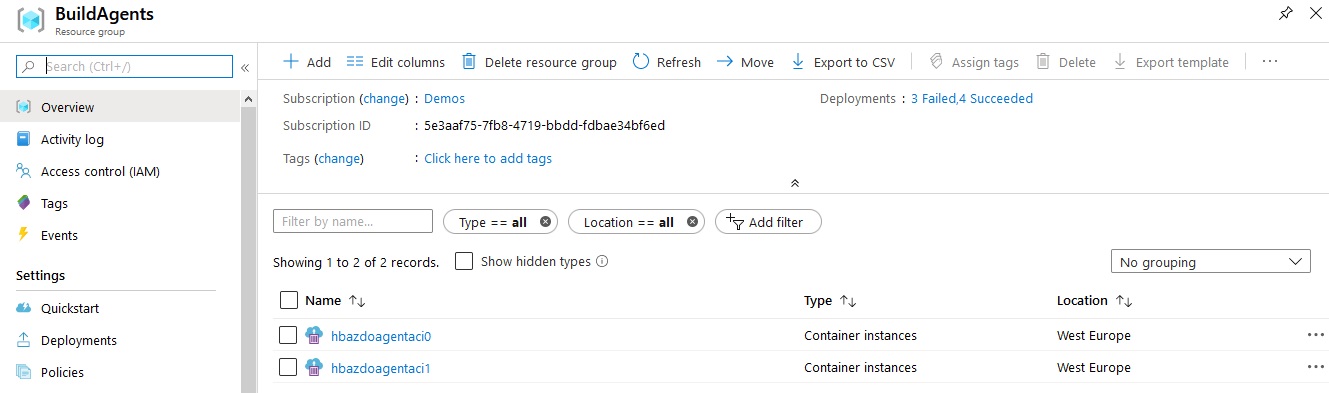
And that means I have following agents in my Pool.
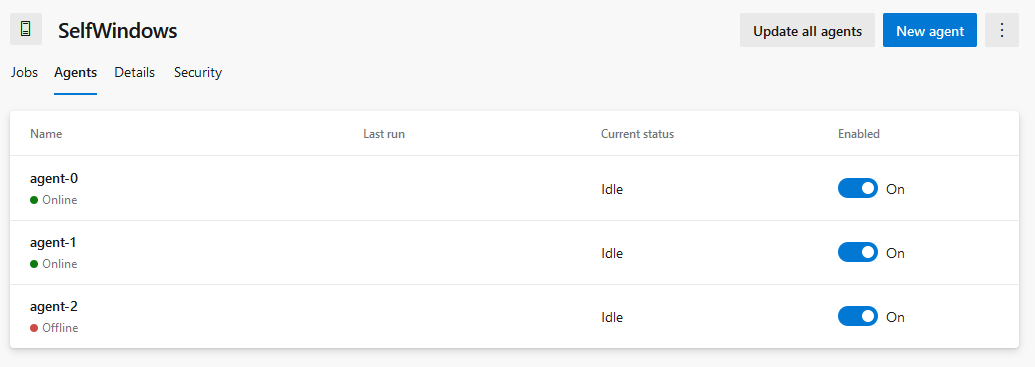
All-in-all: It works! Here you can see that when scaling the number of agents up or down, the names of the agents stay the same and that I will get a number of offline agents that is at most the number of agents to which I have scaled up at a certain point in time.
And with this, I have created a flexible, easy-to-scale, setup for running Azure Pipelines jobs in isolation, in containers!
Downsides
Of course, this solution is not perfect and a number of downsides remain. I have found the following:
- More work
- No caching
More work. The largest drawback that I have found with this approach is that it is more work to set up. Creating a virtual machine that hosts one or more private agents can be done in a few hours, while the above has taken me well over a day to figure out (granted, I was new to containers).
No caching. So slower again. With every job running in isolation, many of the caching benefits that come with using a private agent in a virtual machine are gone again. Now these can be overcome by building a more elaborate image, including more of the different SDK’s and tools by default – but still, complete sources have to be downloaded every time and there will be no intermediate results being cached for free.
If you find more downsides, have identified a flaw, or like this approach, please do let me know!
But still, this approach works for me and I will continue to use it for a while. Also, I have learned a thing or two about working with containers, yay!
This is really useful article, thanks for sharing your work.
I am looking at a self-hosted solution for agents, with a main requirement of achieving isolation between pipeline jobs, which this container approach meets nicely. One drawback though is that developers will not be able to use docker to use custom tooling in their pipelines, which is a problem in my context as the number of teams in the organisation is quite large and their work is varied.
Another approach I am investigating is to somehow use VMs; I like the fact that Microsoft has shared the build process it uses to build the VM images it uses for their hosted agents (https://github.com/microsoft/azure-pipelines-image-generation/blob/master/help/CreateImageAndAzureResources.md). A VM based approach obviously allows the use of docker, and the fact self-hosted and hosted agents are identical is nice. The challenge is how to achieve transient VM instances, one per job, that is affordable and has minimal delays waiting for new agents.
Any insights welcome.
Thanks again for sharing.
So Microsoft have just released the exact feature I have been looking for:
Self-hosted Scale Set agents:
https://docs.microsoft.com/en-us/azure/devops/pipelines/agents/scale-set-agents?view=azure-devops
This allows you to have an Azure scale set of VMs, that integrates tightly into Azure DevOps, and supports pipeline job isolation by recycling a VM once a job has finished.
Hi Trevor,
Thank you for the kind words. Unfortunately I have very limited experience with virtual machines on Azure (or in general).
But thinking out loud, might scale set agents not be what you need? https://docs.microsoft.com/en-us/azure/devops/pipelines/agents/scale-set-agents?view=azure-devops
How does the agent deregister, does it not need the PAT anymore? Since you removed it after registering.
That’s a good question, as the answer is that it doesn’t. In my situation this wasn’t a problem because of two reasons:
1. When an agent completes its job and the container exits and a new instance is booted, the name of the new agent is the same as the name of the agent that just went down. That means that the new agent will register itself under the same name as the agent that just went offline, essentially overwriting it. This way, I don’t get an ever-growing list of offline agents.
2. Now, some agents may exit and not come online again, when you scale the number of agents down. But for me, that’s wanted behavior as it would now show only the agents that were running (but not anymore) as offline. This makes visible how the scaling is going and it makes that you can still find agent details for a job that has run in the past.