In response to my post on tracking bugs using Azure DevOps, I got a question about tracking different types of bugs. As the question was in writing, I’m going to answer it here to -hopefully- help explain my view on tracking bugs in more detail.

Question (slightly edited)

I see a difference between three types of bugs:

  1. Bugs that are discovered when testing a user-story.
  2. Bugs that are discovered when testing a user-story, but are very important (for example an unexpected app shutdown).
  3. Bugs in production that are related to an epic closed a long time ago.

In the first case I would create a new task to deal with the problem encountered. In the second case I would then add an Impediment object to the sprint backlog. And finally, in the third case, I would create an actual bug and track it on the backlog. Now we are organizing our user stories in features and our features in epics. So.., where in this hierarchy should I place this bug? Should I create an epic called “Bugs” with the feature “Bugs” under it, and then add the bug under that feature?

Answer

How to track bugs that are not part of the in-progress work is a question I have encountered at different clients. To answer it, I think we must further differentiate between two groups of bugs that make up this third category:

  1. Bugs in production that we are tracking in a bug-tracking capacity. F.e. to allow customers to vote on them, publish workarounds, etc. Some of these bugs might be part of the product for years, but haven’t been fixed and will probably never be fixed.
  2. Bugs in production that we are tracking because we want to work on them. F.e. bugs that we want to fix in the next sprint or ‘somewhere this quarter.’

If you already have a system for tracking this first category, you probably don’t want to duplicate all the bugs from there into Azure DevOps. But, if you haven’t such a system, it makes sense to track these bugs in Azure DevOps instead and yes, I would then all add them under a feature ‘Known Bugs,’ under an epic ‘Known Bugs.’ But again, if you are using a CRM, GitHub issues or bug-tracking software for recording and detailing bugs, it doesn’t really make sense to me to duplicate all these bugs into Azure DevOps.

The second category is different, these bugs I would duplicate to Azure DevOps (or even better, link to that bug from within Azure DevOps to avoid spreading information related to the bug over two systems.) So how to link these to features and epics? For me it is important that epics and features are ‘done’ at some point, so a general epic or feature ‘bugs to fix’ doesn’t really make sense to me. Instead I would propose to create features like this: ‘Bugs Sprint 101,’ ‘Bugs Sprint 102,’ etc etc, and plan these features for the mentioned sprint. We then connect the bugs we duplicate from the bug-tracker, to the feature, and we are suddenly in planning mode. These features I would then group under features called ‘LCM 2022Q3,’ ‘LCM 2022Q4,’ etc etc. This provides a good overview of which bugs we will be fixing when. Yet, I wouldn’t plan more than 1 or 2 sprints ahead myself.

The added benefit of this system is that it allows you to plan other life cycle management (LCM) work as well. Let’s say you are facing an upgrade to .NET6, the latest version of Angular, or you need to remove a dependency on a duplicated library in 8 projects. As fixing right away is not always possible, you know have the epics in place to plan your LCM work ahead as well.

PS

Tracking a bug that introduces a critical regression as an impediment instead of a bug (the second case) is something that can be debated. Personally, I don’t think I see the difference between the first and second type of bug. However, this may vary from context to context. I would be curious to learn when this would make sense.

When you are using Azure DevOps for tracking work items like features, user stories, and tasks, you probably want to track bugs in that same system. And of course, this is possible with the correct configuration.

Within Azure DevOps, the work item types (epic, feature, user stories, tasks, etc) that are available, is controlled by the work item process you choose for your project. Secondly, once you have chosen a work item process that supports tracking bugs, you have to configure how you want to track bugs: as a backlog item, or as a task. But before we get to that, let’s explore choosing a work item process.

Choosing a work item process

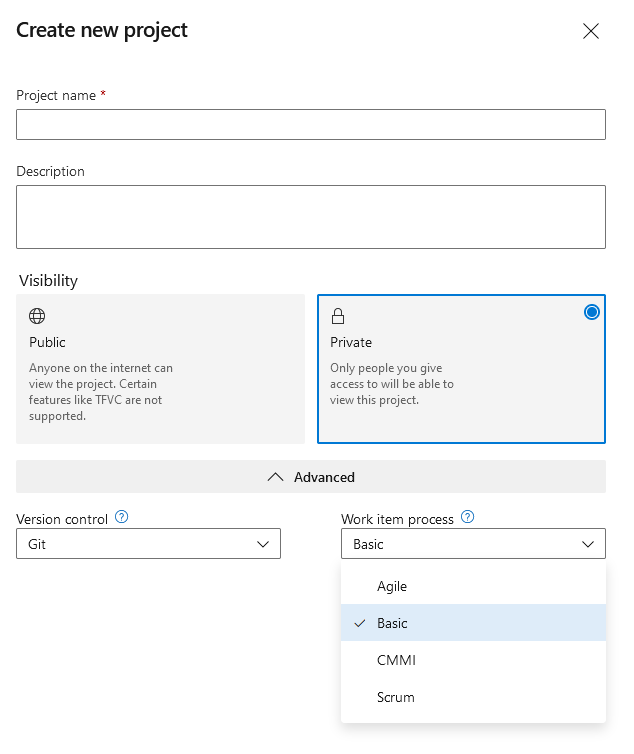
The work item process is selected when you create the Project, and cannot be changed afterward. Selecting a different work item process is available under the Advanced options when creating a project:

Each work item process has different types of work items available, which are all listed here. To track bugs on your backlog, you will have to choose the Agile, CMMI, or Scrum process. My personal favorite is the Agile process, as I prefer the term ‘User Story’ over Product Backlog Item or Requirement. It also has the benefit over the Basic process of having two levels of grouping for user stories: both epics and features.

For the remainder of my examples, I have selected the Agile process.

Choosing how to track bugs

Once you have selected a work item process that allows for tracking bugs, you can decide how to track bugs. There are three options available:

  • Tracking bugs as user stories. This allows you to create bugs on the backlog, where they behave just like user stories: you can group them under a feature, order them for priority and move them to the sprint backlog when you are ready to begin work on them. Once in the sprint backlog, you can add one or more tasks below the bug, tracking progress towards resolving it;
  • Tracking bugs as a task. This allows you to create bugs as a child to a user story. You cannot track bugs on the product backlog directly, cannot group them under a feature, and cannot add them to a sprint directly. Instead, within every user story on the backlog, you can add one or more bugs
  • Not tracking bugs, effectively disabling the ‘bug’ work item type. It is beyond me why you would want to do this. If you don’t want to use the bug work item type, then just don’t.

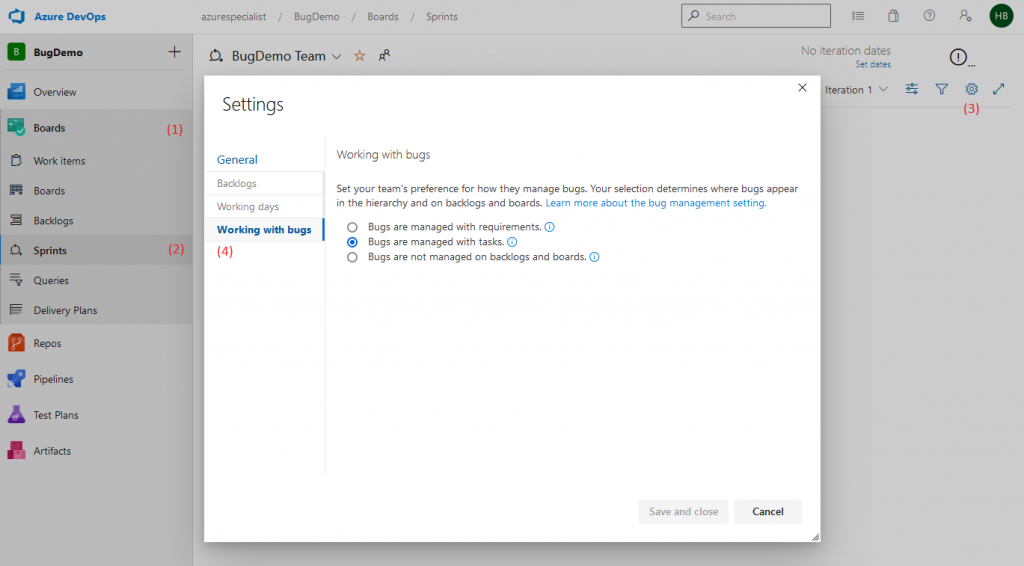
Here you can see how to choose between the three options:

To get here, first, navigate to your sprint board or product backlog. Next, click the cogwheel icon at the top right. In the pop-up that opens, select ‘Working with bugs,’ to find the option you are looking for.

But which option to choose? Let’s explore the first two alternatives in a bit more detail to help you decide which to use.

Tracking bugs as user stories

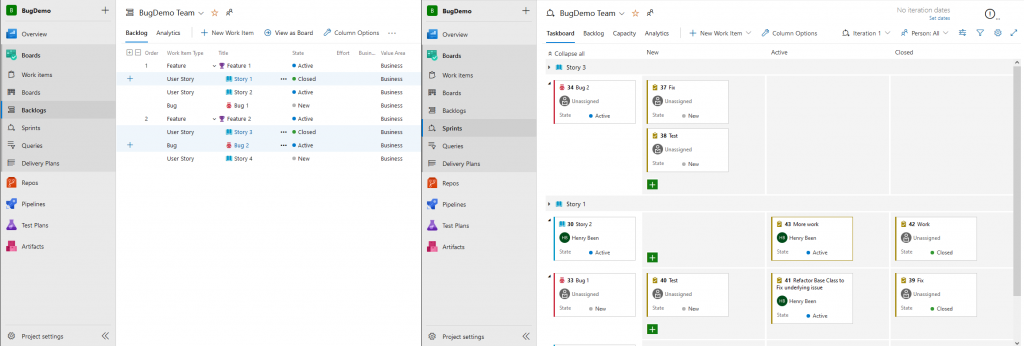
When you are tracking bugs as user stories, they appear on the product backlog, along with the user stories, you see this below, on the left. They are nestable below features and you can prioritize them against other work within the feature. On the right, you see the same stories and tasks in the sprint backlog. Here both appear on the left and you can add tasks to bot the stories and the bugs, to work towards completing the work.

Tracking bugs as tasks

When tracking bugs as tasks, they do not appear on the product backlog along with user stories, as you can see below, on the left. On the right is the sprint view, here the bugs no longer apear on the left, but instead they can be added to user stories, just as tasks.

Choosing between the two options

Now, which one do you choose? I think it depends on how you work and what you use the ‘bug’ work item for. My personal belief is that it makes no sense to track bugs as tasks, under a user story. As long as the story is not complete, anything that is not working properly yet, is just work to be done. A defect is only worthy of tracking as a bug as soon as it is reported by users and no sooner. Therefore, they should be product backlog items in my opinion. Trackable on the backlog, by users, and team members – but more importantly: ready for priorization. You should be able to prioritize bugs just as regular work items on the product backlog.

Do you agree? And if not, what are your reasons?

If you want to learn more about Azure DevOps, check out my Azure DevOps course at A Cloud Guru!


I am a fan of private agents when working with Azure Pipelines, compared to the hosted Azure Pipelines Agents that are also available. In my experience the hosted agents can have a delay before they start and sometimes work slow in comparison with dedicated resources. Of course this is just an opinion. For this reason, I have been running my private agents on a virtual machine for years. Unfortunately, this solution is not perfect and has a big downside as well: no isolation between jobs.

No isolation between different jobs that are executed on the same agent means that all files left over from an earlier job, are available to any job currently running. It also means that it is possible to pollute NuGet caches, change files on the system, etc etc. And of course, running virtual machines in general is cumbersome due to patching, updates and all the operational risks and responsibilities.

So it was time to adopt one of the biggest revolutions in IT: containers. In this blog I will share how I created a Docker container image that hosts an Azure Pipelines agent and how to run a number of those images within Azure Container Instances. As a starting point I have taken the approach that Microsoft has laid down in its documentation, but I have made a number of tweaks and made my solution more complete. Doing so, I wanted to achieve the following:

  1. Have my container instances execute only a single job and then terminate and restart, ensuring nothing from a running job will become available to the next job.
  2. Have a flexible number of containers running that I can change frequently and with a single push on a button.
  3. Have a source code repository for my container image build, including a pipelines.yml that allows me to build and publish new container images on a weekly schedule.
  4. Have a pipeline that I can use to roll-out 1..n agents to Azure Container Instances – depending on the amount I need at that time.
  5. Do not have the PAT token that is needed for (de)registering agents available to anyone using the agent image.
  6. Automatically handle the registration of agents, as soon as a new container instance becomes available.

Besides the step-by-step instructions below I have also uploaded the complete working solution to GitHub at https://github.com/henrybeen/ContainerizedBuildAgents.

Let’s go!

Creating the container image

My journey started with reading the Microsoft documentation on creating a Windows container image with a Pipelines Agent. You can find this documentation at https://docs.microsoft.com/en-us/azure/devops/pipelines/agents/docker?view=azure-devops. I found two downsides to this approach for my use case. First, the PAT token that is used for (de)registering the agent during the complete lifetime of the container. This means that everyone executing jobs on that agent, can pick up the PAT token and abuse it. Secondly, the agent is downloaded and unpacked at runtime. This means that the actual agent is slow to spin up.

To work around these downsides I started with splitting the Microsoft provided script into two parts, starting with a file called Build.ps1 as shown below.

param (
    [Parameter(Mandatory=$true)]
    [string]
    $AZDO_URL,

    [Parameter(Mandatory=$true)]
    [string]
    $AZDO_TOKEN
)

if (-not $(Test-Path "agent.zip" -PathType Leaf))
{
    Write-Host "1. Determining matching Azure Pipelines agent..." -ForegroundColor Cyan

    $base64AuthInfo = [Convert]::ToBase64String([Text.Encoding]::ASCII.GetBytes(":$AZDO_TOKEN"))
    $package = Invoke-RestMethod -Headers @{Authorization=("Basic $base64AuthInfo")} "$AZDO_URL/_apis/distributedtask/packages/agent?platform=win-x64&`$top=1"
    $packageUrl = $package[0].Value.downloadUrl
    Write-Host "Package URL: $packageUrl"

    Write-Host "2. Downloading the Azure Pipelines agent..." -ForegroundColor Cyan

    $wc = New-Object System.Net.WebClient
    $wc.DownloadFile($packageUrl, "$(Get-Location)\agent.zip")
}
else {
    Write-Host "1-2. Skipping downloading the agent, found an agent.zip right here" -ForegroundColor Cyan
}

Write-Host "3. Unzipping the Azure Pipelines agent" -ForegroundColor Cyan
Expand-Archive -Path "agent.zip" -DestinationPath "agent"

Write-Host "4. Building the image" -ForegroundColor Cyan
docker build -t docker-windows-agent:latest .

Write-Host "5. Cleaning up" -ForegroundColor Cyan
Remove-Item "agent" -Recurse

The script downloads the latest agent, if agent.zip is not existing yet, and unzips that file. Once the agent is in place, the docker image is build using the call to docker build. Once completed, the unpacked agent.zip folder is removed – just to keep things tidy. This clean-up also allows for rerunning the script from the same directory multiple times without warnings or errors. A fast feedback loop is also the reason I test for the existence of agent.zip before downloading it.

The next file to create is the Dockerfile. The changes here are minimal. As you can see I also copy over the agent binaries, so I do not have to download these anymore when the container runs.

FROM mcr.microsoft.com/windows/servercore:ltsc2019

WORKDIR c:/azdo/work

WORKDIR c:/azdo/agent
COPY agent .

WORKDIR c:/azdo
COPY Start-Up.ps1 .

CMD powershell c:/azdo/Start-Up.ps1

First we ensure that the directory c:\azdo\work exists by setting it as the working directory. Next we move to the directory that will contain the agent files and copy those over. Finally, we move one directory up and copy the Start-Up script over. To run the container image, a call into that script is made. So, let’s explore Start-Up.ps1 next.

if (-not (Test-Path Env:AZDO_URL)) {
  Write-Error "error: missing AZDO_URL environment variable"
  exit 1
}

if (-not (Test-Path Env:AZDO_TOKEN)) {
  Write-Error "error: missing AZDO_TOKEN environment variable"
  exit 1
}

if (-not (Test-Path Env:AZDO_POOL)) {
  Write-Error "error: missing AZDO_POOL environment variable"
  exit 1
}

if (-not (Test-Path Env:AZDO_AGENT_NAME)) {
  Write-Error "error: missing AZDO_AGENT_NAMEenvironment variable"
  exit 1
}

$Env:VSO_AGENT_IGNORE = "AZDO_TOKEN"

Set-Location c:\azdo\agent

Write-Host "1. Configuring Azure Pipelines agent..." -ForegroundColor Cyan

.\config.cmd --unattended `
  --agent "${Env:AZDO_AGENT_NAME}" `
  --url "${Env:AZDO_URL}" `
  --auth PAT `
  --token "${Env:AZDO_TOKEN}" `
  --pool "${Env:AZDO_POOL}" `
  --work "c:\azdo\work" `
  --replace

Remove-Item Env:AZDO_TOKEN

Write-Host "2. Running Azure Pipelines agent..." -ForegroundColor Cyan

.\run.cmd --once

The script first checks for the existence of four, mandatory, environment variables. I will provide these later on from Azure Container Instances, where we are going to run the image. Since the PAT token is still in this environment variable, we are setting another variable that will ensure that this environment variable is not listed or exposed by the agent, even though we will unset it later on. From here on, the configuration of the agent is started with a series of command-line arguments that allow for a head-less registration of the agent with the correct agent pool.

It is good to know that I am using a non-random name on purpose. This allows me to re-use the same agent name -per Azure Container Instances instance- which prevents an ever increasing list of offline agents in my pool. This is also the reason I have to add the –replace argument. Omitting this would cause the registration to fail.

Finally, we run the agent, specifying the –once argument. This argument will make that the agent will pick-up only a single job and terminate once that job is complete. Since this is the final command in the PowerShell script, this will also terminate the script. And since this is the only CMD specified in the Dockerfile, this will also terminate the container.

This ensures that my container image will execute only one job ever, ensuring that the side-effects of any job cannot propagate to the next job.

Once these files exist, it is time to execute the following from the PowerShell command-line.

PS C:\src\docker-windows-agent> .\Build.ps1 -AZDO_URL https://dev.azure.com/**sorry**-AZDO_TOKEN **sorry**
1-2. Skipping downloading the agent, found an agent.zip right here
3. Unzipping the Azure Pipelines agent
4. Building the image
Sending build context to Docker daemon  542.8MB
Step 1/7 : FROM mcr.microsoft.com/windows/servercore:ltsc2019
 ---> 782a75e44953
Step 2/7 : WORKDIR c:/azdo/work
 ---> Using cache
 ---> 24bddc56cd65
Step 3/7 : WORKDIR c:/azdo/agent
 ---> Using cache
 ---> 03357f1f229b
Step 4/7 : COPY agent .
 ---> Using cache
 ---> 110cdaa0a167
Step 5/7 : WORKDIR c:/azdo
 ---> Using cache
 ---> 8d86d801c615
Step 6/7 : COPY Start-Up.ps1 .
 ---> Using cache
 ---> 96244870a14c
Step 7/7 : CMD powershell Start-Up.ps1
 ---> Running in f60c3a726def
Removing intermediate container f60c3a726def
 ---> bba29f908219
Successfully built bba29f908219
Successfully tagged docker-windows-agent:latest
5. Cleaning up

and…

docker run -e AZDO_URL=https://dev.azure.com/**sorry** -e AZDO_POOL=SelfWindows -e AZDO_TOKEN=**sorry** -e AZDO_AGENT_NAME=Agent007 -t docker-windows-agent:latest

1. Configuring Azure Pipelines agent...

  ___                      ______ _            _ _
 / _ \                     | ___ (_)          | (_)
/ /_\ \_____   _ _ __ ___  | |_/ /_ _ __   ___| |_ _ __   ___  ___
| | | |/ /| |_| | | |  __/ | |   | | |_) |  __/ | | | | |  __/\__ \
\_| |_/___|\__,_|_|  \___| \_|   |_| .__/ \___|_|_|_| |_|\___||___/
                                   | |
        agent v2.163.1             |_|          (commit 0a6d874)


>> Connect:

Connecting to server ...

>> Register Agent:

Scanning for tool capabilities.
Connecting to the server.
Successfully added the agent
Testing agent connection.
2019-12-29 09:45:39Z: Settings Saved.
2. Running Azure Pipelines agent...
Scanning for tool capabilities.
Connecting to the server.
2019-12-29 09:45:47Z: Listening for Jobs
2019-12-29 09:45:50Z: Running job: Agent job 1
2019-12-29 09:47:19Z: Job Agent job 1 completed with result: Success

This shows that the container image can be build and that running it allows me to execute jobs on the agent. Let’s move on to creating the infrastructure within Azure that is needed for running the images.

Creating the Azure container registry

As I usually do, I created a quick ARM templates for provisioning the Azure Container Registry. Below is the resource part.

{
    "name": "[variables('acrName')]",
    "type": "Microsoft.ContainerRegistry/registries",
    "apiVersion": "2017-10-01",
    "location": "[resourceGroup().location]",
    "sku": {
        "name": "Basic"
    },
    "properties": {
        "adminUserEnabled": true
    }
}

Creating a container registry is fairly straightforward, specifying a sku and enabling the creation of an administrative account is enough. Once this is done, we roll this template out to a resource group called Tools, tag the image against the new registry, authenticate and push the image.

PS C:\src\docker-windows-agent> New-AzureRmResourceGroupDeployment -ResourceGroupName Tools -TemplateFile .\acr.json -TemplateParameterFile .\acr.henry.json

DeploymentName          : acr
ResourceGroupName       : Tools
ProvisioningState       : Succeeded
Timestamp               : 29/12/2019 20:07:25
Mode                    : Incremental
TemplateLink            :
Parameters              :
                          Name             Type                       Value
                          ===============  =========================  ==========
                          discriminator    String                     hb

Outputs                 :
DeploymentDebugLogLevel :

PS C:\src\docker-windows-agent> az acr login --name hbazdoagentacr
Unable to get AAD authorization tokens with message: An error occurred: CONNECTIVITY_REFRESH_TOKEN_ERROR
Access to registry 'hbazdoagentacr.azurecr.io' was denied. Response code: 401. Please try running 'az login' again to refresh permissions.
Unable to get admin user credentials with message: The resource with name 'hbazdoagentacr' and type 'Microsoft.ContainerRegistry/registries' could not be found in subscription 'DevTest (a314c0b2-589c-4c47-a565-f34f64be939b)'.
Username: hbazdoagentacr
Password:
Login Succeeded

PS C:\src\docker-windows-agent> docker tag docker-windows-agent hbazdoagentacr.azurecr.io/docker-windows-agent

PS C:\src\docker-windows-agent> docker push hbazdoagentacr.azurecr.io/docker-windows-agent
The push refers to repository [hbazdoagentacr.azurecr.io/docker-windows-agent]
cb08be0defff: Pushed
1ed2626efafb: Pushed
f6c3f9abc3b8: Pushed
770769339f15: Pushed
8c014918cbca: Pushed
c57badbbe459: Pushed
963f095be1ff: Skipped foreign layer
c4d02418787d: Skipped foreign layer
latest: digest: sha256:7972be969ce98ee8c841acb31b5fbee423e1cd15787a90ada082b24942240da6 size: 2355

Now that all the scripts and templates are proven, let’s automate this through a pipeline. The following YAML is enough to build and publish the container.

trigger:
  branches:
    include: 
      - master
  paths:
    include: 
      - agent
    
pool:
  name: Azure Pipelines
  vmImage: windows-2019

workspace:
    clean: all

steps:
  - task: PowerShell@2
    displayName: 'PowerShell Script'
    inputs:
      targetType: filePath
      workingDirectory: agent
      filePath: ./agent/Build.ps1
      arguments: -AZDO_URL https://dev.azure.com/azurespecialist -AZDO_TOKEN $(AZDO_TOKEN)

  - task: Docker@2
    displayName: Build and push image to container registry
    inputs:
      command: buildAndPush
      containerRegistry: BuildAgentsAcr
      repository: docker-windows-agent
      Dockerfile: agent/Dockerfile
      tags: latest
      buildContext: agent

To make the above work, two more changes are needed:

  1. The Build.ps1 needs to be changed a bit, just remove steps 4 and 5
  2. A service connection to the ACR has to be made with the name BuildAgentsAcr

With the container image available in an ACR and a repeatable process to get updates out, it is time to create the Azure Container Instances that are going to run the image.

Creating the Azure container instance(s)

Again, I am using an ARM template for creating the Azure Container Instances.

{
    "copy": {
        "name": "acrCopy", 
        "count": "[parameters('numberOfAgents')]" 
    },
    "name": "[concat(variables('aciName'), copyIndex())]",
    "type": "Microsoft.ContainerInstance/containerGroups",
    "apiVersion": "2018-10-01",
    "location": "[resourceGroup().location]",
    "properties": {
        "imageRegistryCredentials": [{
            "server": "[reference(resourceId('Microsoft.ContainerRegistry/registries',variables('acrName'))).loginServer]",
            "username": "[listCredentials(resourceId('Microsoft.ContainerRegistry/registries',variables('acrName')),'2017-03-01').username]",
            "password": "[listCredentials(resourceId('Microsoft.ContainerRegistry/registries',variables('acrName')),'2017-03-01').passwords[0].value]"
        }], 
        "osType": "Windows", 
        "restartPolicy": "Always",
        "containers": [{
            "name": "[concat('agent-', copyIndex())]",
            "properties": {
                "image": "[parameters('containerImageName')]",
                "environmentVariables": [
                    {
                        "name": "AZDO_URL",
                        "value": "[parameters('azdoUrl')]"
                    },
                    {
                        "name": "AZDO_TOKEN",
                        "secureValue": "[parameters('azdoToken')]"
                    },
                    {
                        "name": "AZDO_POOL",
                        "value": "[parameters('azdoPool')]"
                    },
                    {
                        "name": "AZDO_AGENT_NAME",
                        "value": "[concat('agent-', copyIndex())]"
                    }
                ],
                "resources": {
                    "requests": {
                        "cpu": "[parameters('numberOfCpuCores')]",
                        "memoryInGB": "[parameters('numberOfMemoryGigabytes')]"
                    }
                }
            }
        }]
    }
}

At the start of the resource definition, we specify that we want multiple copies of this resource, not just one. The actual number of resources is specified using a template parameter. This construct allows us to specify the number of agents that we want to run in parallel in ACI instances every time this template is redeployed. If we combine this with a complete deployment mode, the result will be that agents in excess of that number get removed automatically as well. When providing the name of the ACI instance, we are concatenating the name with the outcome of the function copyIndex(). This function will return a integer, specifying in which iteration of the copy loop the template currently is. This way unique names for all the resources are being generated.

As with most modern resources, the container instance takes the default resource properties in the root object and contains another object called properties that contains all the resource specific configuration. Here we first have to specify the imageRegistryCredentials. These are the details needed to connect ACI to the ACR, for pulling the images. I am using ARM template syntax to automatically fetch and insert the values, without ever looking at them.

The next interesting property is the RestartPolicy. The value of Always instructs ACI to automatically restart my image whenever it completes running, no matter if that is from an error or successfully. This way, whenever the agent has run a single job and the container completes, it gets restarted within seconds.

In the second properties object, a reference to the container image, the environment variables and the container resources are specified. The values here should be self-explanatory, and of course the complete ARM template with all parameters and other plumbing is available on the GitHub repository.

With the ARM template done and ready to go, let’s create another pipeline – now using the following YAML.

trigger:
  branches:
    include: 
      - master
  paths:
    include: 
      - aci
    
pool:
  name: Azure Pipelines
  vmImage: windows-2019

workspace:
    clean: all

steps:
  - task: AzureResourceGroupDeployment@2
    displayName: 'Create or update ACI instances'
    inputs:
      azureSubscription: 'RG-BuildAgents'
      resourceGroupName: 'BuildAgents'
      location: 'West Europe'
      csmFile: 'aci/aci.json'
      csmParametersFile: 'aci/aci.henry.json'
      deploymentMode: Complete
      overrideParameters: '-azdoToken "$(AZDO_TOKEN)"'

Nothing new in here really. This pipeline just executes the ARM template against another Azure resource group. Running this pipeline succeeds and a few minutes later, I have the following ACI instances.

And that means I have following agents in my Pool.
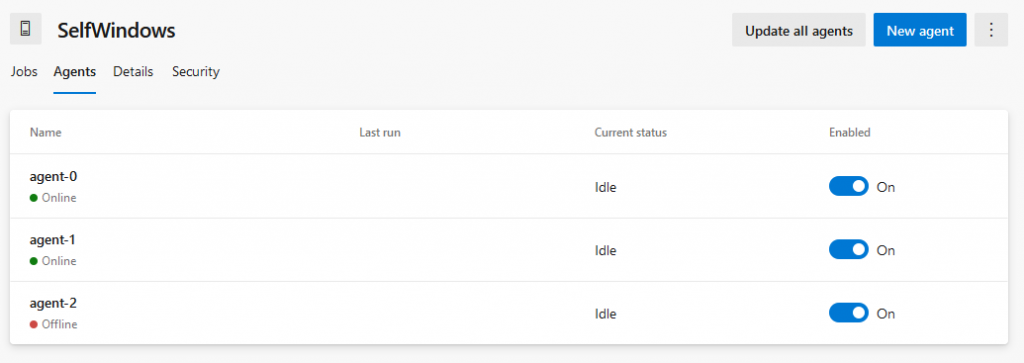
All-in-all: It works! Here you can see that when scaling the number of agents up or down, the names of the agents stay the same and that I will get a number of offline agents that is at most the number of agents to which I have scaled up at a certain point in time.

And with this, I have created a flexible, easy-to-scale, setup for running Azure Pipelines jobs in isolation, in containers!

Downsides

Of course, this solution is not perfect and a number of downsides remain. I have found the following:

  1. More work
  2. No caching

More work. The largest drawback that I have found with this approach is that it is more work to set up. Creating a virtual machine that hosts one or more private agents can be done in a few hours, while the above has taken me well over a day to figure out (granted, I was new to containers).

No caching. So slower again. With every job running in isolation, many of the caching benefits that come with using a private agent in a virtual machine are gone again. Now these can be overcome by building a more elaborate image, including more of the different SDK’s and tools by default – but still, complete sources have to be downloaded every time and there will be no intermediate results being cached for free.

If you find more downsides, have identified a flaw, or like this approach, please do let me know!

But still, this approach works for me and I will continue to use it for a while. Also, I have learned a thing or two about working with containers, yay!
This is a subject that I have been wanting to write about for a while now and I am happy to say that I finally found the time while in an airplane*. I think I first discussed this question a few months ago with Wouter de Kort at the start of this year (2019.) Since then he has written an interesting blog post on how to structure your DTAP streets in Azure DevOps. His advice is to structure your environments as a pipeline that allows your code only to flow from source control to production, via other environments. Very sound advice, but next to that I wonder, do you need all those environments?

Traditionally a lot of us have been creating a number of environments, and for reasons. One for developers to deploy to and test their own work. One for testers to execute automated tests and do exploratory testing. And only when a release is of sufficient quality, it is promoted to the next environment: acceptance. Here the release is validated one final time in a production-like-environment, before it is pushed to production. The value that an acceptance environment is supposed to add, is that it is as production-like as possible. Often connected to other live systems to test integrations, whereas a test environment might be connected to stubs or not connected at all.

Drawbacks of multiple environments

However, creating and maintaining all these environments also comes with drawbacks:

  • It’s easy to see that your costs increase with the number of environments. Not necessarily in setting the environment up and maintaining it (since that is all done through IaC, right?) But still, we have to pay for the resource we use, and that can be serious money
  • Since our code and the value it delivers can only flow through production after it has gone through all the other environments, the number of environments has impact on how quickly we can deliver our code to production.

All these drawbacks are a plea for limiting the number of environments to as few as possible. Now with that in mind, do you really need an acceptance environment? I am going to argue that you might not. Especially when I hear things like: “Let’s go to acceptance quickly, so we do not have to wait another two days before we can go to production,” I die a little on the inside.

Why you might not need acceptance

So let’s go over some reasons for having an acceptance environment and seeing if we can make these redundant.

No wait, we do need an acceptance environment where our customer can explore the new features and accept their working, before we release them to all users.

While I hope that you involve your customer and other stakeholders before you have a finalized product, there can be value in customers having approve the release of features to users explicitly. However, is it really necessary to do this from an acceptance environment? Have you considered using feature toggles? This way you can release your code to the production environment and allow only your customer access to this new feature. Only after he approves, you open the feature up to more users. In other words, if we can ensure that shipping the new binaries to production, does not automatically entail the release of new features, we do not need an acceptance environment for final feature acceptance by the client. More information on feature flags (also called feature toggles), can be found here.

We need a production-like environment to do final tests

Trust me, there is no place like home. And for your code, production is home. The only way to truly validate your code and the value it should bring, is by running in it in production. An acceptance environment, even if more integrated with other systems and with more realistic data than production, does not compare to production. You cannot fully predict what your users will do with your features, estimate the impact of real world usage or foresee all deviating scenario’s. Here again, if you are using feature flags, that would be a much better approach to progressively open up a new feature to more and more users. And if issues show up, just stop the roll out for a bit or even reverse it, while you are shipping a fix.

Now, do you think you can go without an acceptance environment? And if not, please let me know why not and I might just add a counter argument.

Now, while I do realize that the above does not hold for every organization and every development team, I would definitely recommend to keep challenging yourself on the number of environments you need and if you can reduce that number.


(*) An airplane, where there is absolutly nothing else to do, is an environment I bet we all find inspiring!

In an earlier post on provisioning a Let’s encrypt SSL certificate to a Web App, I touched upon the subject of creating an RBAC Role Assignment using an ARM template. In that post I said that I wasn’t able to provision an Role Assignment to a just single resource (opposed to a whole Resourcegroup.) This week I found out that this was due to an error on my side. The template for provisioning an Authorizaton Rule for just a single resource, differs from that for provisioning a Rule for a whole Resourcegroup.

Here the correct JSON for provisioning an Role Assignment to a single resource:

    {
      "type": "Microsoft.Web/sites/providers/roleAssignments",
      "apiVersion": "2015-07-01",
      "name": "[concat(parameters('appServiceName'), '/Microsoft.Authorization/', parameters('appServiceContributerRoleGuid'))]",
      "dependsOn": [
        "[resourceId('Microsoft.Web/Sites', parameters('appServiceName'))]"
      ],
      "properties": {
        "roleDefinitionId": "[concat('/subscriptions/', subscription().subscriptionId, '/providers/Microsoft.Authorization/roleDefinitions/', 'b24988ac-6180-42a0-ab88-20f7382dd24c')]",
        "principalId": "[parameters('appServiceContributorObjectId')]"
      }
    },

As Ohad correctly points out in the comments the appServiceContributerRoleGuid, should be a unique Guid generated by you. It does not refer back to a Guid of any predefined role.

In contrast, below find the JSON for provisioning an Authorizaton Rule for a Resourcegroup as a whole. To provision a roleAssignment for a single resource, we do not need to set a more specific scope, but completely leave it out. Instead the roleAssignment has to be nested within the resource it applies to. This is visible when comparing the type, name and scope properties of both definitions.

    {
      "type": "Microsoft.Authorization/roleAssignments",
      "apiVersion": "2015-07-01",
      "name": "[parameters('appServiceContributerRoleName')]",
      "dependsOn": [
        "[resourceId('Microsoft.Web/Sites', parameters('appServiceName'))]"
      ],
      "properties": {
        "roleDefinitionId": "[concat('/subscriptions/', subscription().subscriptionId, '/providers/Microsoft.Authorization/roleDefinitions/', 'b24988ac-6180-42a0-ab88-20f7382dd24c')]",
        "principalId": "[parameters('appServiceContributorObjectId')]",
        "scope": "[concat(subscription().id, '/resourceGroups/', resourceGroup().name)]"
      }
    }

If you have been reading my previous two posts (part I & part II) on this subject, you might have noticed that neither solution I presented is perfect. Both solutions still suffer from storing secrets for local development in source control. Also combining configuration from multiple sources, can be be difficult. Luckily, in the newest versions of the .NET Framework and .NET Core there is a solution available that allows you to store your local development secrets outside of source control: user secrets.

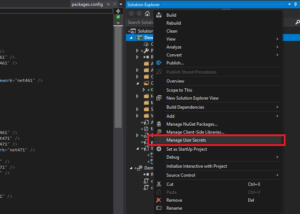
User secrets are contained in a JSON file that is stored in your user profile and which contents can be applied to your runtime App Settings. Adding user secrets to you project is done by rightclicking on the project and selecting manage user secrets:

The first time you do this, an unique GUID is generated for the project which links this specific project to an unique file in your users folder. After this, the file is automatically opened up for editting. Here you can provide overrides for app settings:

When starting the project now, these user secrets are loaded using config builders and available as AppSettings. So let’s take a closer look at these config builders.

Config builders

Config builders are new in .NET Framework 4.7.1 and .NET Core 2.0 and allow for pulling settings from one ore more other sources than just your app.config. Config builders support a number of different sources like user secrets, environment variables and Azure Key Vault (full list on MSDN). Even better: you can create your own config builder, to pull in configuration from your own configuration management system / keychain

The way config builders are used, differs between .NET Core and the Full Framework. In this example, I will be using the full framework. In the full framework config builders are added to your app.settings file. If you have added user secrets to your project, you will find an UserSecretsConfigBuilder in your Web.config already:


  ..
  

Important: If you add or edit this configuration by hand, do make sure that the configBuilders section is BEFORE the appSettings section.

Config builders and Azure KeyVault

Now let’s make this more realistic. When running locally, user secrets are fine. However, when running in Azure we want to use our Key Vault in combination with Manged Identity again. The full example is on GitHub and as in my previous posts, this example is based on first deploying an ARM template to set up the required infrastructure. With this in place, we can have our application read secrets from KeyVault on startup automatically.

Important: Your managed identity will need both list and get access to your Key vault. If not, you will get hard to debug errors.

As a first step, we have to install the config builder for Key Vault by adding the NuGET package Microsoft.Configuration.ConfigurationBuilders.Azure. After that, add an Web.config transformation for the Release configuration as follow:


Now we just have to deploy and enjoy the result:

Happy coding!

In my previous post (secret management part 1: using azurekey vault and azure managed identity) I showed an example of storing secrets (keys, passwords or certificates) in an Azure Key Vault and how to retrieve them securely. Now, this approach has one downside and that is this indirection via the Key Vault.

In the previous implementation, service X creates an key to access it and we store it in the Key Vault. After that, service Y that needs the key, authenticates to the Azure Active Directory to access the Key Vault, retrieve the secret and use it to access service X. Why can’t we just access service X, after authenticating to the Azure Active Directory, as shown below?

In this approach we completely removed the need for Azure Key Vault, reducing the amount of hassle. Another benefit is that we are no longer creating extra secrets, which means we can also not loose them. Just another security benefit. Now let’s build an example and see how this works.

Infrastructure

Again we start by creating an ARM Template to deploy our infrastructure. This time we are using a feature of the Azure SQL DB Server to have an AAD identity be appointed as an administrator on that server, in the following snippet.

{
  "type": "administrators",
  "name": "activeDirectory",
  "apiVersion": "2014-04-01-preview",
  "location": "[resourceGroup().location]",
  "properties": {
    "login": "MandatorySettingValueHasNoFunctionalImpact", 
    "administratorType": "ActiveDirectory",
    "sid": "[reference(concat(resourceId('Microsoft.Web/sites', parameters('appServiceName')),'/providers/Microsoft.ManagedIdentity/Identities/default'), '2015-08-31-preview').principalId]",
    "tenantId": "[subscription().tenantid]"
  },
  "dependsOn": [
    "[concat('Microsoft.Sql/servers/', parameters('sqlServerName'))]"
  ]
}

We are using the same approach as earlier, but now to set the objectId for the AAD admin of the Azure SQL DB Server. One thing that is also important is that the property for ‘login’ is just a placeholder of the principals name. Since we do not know it, we can set it to anything we want. If we would ever change the user through the portal (which we shouldn’t), this property will reflect the actual username.

Again, the full template can be found on GitHub.

Code

With the infrastructure in place, let’s write some passwordless code to have our App Service access the created Azure SQL DB:

if (isManagedIdentity)
{
  var azureServiceTokenProvider = new AzureServiceTokenProvider();
  var accessToken = await azureServiceTokenProvider.GetAccessTokenAsync("https://database.windows.net/");

  var builder = new SqlConnectionStringBuilder
  {
    DataSource = ConfigurationManager.AppSettings["databaseServerName"] + ".database.windows.net",
    InitialCatalog = ConfigurationManager.AppSettings["databaseName"],
    ConnectTimeout = 30
  };

  if (accessToken == null)
  {
    ViewBag.Secret = "Failed to acuire the token to the database.";
  }
  else
  {
    using (var connection = new SqlConnection(builder.ConnectionString))
    {
      connection.AccessToken = accessToken;
      connection.Open();

      ViewBag.Secret = "Connected to the database!";
    }
  }
}

First we request a token and specify a specific resource “https://database.windows.net/” as the type of resource we want to use the token for. Next we start building a connection string, just as we would do normally. However, we leave out anything related to authentication. Next (and this is only available in .NET Framework 4.6.1 or higher), just before opening the SQL Connection we set the acquired token on the connection object. From there on, we can again work normally as ever before.

Again, it’s that simple! The code is, yet again available on GitHub.

Supported services

Unfortunately, you can not use this approach for every service you will want to call and are dependent on the service supporting this approach. A full list of services that support token based application authentication are listed on MSDN. Also, you can support this way of authentication on your own services. Especially when you are moving to a microservices architecture, this can save you a lot of work and management of secrets.

Last week I received a follow-up question from a fellow developer about a presentation I did regarding Azure Key Vault and Azure Managed Identity. In this presentation I claimed, and quickly showed, how you can use these two offerings to store all the passwords, keys and certificates you need for your ASP.NET application in a secure storage (the Key Vault) and also avoid the problem of just getting another, new password to access that Key Vault.

I have written a small ASP.NET application that reads just one very secure secret from an Azure Key Vault and displays it on the screen. Let’s dive into the infrastructure and code to make this work!

Infrastructure

Whenever we want our code to run in Azure, we need to have some infrastructure it runs on. For a web application, your infrastructure will often contain an Azure App Service Plan and an Azure App Service. We are going to create these using an ARM template. We use the same ARM template to also create the Key Vault and provide an identity to our App Service. The ARM template that delivers these components can be found on GitHub. Deploying this template, would result in the following:

The Azure subscription you are deploying this infrastructure to, is backed by an Azure Active Directory. This directory is the basis for all identity & access management within the subscription. This relation also links the Key  Vault to that same AAD. This relation allows us to create access policies on the Key Vault that describe what operations (if any) any user in that directory can perform on the Key Vault.

Applications can also be registered in an AAD and we can thus give them access to the Key Vault. However, how would an application authenticate itself to the AAD? This is where Managed Identity comes in. Managed Identity will create an service principal (application) in that same Active Directory that is backing the subscription. At runtime your Azure App Service will be provided with environment variables that allow you to authenticate without the use of passwords.

For more information about ARM templates, see the information on MSDN. However there are two important parts of my template that I want to share. First the part that enables the Managed Identity on the App Service:

{
  "name": "[parameters('appServiceName')]",
  "type": "Microsoft.Web/sites",
  …,
  "identity": {
    "type": "SystemAssigned"
  }
}

Secondly, we have to give this identity, that is yet to be created, access to the Key Vault. We do this by specifying an access policy on the KeyVault. Be sure to declare a ‘DependsOn’ the App Service, so you will only reference the identity after it is created:

{
  "type": "Microsoft.KeyVault/vaults",
  "name": "[parameters('keyVaultName')]",
  …,
  "properties": {
    "enabledForTemplateDeployment": false,
    "tenantId": "[subscription().tenantId]",
    "accessPolicies": [
       {
        "tenantId": "[subscription().tenantId]",
        "objectId": "[reference(concat(resourceId('Microsoft.Web/sites', parameters('appServiceName')),'/providers/Microsoft.ManagedIdentity/Identities/default'), '2015-08-31-preview').principalId]",
        "permissions": {
          "secrets": [ "get" ]
        }
      }
    ]
  }
}

Here I am using some magic (that I just copy/pasted from MSDN) to refer back to my earlier deployed app service managed identity and retrieve the principalId and use that to create an access policy for that identity.

That is all, so let’s deploy the templates. Normally you would set up continuous deployment using Azure Pipelines, but for this quick demo I used Powershell:

Login-AzureRmAccount
Select-AzureRmSubscription -SubscriptionId " xxxxxxxx-xxxx-xxxx-xxxx-xxxxxxxxxxx"
New-AzureRmResourceGroup "keyvault-managedidentity" -Location "West-Europe"
New-AzureRmResourceGroupDeployment -TemplateFile .\keyvault-managedidentity.json -TemplateParameterFile .\keyvault-managedidentity.parameters.json -ResourceGroupName keyvault-managedidentity

Now with the infrastructure in place, let’s add the password that we want to protect to the Key Vault. There are many, many ways to do this but let’s use Powershell again:

$password = Read-Host 'What is your password?' -AsSecureString
Set-AzureKeyVaultSecret -VaultName demo4847 -Name password -SecretValue $password

Do not be alarmed if you get an access denied error. This is most likely because you still have to give yourself access to the Key Vault. By default no-one has access, not even the subscription owners. Let’s fix that with the following command:

Set-AzureRmKeyVaultAccessPolicy -ResourceGroupName "keyvault-managedidentity" -VaultName demo4847 -ObjectId xxxxxxxx-xxxx-xxxx-xxxx-xxxxxxxxxxxx -PermissionsToSecrets list,get,set

Code

With the infrastructure in place, let’s write the application that access this secret. I have created a simple, ASP.NET MVC application and edited the Home view to contain the following main body. Again the code is also on GitHub:

A secret

@if (ViewBag.IsManagedIdentity) {

Got a secret, can you keep it? (...) If I show you then I know you won't tell what I said: @ViewBag.Secret

} else {

Running locally, so no secret to tell }

Now to supply the requested values, I have added the following code to the HomeController:

public async Task Index()
  var isManagedIdentity = Environment.GetEnvironmentVariable("MSI_ENDPOINT") != null
    && Environment.GetEnvironmentVariable("MSI_SECRET") != null;

  ViewBag.IsManagedIdentity = isManagedIdentity;

  if (isManagedIdentity)
  {
    var azureServiceTokenProvider = new AzureServiceTokenProvider();
    var keyVaultClient = new KeyVaultClient(new KeyVaultClient.AuthenticationCallback(azureServiceTokenProvider.KeyVaultTokenCallback));
    var secret = await keyVaultClient.GetSecretAsync("https://demo4847.vault.azure.net/secrets/password");

    ViewBag.Secret = secret.Value;
  }

  return View();
}

First I check if we are running in an Azure App Service with Managed Identity enabled. This looks a bit hacky, but it is actually the recommended approach. Next, if running as an MI, I use the AzureSErviceTokenProvider (NuGet package: Microsoft.Azure.Services.AppAuthentication) to retrieve an AAD token. In turn I use that token to instantiate an KeyVaultClient (NuGet package: Microsoft.Azure.KeyVault) and use it to retrieve the secret.

That’s it!

Want to know more?

I hope to write two more blogs on this subject soon. One about using system to system authentication and authorization and not storing extra secrets into KeyVault and one about Config Builders, a new development for .NET Core 2.0 and .NET Framework 4.71 or higher.

Over the last couple of months I have been coaching a number of PHP teams to help them improve their software engineering practices. The main goals were to improve the quality of the product, ease of delivery and the overall maintainability of the code. If there is one thing that defines maintainable code, in my opinion, it is the existence of unit tests. However, one of the things that proved more difficult than one might expect is to start writing proper unit tests in an existing PHP solution.

In this instance, the teams were using the Laravel framework. However, standard Laravel practices limited the testability of the code created by the teams. I have worked with these teams to make their code more testable to two ends:

  • Improve overall testability by introducing new class design patterns
  • Reduce the duration of tests. Prior to this approach, a lot of tests were implemented as end-to-end, interface based tests. And boy, are they slow!

After a number of weeks, we saw the first results coming in, so all of this worked out nicely.

The goal of this post is to share the issues found that were preventing the team from proper unit testing and how we got around them.

Issue 1: instantiating a class in a unit test

The first thing we ran into was the fact that it was impossible to instantiate any class from a unit test. There were two reasons for this. The first was that there was actual work done in the constructor of almost every class: calling a method on another class and/or hitting the database.

Next to this, dependencies for any class were not passed in via the constructor, but were created in the constructor using a standard Laravel pattern. The good news here is that Laravel actually provides you with a dependency container. The bad news is, that it was often used like this:

class TestSubject {
    public function __construct() {
        $this->someDependency = app()->make(SomeDependency::class);
    }
}

This calls a global, static method app() to get the dependency container and then instantiates a class by type. Having this code in the constructor makes it completely impossible to new the class up from a unit test.

In short, we couldn’t instantiate classes in a unit test due to:

  • Doing work in a constructor
  • Instantiating dependencies ourselves

Solution: Let the constructor only gather dependencies

First of all, calling methods or the database was quite easy to refactoring out of the constructors. Also, this is a thing that can easily be avoided when creating new classes.

The best way to not instantiate dependencies yourselves, is to leave that to the framework. Instead of hitting the global app() method to obtain the container, we added the needed type as a parameter to the constructor, leaving it up to the Laravel container to provide an instance at runtime (constructor dependency injection.)

public function __construct(SomeDependency $someDependency) {
    $this->someDependency = $someDependency;
}

Now there is still one issue here and that is we are depending upon a concrete class, not an abstraction. This means, we are violation the Dependency Inversion principle. To fix this, we need to depend on an interface. However, now the Laravel dependency container no longer knows which type to provide to our class when instantiating it, since it cannot instantiate a class. Therefore, we have to configure a binding that maps the interface to the class.

app()->bind(SomeDependencyInterface::class, SomeDependency::class);

Having done this, we can now change our constructor to look as follows.

public function __construct(SomeDependency $someDependency) {
    $this->someDependency = $someDependency;
}

At this point we have changed the following:

  • No work in constructors
  • Getting dependencies provided instead of instantiating them ourselves.
  • Depending upon abstractions

Mission accomplished! These things combined now allows to instantiate our test subject in a unit test as follows:

$this->dependencyMock = $this->createMock(SomeDependencyInterface::class);

$this->subject = new TestSubject($this-> dependencyMock);

Issue 2: Global static helper methods

Now we can instantiate a TestSubject in a test and start testing it. The second we got to this state, we ran into another problem that was all over the code base: global, static, helper methods. These methods have different sources. They are built-in PHP methods, Laravel helper methods or convenience methods from 3rd parties. However, they all present us with the same problems when it comes to testability:

  • We cannot mock calls to global, static methods. Which means we cannot remove their behavior at runtime and thus cannot isolate our TestSubject and start pulling in real dependencies, dependencies of dependencies, etc…

From here on, I will share (roughly in order of preference) a number of approaches to get around this limitation.

Solution 1: Finding a constructor injection replacement

When starting to investigate these static methods, especially those provided by Laravel, we saw that a lot of them were just short wrapper methods around the Dependency Container. For example, the implementation of a much used view method was this:

public function view($name = null, $data = [], $mergeData = [])
{
    $factory = app(ViewFactory::class);

    if (func_num_args() === 0) {
        return $factory;
    }
    return $factory->make($view, $data, $mergeData);
}

For all these convenience methods, it is straightforward to see that we can easily refactor the calling code from this:

public function __construct() { }

public function index() {
    // … more code
    return view(“blade.name”, $params);
}

To this:

public function __construct(ViewFactory $viewFactory) {
    $this->viewFactory = $viewFactory;
}

public function index() {
    // … more code
    return $this->viewFactory->make(“blade.name”, $params);
}

A quick and easy way to remove a decent portion of calls to global functions.

Solution 2: Software engineering tricks

If there is no interface readily available for constructor injection, we can create one ourselves. A common engineering trick is to move unmockable code to a new class. We then inject this to our subject at runtime. At test time however, we can then mock this wrapper and test our subject as much as possible.

As an example, let’s take the following code:

class Subject {
    function isFileChanged($fileName, $originalHash) {
        $newHash = sha1($fileName);
        return $originalHash == $newHash;
    }
}

Of course we can test this class by letting it operate on a temporary file, but another approach would be to do this:

class Subject {
    private $sha1Hasher;

    public function __construct(ISha1Hasher $sha1Hasher) {
        $this->sha1Hasher = $sha1Hasher;
    }

    function isFileChanged($fileName, $originalHash) {
        $newHash = $this->sha1Hasher->hash ($fileName);
        return $originalHash == $newHash;
    }
}

Maybe not a thing you would do in this specific instance. But if you have code that is more complex and is executing a single call to a global method, this way you can move that call behind an interface and mock it out while testing:

public function testSubject() {
    $hasherMock = $this->createMock(ISha1Hasher::class);
    $hasherMock->method(“hash”)->with(“n/a”)->willReturn(“123”);
    $subject = new Subject($hasherMock);

    $result =$subject->isFileChanged(“n/a”, “123”);

    $this->assertFalse($result);
}

In my opinion, solution 2 is by far a better approach to take than solutions 3 and 4. However, if you are afraid that adding to much types might clutter your codebase or reduce the performance of your application, there are two more approaches available. Both have drawbacks, so I would only use them if you see no other way.

Solution 3: Leveraging PHP namespace precedence

If refactoring global static calls in you code to a new class is not an option and your code is organized into namespaces, there is another way we can mock calls to built-in PHP methods. In the file with our TestClass, we can add a new method with the same name in a namespace that is closer to the caller.

For example, the following call to file_exists() cannot be mocked out:

namespace demo;

class Subject {
    public function hasFile() {
        return file_exists("d:\bier");
    }
}

As you can see, the class containing the hasFile() method is in a namespace called demo. We can create a new method, also called file_exists() in that same namespace, just before our TestClass. When executing, the methods in the namespace that is the closed to the caller will take precedence.

This means, we mock the call to file_exists() to always return true, as follows:
namespace demo;

function file_exists($fileName) {
    return true;
}

class TestClass {
    public function testWhenFileExists_thenReturnTrue() {
        $result = $this->subject->hasFile();

        $this->assertTrue($result);
    }
}


The main drawback of this approach is that it reduces the readability of your code. Also, relying on method hiding for testing purposes might make your code harder to understand for those that do not grasp all the language details.

Solution 4: Leveraging your frameworks and libraries

Finally, your framework might provide its own means for mocking certain calls. In Laravel for example, there is a construct of Facades that you can also use for mocking purposes. Another example is the Carbon datetime convenience library that provides a global static Carbon::setTestNow() method.

I for one would discourage this, as it would mean that you are writing logic that will become dependent on your framework and will not ever be able to switch to another framework without redoing everything. (However… who has done that even once?)

My other argument is one of taste: I simply do not like adding methods to production code, only to make it testable. And I have seen misuse of methods intended for tests only in production code as well…

However, if you do not share these feelings, the approach is quite nicely detailed here: https://laravel.com/docs/5.6/facades or here: http://laraveldaily.com/carbon-trick-set-now-time-to-whatever-you-want/

Conclusion

I hope that this blog gives you a number of approaches to make your PHP code more (unit)testable. Because we all know that only code that is continued tested in a pipeline, can quickly and easily be shipped fast and often to customers.

Enjoy!

With thanks for proofreading: Wouter de Kort, Alex Lisenkov