If you have been reading my previous two posts (part I & part II) on this subject, you might have noticed that neither solution I presented is perfect. Both solutions still suffer from storing secrets for local development in source control. Also combining configuration from multiple sources, can be be difficult. Luckily, in the newest versions of the .NET Framework and .NET Core there is a solution available that allows you to store your local development secrets outside of source control: user secrets.

User secrets are contained in a JSON file that is stored in your user profile and which contents can be applied to your runtime App Settings. Adding user secrets to you project is done by rightclicking on the project and selecting manage user secrets:

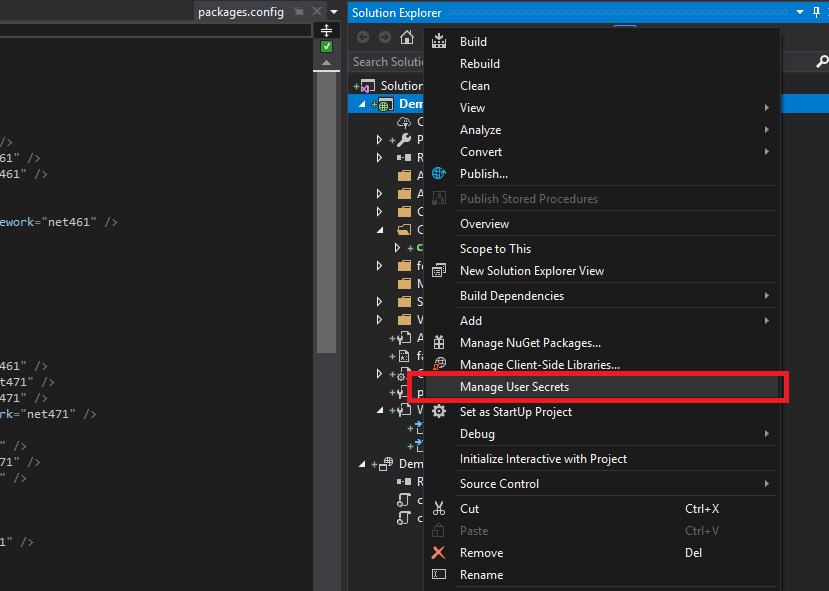
The first time you do this, an unique GUID is generated for the project which links this specific project to an unique file in your users folder. After this, the file is automatically opened up for editting. Here you can provide overrides for app settings:

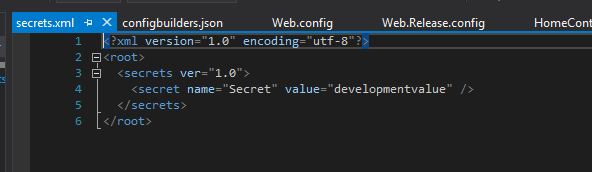
When starting the project now, these user secrets are loaded using config builders and available as AppSettings. So let’s take a closer look at these config builders.

Config builders

Config builders are new in .NET Framework 4.7.1 and .NET Core 2.0 and allow for pulling settings from one ore more other sources than just your app.config. Config builders support a number of different sources like user secrets, environment variables and Azure Key Vault (full list on MSDN). Even better: you can create your own config builder, to pull in configuration from your own configuration management system / keychain

The way config builders are used, differs between .NET Core and the Full Framework. In this example, I will be using the full framework. In the full framework config builders are added to your app.settings file. If you have added user secrets to your project, you will find an UserSecretsConfigBuilder in your Web.config already:


  ..
  

Important: If you add or edit this configuration by hand, do make sure that the configBuilders section is BEFORE the appSettings section.

Config builders and Azure KeyVault

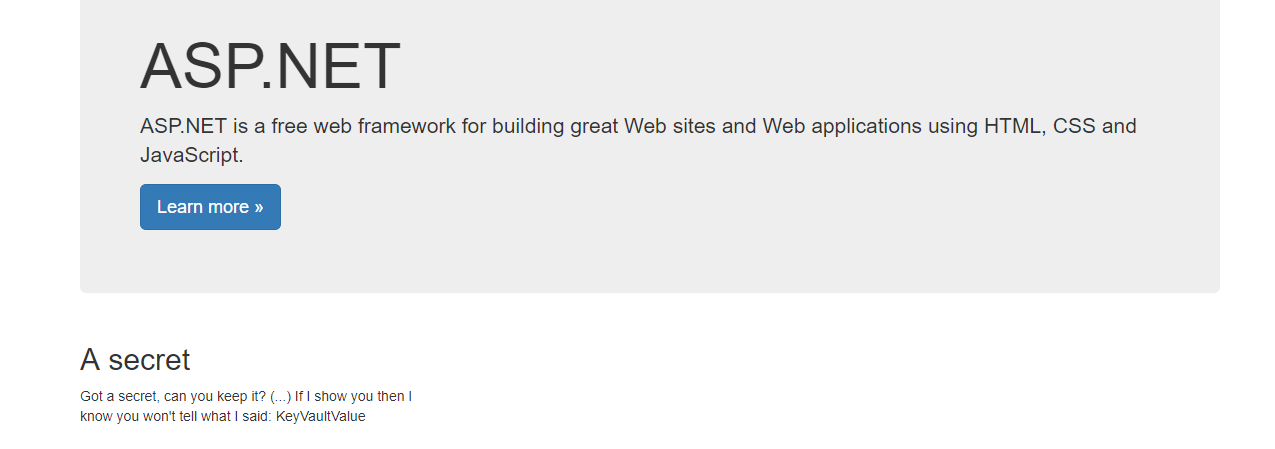
Now let’s make this more realistic. When running locally, user secrets are fine. However, when running in Azure we want to use our Key Vault in combination with Manged Identity again. The full example is on GitHub and as in my previous posts, this example is based on first deploying an ARM template to set up the required infrastructure. With this in place, we can have our application read secrets from KeyVault on startup automatically.

Important: Your managed identity will need both list and get access to your Key vault. If not, you will get hard to debug errors.

As a first step, we have to install the config builder for Key Vault by adding the NuGET package Microsoft.Configuration.ConfigurationBuilders.Azure. After that, add an Web.config transformation for the Release configuration as follow:


Now we just have to deploy and enjoy the result:

Happy coding!

In my previous post (secret management part 1: using azurekey vault and azure managed identity) I showed an example of storing secrets (keys, passwords or certificates) in an Azure Key Vault and how to retrieve them securely. Now, this approach has one downside and that is this indirection via the Key Vault.

In the previous implementation, service X creates an key to access it and we store it in the Key Vault. After that, service Y that needs the key, authenticates to the Azure Active Directory to access the Key Vault, retrieve the secret and use it to access service X. Why can’t we just access service X, after authenticating to the Azure Active Directory, as shown below?

In this approach we completely removed the need for Azure Key Vault, reducing the amount of hassle. Another benefit is that we are no longer creating extra secrets, which means we can also not loose them. Just another security benefit. Now let’s build an example and see how this works.

Infrastructure

Again we start by creating an ARM Template to deploy our infrastructure. This time we are using a feature of the Azure SQL DB Server to have an AAD identity be appointed as an administrator on that server, in the following snippet.

{
  "type": "administrators",
  "name": "activeDirectory",
  "apiVersion": "2014-04-01-preview",
  "location": "[resourceGroup().location]",
  "properties": {
    "login": "MandatorySettingValueHasNoFunctionalImpact", 
    "administratorType": "ActiveDirectory",
    "sid": "[reference(concat(resourceId('Microsoft.Web/sites', parameters('appServiceName')),'/providers/Microsoft.ManagedIdentity/Identities/default'), '2015-08-31-preview').principalId]",
    "tenantId": "[subscription().tenantid]"
  },
  "dependsOn": [
    "[concat('Microsoft.Sql/servers/', parameters('sqlServerName'))]"
  ]
}

We are using the same approach as earlier, but now to set the objectId for the AAD admin of the Azure SQL DB Server. One thing that is also important is that the property for ‘login’ is just a placeholder of the principals name. Since we do not know it, we can set it to anything we want. If we would ever change the user through the portal (which we shouldn’t), this property will reflect the actual username.

Again, the full template can be found on GitHub.

Code

With the infrastructure in place, let’s write some passwordless code to have our App Service access the created Azure SQL DB:

if (isManagedIdentity)
{
  var azureServiceTokenProvider = new AzureServiceTokenProvider();
  var accessToken = await azureServiceTokenProvider.GetAccessTokenAsync("https://database.windows.net/");

  var builder = new SqlConnectionStringBuilder
  {
    DataSource = ConfigurationManager.AppSettings["databaseServerName"] + ".database.windows.net",
    InitialCatalog = ConfigurationManager.AppSettings["databaseName"],
    ConnectTimeout = 30
  };

  if (accessToken == null)
  {
    ViewBag.Secret = "Failed to acuire the token to the database.";
  }
  else
  {
    using (var connection = new SqlConnection(builder.ConnectionString))
    {
      connection.AccessToken = accessToken;
      connection.Open();

      ViewBag.Secret = "Connected to the database!";
    }
  }
}

First we request a token and specify a specific resource “https://database.windows.net/” as the type of resource we want to use the token for. Next we start building a connection string, just as we would do normally. However, we leave out anything related to authentication. Next (and this is only available in .NET Framework 4.6.1 or higher), just before opening the SQL Connection we set the acquired token on the connection object. From there on, we can again work normally as ever before.

Again, it’s that simple! The code is, yet again available on GitHub.

Supported services

Unfortunately, you can not use this approach for every service you will want to call and are dependent on the service supporting this approach. A full list of services that support token based application authentication are listed on MSDN. Also, you can support this way of authentication on your own services. Especially when you are moving to a microservices architecture, this can save you a lot of work and management of secrets.

Een van de eerste uitdagingen die ik tegenkwam toen ik begon te ontwikkelen op een Windows machine, was het creëren van een valide SSL certificaat. Er zijn veel handleidingen te vinden die je van alles met IIS laten doen of via allerlei hoepels self signed certificaten laten genereren. Uiteindelijk ben ik toch teruggevallen op wat me zo beviel onder Linux: de command line.

Omdat het mijn doel was een om echt geldig certificaat te krijgen, moest ik eerst een CSR (certificate sign request) genereren om te kunnen opsturen naar een certificate authority zodat ik een geldig certificaat krijg. Natuurlijk is het mogelijk om een certificaat te bemachtigen zonder eerst een CSR te genereren, maar dat raad ik af.

Een certificaat downloaden zonder CSR

Een certificaat bestaat altijd uit twee delen, het publieke en het privé deel. Het publieke deel kan gebruikt worden om informatie voor de houder van het certificaat te versleutelen, het privé deel om die weer te ontsleutelen. Ten overvloede, dat privé deel moet je dus voor jezelf houden. Wanneer je een volledig certificaat (publiek en privé deel) van een certificate authority krijgt betekend dus dat een of meer mensen het privé deel van je certificaat hebbben (gehad). Als je zelf een CSR genereert, dan genereer je zelf het privé deel en een gedeelte van het publieke deel van je certificaat. Deze informatie gebruikt je certificate authority om het publieke deel van je certificaat te maken. Ze krijgen dus het privé deel nooit te zien als je een CSR gebruikt. Helemaal wanneer je je certificaten bij je leverancier kan downloaden, is het dus verstandig om zelf een CSR te genereren.

Het genereren van een CSR

Zoals gezegd had ik geen zin in gedoe met IIS, domein controllers of allerlei andere onbekende software voor het genereren van een CSR, dus ik heb de OpenSSbinaries voor Windows gebruikt. Je kunt deze vinden op http://indy.fulgan.com/SSL/ of een andere bron opzoeken via www.openssl.org.

Nadat OpenSSL geinstalleerd is, kan een keypair gegeneerd worden. Dit keypair is de basis van een certificaat:

.\openssl.exe genrsa -out .\henrybeen.nl.key 4096

Ik heb gekozen voor een 4096 bit sleutel. Op dit moment zijn er veel tutorials of voorbeelden die een 1024 bit sleutel gebruiken, maar dit is echt te kort. Veel certificate authorities accepteren alleen nog maar CSR’s met een sleutel van 2048 of langer. Deze lengte zal veilig zijn tot ongeveer 2030 verwacht men. De reden dat ik 4096 gebruik, is simpelweg omdat ik kan. Na het genereren van het keypair, kunnen we dit gebruiken om een CSR te generen:

.\openssl.exe req -new -sha256 -key "henrybeen.nl.key" -out "henrybeen.nl.csr" -days 730 -nodes -x509 -subj "/C=NL/ST=xx/L=xx/O=yy/CN=henrybeen.nl"

Dit CSR kunnen we opsturen naar een certificate authority om het publieke deel van het certificaat te ontvangen. Er zijn veel certificate authorities, de enige nog duurder dan andere. Zelf gebuik ik regelmatig StartSSL, welke gratis is voor privé gebruik.

Nu nog automatiseren

Lui als ik ben, wil ik dit natuurlijk niet elke keer met de hand doen, dus ik heb een eenvoudig Powershell script geschreven dat het downloaden van OpenSSL, het genereren van een keypair en CSR automatiseert. Leuk om ook eens aan scripten onder Windows, in Powershell te ruiken. Het is niet bepaald mijn lievelings, maar het werk. Het script is natuurlijk te downloaden en kan als volgt gebruikt worden:

.\GenerateCSR.ps1 -domain henrybeen.nl -countryCode NL -city "xx"-organization "yy"

Wat uiteindelijk twee bestanden oplevert: Het keypair en de CSR